Apple Messages for Business Node
Understand what an Apple Messages for Business node is and how to configure it
The Apple Messages for Business node enables you to send imessages to the iPhone, iPad, Mac, and Apple Watch users. Apart from sending text messages and attachments, you can also send rich links, list pickers, and time picker.
Sending a rich link enables the user to preview the content inline without first loading a preview whereas the list picker displays a list of items on the customer's device. It also provides item information, which includes - item name, description, and image. Regarding the time picker, it allows picking a time slot when scheduling a meeting or appointment.
When you double-click this node, the Apple Messages for Business screen appears with three tabs: Configuration, Transition Actions, and Data Stream. The Configuration tab enables you to configure the message settings whereas the Transitions Actions tab provides configuring the node on-enter/on-leave operations.
Apple Messages for Business Node
Message Types supported by Webex Connect:
- Text
- Text with Attachments
- Quick Replies
- Rich Link
- List Picker
- Time Picker
- Form Message
- Payment
- Classical Authentication (Deprecated)
- iMessage App
- New Authentication Message
Note
Please note that Apple Messages for Business commercial accounts that have not registered any activity in the past three months could be scheduled for deactivation by Apple.
Interface Elements
Here is the description for the interface elements:
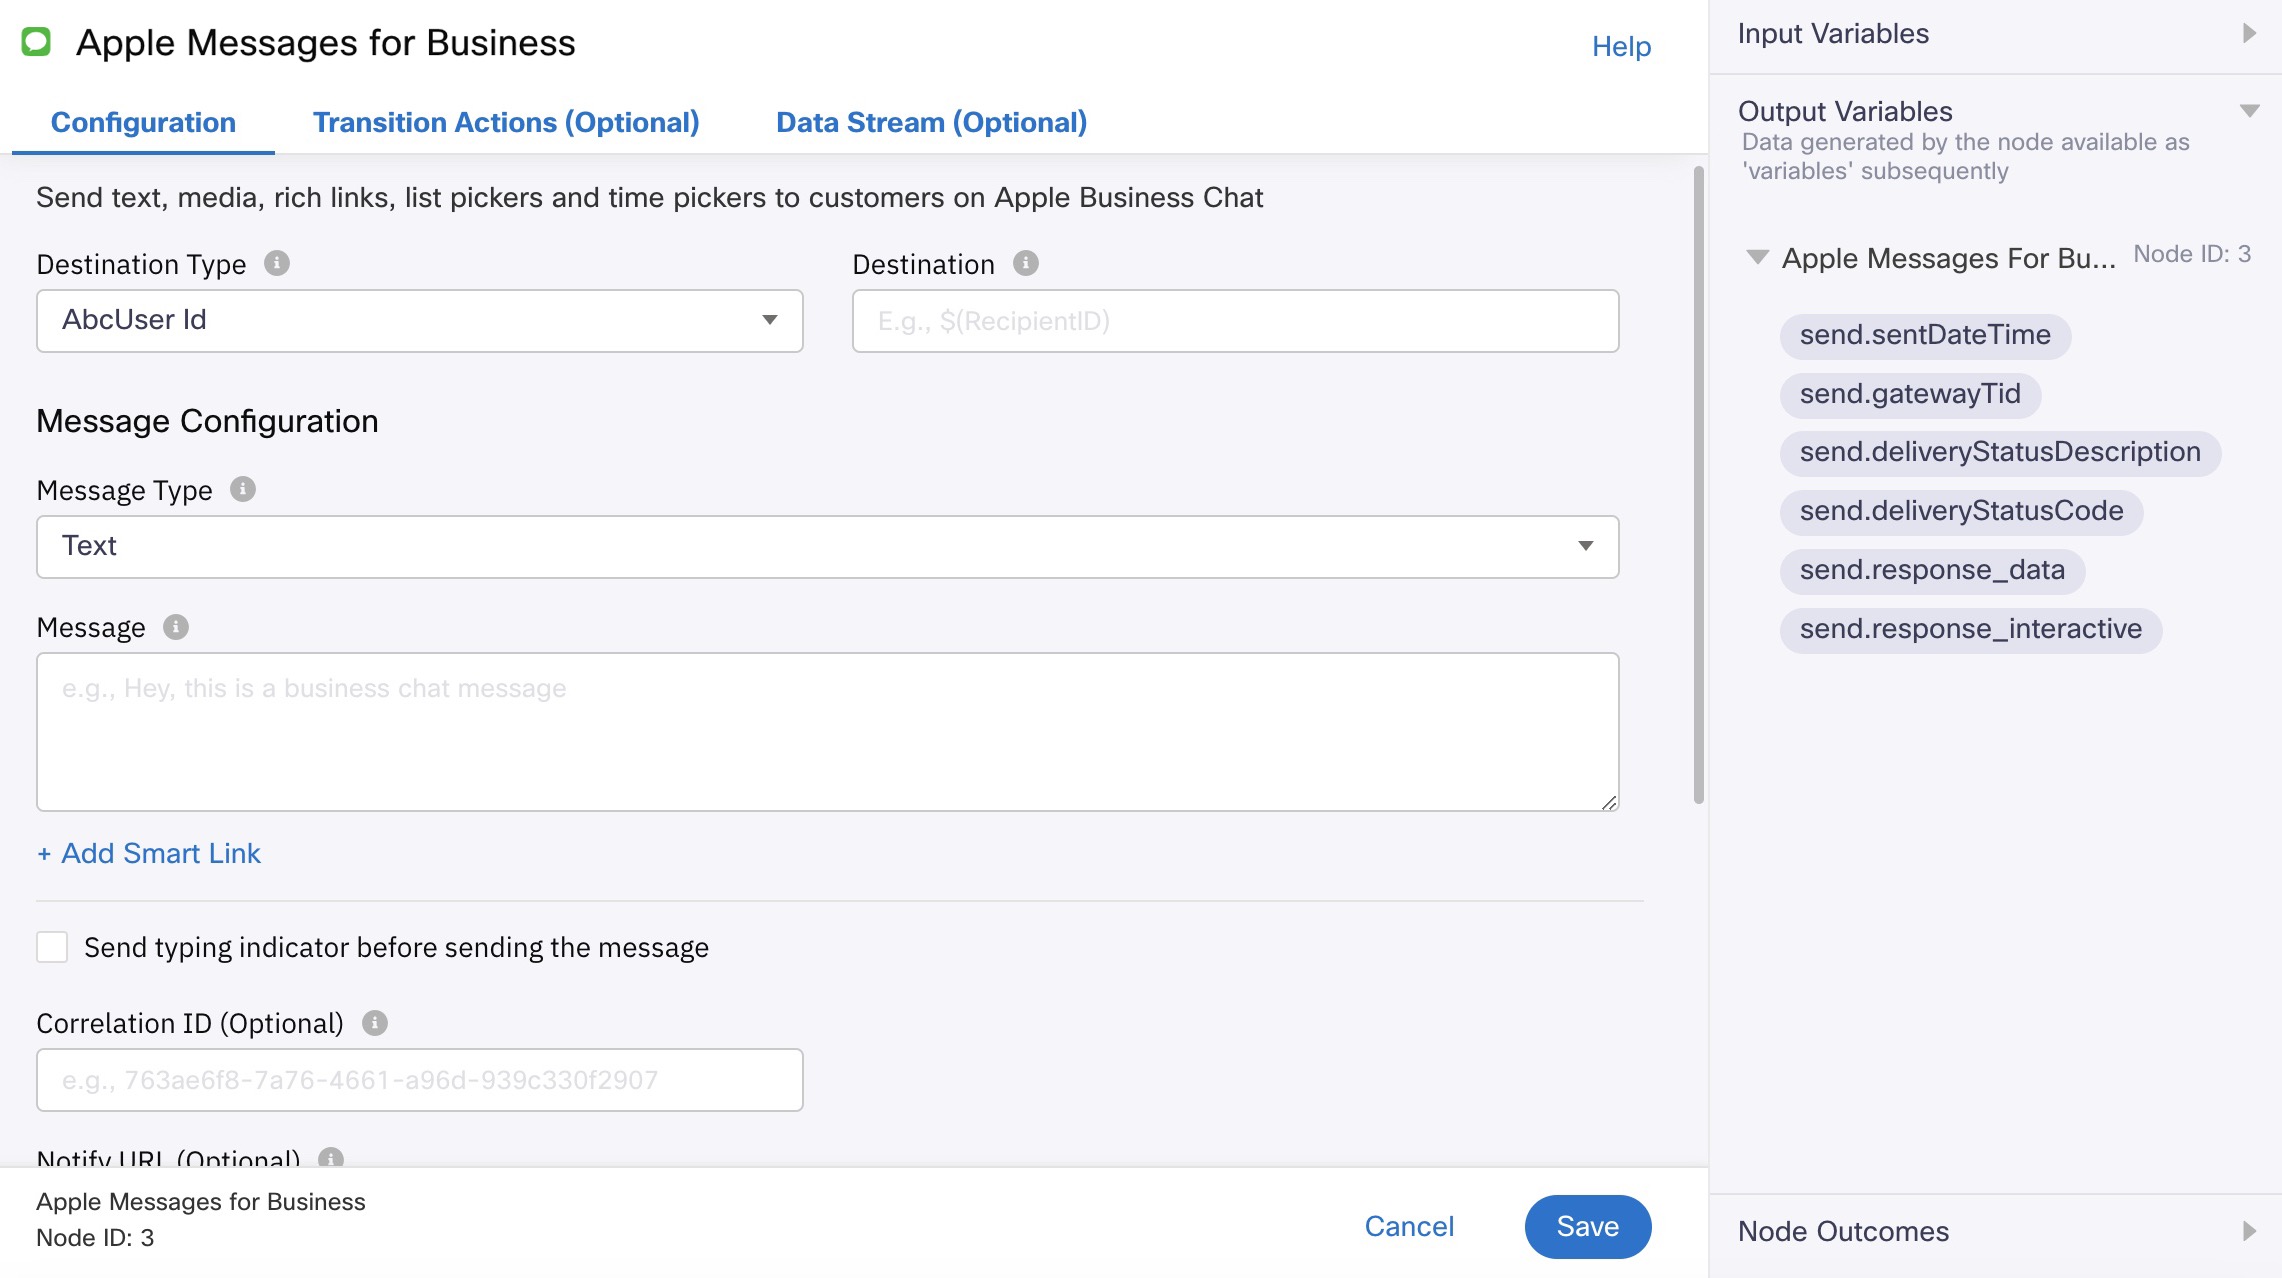
Screenshot of Node Configuration Page.
| Element | Description |
|---|---|
| Configuration tab | Use this tab to configure the message settings. Here is the description for the fields: DESTINATION TYPE Select User ID from this dropdown box. DESTINATION Specify the User ID in this field. WAIT FOR This dropdown box contains the below option: _ GW submit: Use this option to configure the flow to wait until the message is submitted to the gateway. Along with configuring this option, specify the timeout in seconds in the corresponding Timeout field. EXPIRY This dropdown box contains the below two options: UTC: Use this option to specify the date when the message should expire. Seconds: Use this option to specify the message expiry time in seconds. MESSAGE TYPE This dropdown box contains the below message types: Text: Use this option to send a static text message. For more information, refer to Sending a Text Message below. Text with Attachments: Use this option to send a static text message along with attachments. For more information, refer to Sending an Attachment below. Rich Link: Use this option to send a rich link, which enables the user to preview the content inline without first loading a preview. For more information, refer to Sending a Rich Link below. List Picker: Use this option to send a list picker, which displays a list of items along with item information on the customer's device. For more information, refer to Sending a List Picker below. Form Message Payment Classical Authentication (Deprecated) iMessage App New Authentication Message Authentication: ADD SMART LINK Click this link if you wish to add a smart link. Note: SmartLink is a single URL, which contains multiple various offers in it. For example, you can create a single URL for multiple network marketing channels including email, SMS, company website, and social. |
| Transition Actions tab | Use this tab to configure node on-enter/on-leave operations. Here is the description for the fields: Add action link Click it to view the Transition action fields. |
| Input Variables | Click this collapsible panel to view the list of all the available flow variables. You can search for a variable using the Search field. You can also add a variable to the flow variables list by clicking the Add new flow variable link at the bottom of the list. |
| Output Variables | Click this collapsible panel to view the output variables. The data generated by the node is displayed as variables here. |
| Node Outcomes | Click this collapsible panel to view the list of possible node outcomes. You can also customize the node labels by clicking the Edit icon. |
Configuring Apple Messages for Business Settings
You can configure the Apple Messages for Business node to send text messages, attachments, rich links, time pickers, and list pickers.
Here are the configuration steps:
Configuring General Settings
-
Double-click the Apple Messages for Business node.
The Apple Messages for Business screen appears.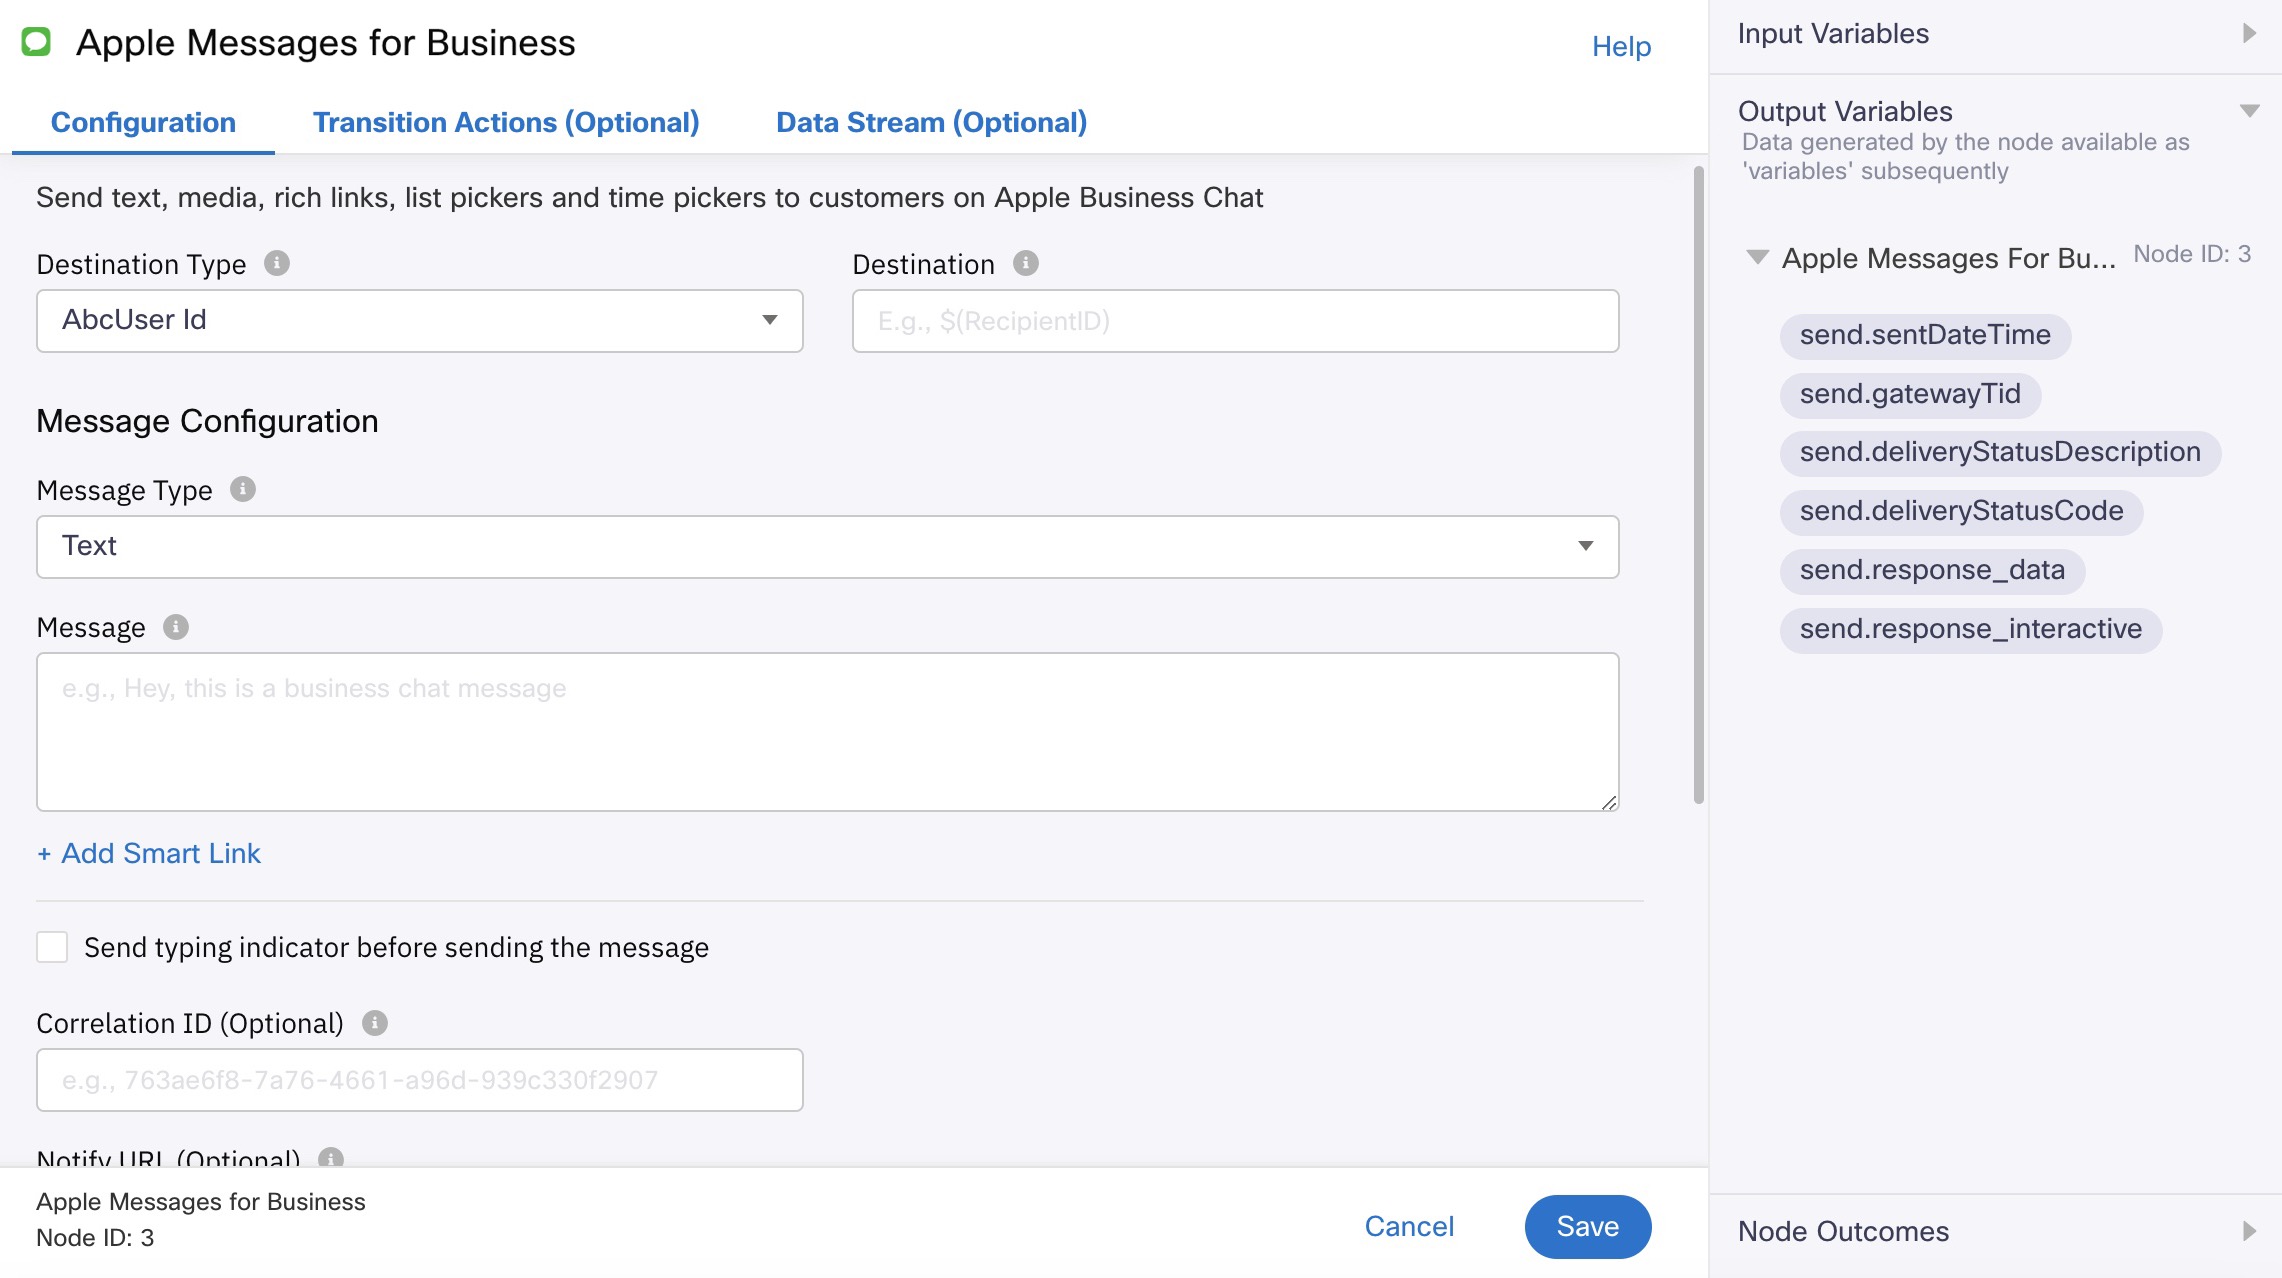
Screenshot of Configuration General Settings.
-
On the Configuration tab:
- Select User ID from the Destination Type dropdown.
- Enter the Apple Messages for Business ID in the Destination field.
- From the Wait For dropdown box, choose None or Gateway Submit.
Note: Selecting Gateway Submit enables the flow to wait until the message is submitted to the gateway.
* If you have selected the Gateway Submit option, then specify the timeout in seconds in the Timeout field. - From the Expiry dropdown box, specify UTC or Seconds.
- If you have selected the UTC option, specify the date when the message should expire in the Message Expiry field.
- If the Seconds option is selected, then specify the time in seconds in the Message Expiry field.
Configuring a Text Message
As part of sending a text message, you need to specify the text, which you wish to send. Along with the text message, you can also send smart links and typing indicator.
Here are the steps:
- After specifying the general settings, from the Message Type dropdown box, select Text.
The Message box appears below. - In the Message box, specify the message, which you wish to send.
- (Optional) Select the ‘Send the link mentioned in message preferably as an App Clip instead of as a Rich Link’ option if you wish to send the link as an App Clip.
App Clips availability on devices
Please note that App Clips are supported only on iPhones and iPads running on any versions of iOS and iPadOS respectively.
- (Optional) Select an option from the ‘App Store Region for App Clip (Optional)’ drop-down menu to select the App Store Region of the App / App Clip.
Selection of Region
If you do not select a region, the default region selected by the system is US. Conversely, if your App Store Region is US, you need not select the region in the above step.
- If you wish to send a Smart link:
- Click Add Smart Link.
The Smart Link dropdown box and Link Validity checkbox appears. - From the Smart Link dropdown box, select the desired smart link.
- Select the Link Validity checkbox, and then specify the time in minutes.
- Click Add Smart Link.
- If you wish to send a Typing Indicator, select the Send typing indicator before sending the message checkbox.
- Click the Save button at the bottom.
The text message is configured.
Configuring Text with Attachment
As part of sending an attachment along with the text message, you need to attach the file, which you wish to send. You can send text, PDF, image, audio, and video files as attachments. In addition, you can send smart links and typing indicator.
Here are the steps:
- After specifying the general settings, from the Message Type dropdown box, select Text with Attachments.
The Message box appears below. - In the Message box, specify the message, which you wish to send.
- If you wish to send a Smart link:
Click Add Smart Link.
The Smart Link dropdown box and Link Validity checkbox appears.
From the Smart Link dropdown box, select the desired smart link.
* Select the Link Validity checkbox, and then specify the time in minutes. - In the Attachments area:
From the Select File dropdown box, select the file, which you wish to attach.
In the URL field, specify the URL of the attachment.Note:
- Please use URL-friendly file names for attachments, and avoid using special characters such as “+” in file names.
- To attach more files, click the Plus icon in the Action column. If you wish to remove an attachment, click the Delete icon.
- If you wish to send a Typing Indicator, select the Send typing indicator before sending the message checkbox.
- Click the Save button at the bottom.
The attachment is configured.
Configuring a Rich Link
Customers generally need to tap the "Tap to Load Preview" message when a URL with an inline image or video is sent to them. By sending a rich link, you can enable them to preview the content inline without first loading a preview.
As part of configuring rich link settings, you need to specify the website URL, message title, image URL, and MIME type.
Here are the steps:
-
After specifying the general settings, from the Message Type dropdown box, select Rich Link.
The Rich Link fields including Website URL and Image URL appear below.
-
Specify the Website URL and the Title.
Note: The Title is the title of the message. The title can be a maximum of 128 characters. -
Specify the Image URL, and then from the MIME dropdown box, select the Extension corresponding to the image.
-
If you wish to add a video, then select the Add Video URL (When added will be rendered in place when played) checkbox.
-
If you wish to send a Typing Indicator, select the Send typing indicator before sending the message checkbox.
-
Click the Save button at the bottom.The rich link is configured.
Output Variables
Output variables that are specific to Rich Link:
- send.richLink
For more information, you can access the Common Output variable section
Rich Link Previews for Domains (Optional)
If a Text messages contain links, they are auto-converted to Rich Links.
When converting hyperlinks in text messages to rich links, if a webpage doesn’t have preview quality image, the platform uses default preview image. You can control what preview image should be used by default for such webpages by using this feature. You can add one default preview image per domain for up to 25 domains. You should use this feature only if the hyperlinks you want to send to customers do not have preview quality images. You can figure out whether a particular webpage has preview quality image by sending yourself the hyperlink as an iMessage from any Apple device. If the webpage has a preview quality image, it’ll show up on the iMessages console.
Note
When messages with links are converted to a combination of text messages and rich links, typing indicators are sent before each of the part messages.
To upload preview images:
- Click Add Preview For Domain.

Screenshot of Add Preview For Domain Button.
- Enter a valid Domain name.

Screenshot displaying to enter domain name.
- Click Choose File to upload the image for the domain.

Screenshot displaying to upload the image file.
Configuring a List Picker
The list picker displays a list of items on the customer's device. It also provides item information, which includes - item name, description, and image.
Note that Webex Connect allows for only 20 sections to be added as part of a single List Picker message. Further each section can have a maximum of 20 items in it.
As part of configuring a list picker, you need to configure the bubble settings, list settings, and reply configuration settings.
Here are the steps:
- After specifying the general settings, from the Message Type dropdown box, select List Picker.
The fields pertaining to Message Bubble Preview, List Configuration, and Message Reply Configuration appear below. - In the the Message Bubble Preview area:
- From the Bubble Style dropdown box, select Small, Icon, or Large.
- In the Title field, specify the title.
- In the Subtitle field, specify the subtitle.
- In the List Configuration area:
- Specify the Section Title.
- Specify the Section Item Style choosing from Small, Icon, or Large.
To configure the item:
Click the Item in the Configure Item column.
The Configure Items window appears.
On the Configure Items window, specify the Item Title, Subtitle, Identifier, and then click the Save button at the bottom. - If you wish to allow multiple selection, then select the Allow multiple item selection across the list sections checkbox.
- In the Request Identifier field, specify the identifier.
Note
When a customer responds to an interactive message, the requestIdentifier variable is returned. Depending on the value of this variable, it can be used in conditional variables to selectively trigger the following:
- Flows using Start node and/or
- Rules using rule trigger
- In the Message Reply Configuration area:
- From the Message Style dropdown box, select Small, Icon, or Large.
- Specify the Title and Subtitle.
- If you wish to send a Typing Indicator, select the Send typing indicator before sending the message checkbox.
- Click the Save button at the bottom.The list picker is configured.
Output Variables
Output variables that are specific to List Picker:
- send.ListPicker - please find the sample payload reference.
For more information, you can access the Common Output variable section.
{
  "data": {
    "version": "1.0",
    "requestIdentifier": "21d4a1c4-327c-ba35-45b1-36a050b15ad2",
    "images": [
      {
        "identifier": "c020521e-cc3c-41fa-876e-a445237a6f83",
        "url": "https://www.lens-rumors.com/wp-content/uploads/2014/10/Nikon-AF-S-DX-Nikkor-18-140mm-f3.5-5.6G-ED-VR-sample-images1.jpg"
      },
      {
        "identifier": "b70de3eb-a412-4fdd-a4b1-cb4eef853ded",
        "url": "http://www.tompetty.com/sites/g/files/g2000007521/f/sample1_1.jpg"
      }
    ],
    "listPicker": {
      "sections": [
        {
          "items": [
            {
              "style": "default",
              "title": "iPhone X",
              "imageIdentifier": "c020521e-cc3c-41fa-876e-a445237a6f83",
              "subtitle": "So immersive the device itself disappears into the experience",
              "order": 0,
              "identifier": "0"
            },
            {
              "style": "default",
              "title": "iPhone 8",
              "imageIdentifier": "b70de3eb-a412-4fdd-a4b1-cb4eef853ded",
              "subtitle": "iPhone 8 introduces an all new glass design",
              "order": 1,
              "identifier": "1"
            }
          ],
          "title": "Available offers!",
          "multipleSelection": true,
          "order": 0
        }
      ]
    }
  },
  "useLiveLayout": true,
  "receivedMessage": {
    "style": "small",
    "title": "The best deals on new iPhones!",
    "subtitle": "Upgrade to a brand new iPhone this summer",
    "imageIdentifier": "6de6a59c-846f-45d8-a1d7-24382d9919db"
  }
}
Configuring a Time Picker
The time picker allows you to select a time slot when scheduling a meeting or appointment.
Note that Webex Connectallows for a maximum of 10 time slot options to be sent as part of single Time Picker message.
As part of configuring it, you need to configure bubble style settings, time slot configuration, location details, and message reply configuration settings.
Here are the steps:
- After specifying the general settings, from the Message Type dropdown box, select Time Picker.
The fields pertaining to Message Bubble Preview, Time Slot Configuration, Location Details, and Message Reply Configuration appear below. - In the Message Bubble Preview area:
- Select Small, Icon, or Largefrom the Bubble Style dropdown.
- Enter title Title field, specify the title. This is the title of your message.
- In the Subtitle field, specify the subtitle. The subtitle contains the message details.
- If you wish to provide image preview, select the Add Preview Image checkbox, and then specify the Image URL.
- In the Time Slot Configuration area:
- Specify the Request Identifier. This can be used in the interactive response and can be used to correlate the user response with the to an interactive message.
- Specify the Title and Identifier
- Select the Timezone. If you select Dynamic, you can pass a variable that contains the timezone. The timezone must be in the IS0 8001 format.
- Enter a valid Slot Start Date, Slot Start Time, Slot Duration (in secs), and Identifier. You can also pass variables that contain valid date and time.
Note
The time slots that are past the time of message delivery will not be displayed in the time picker delivered to customer.
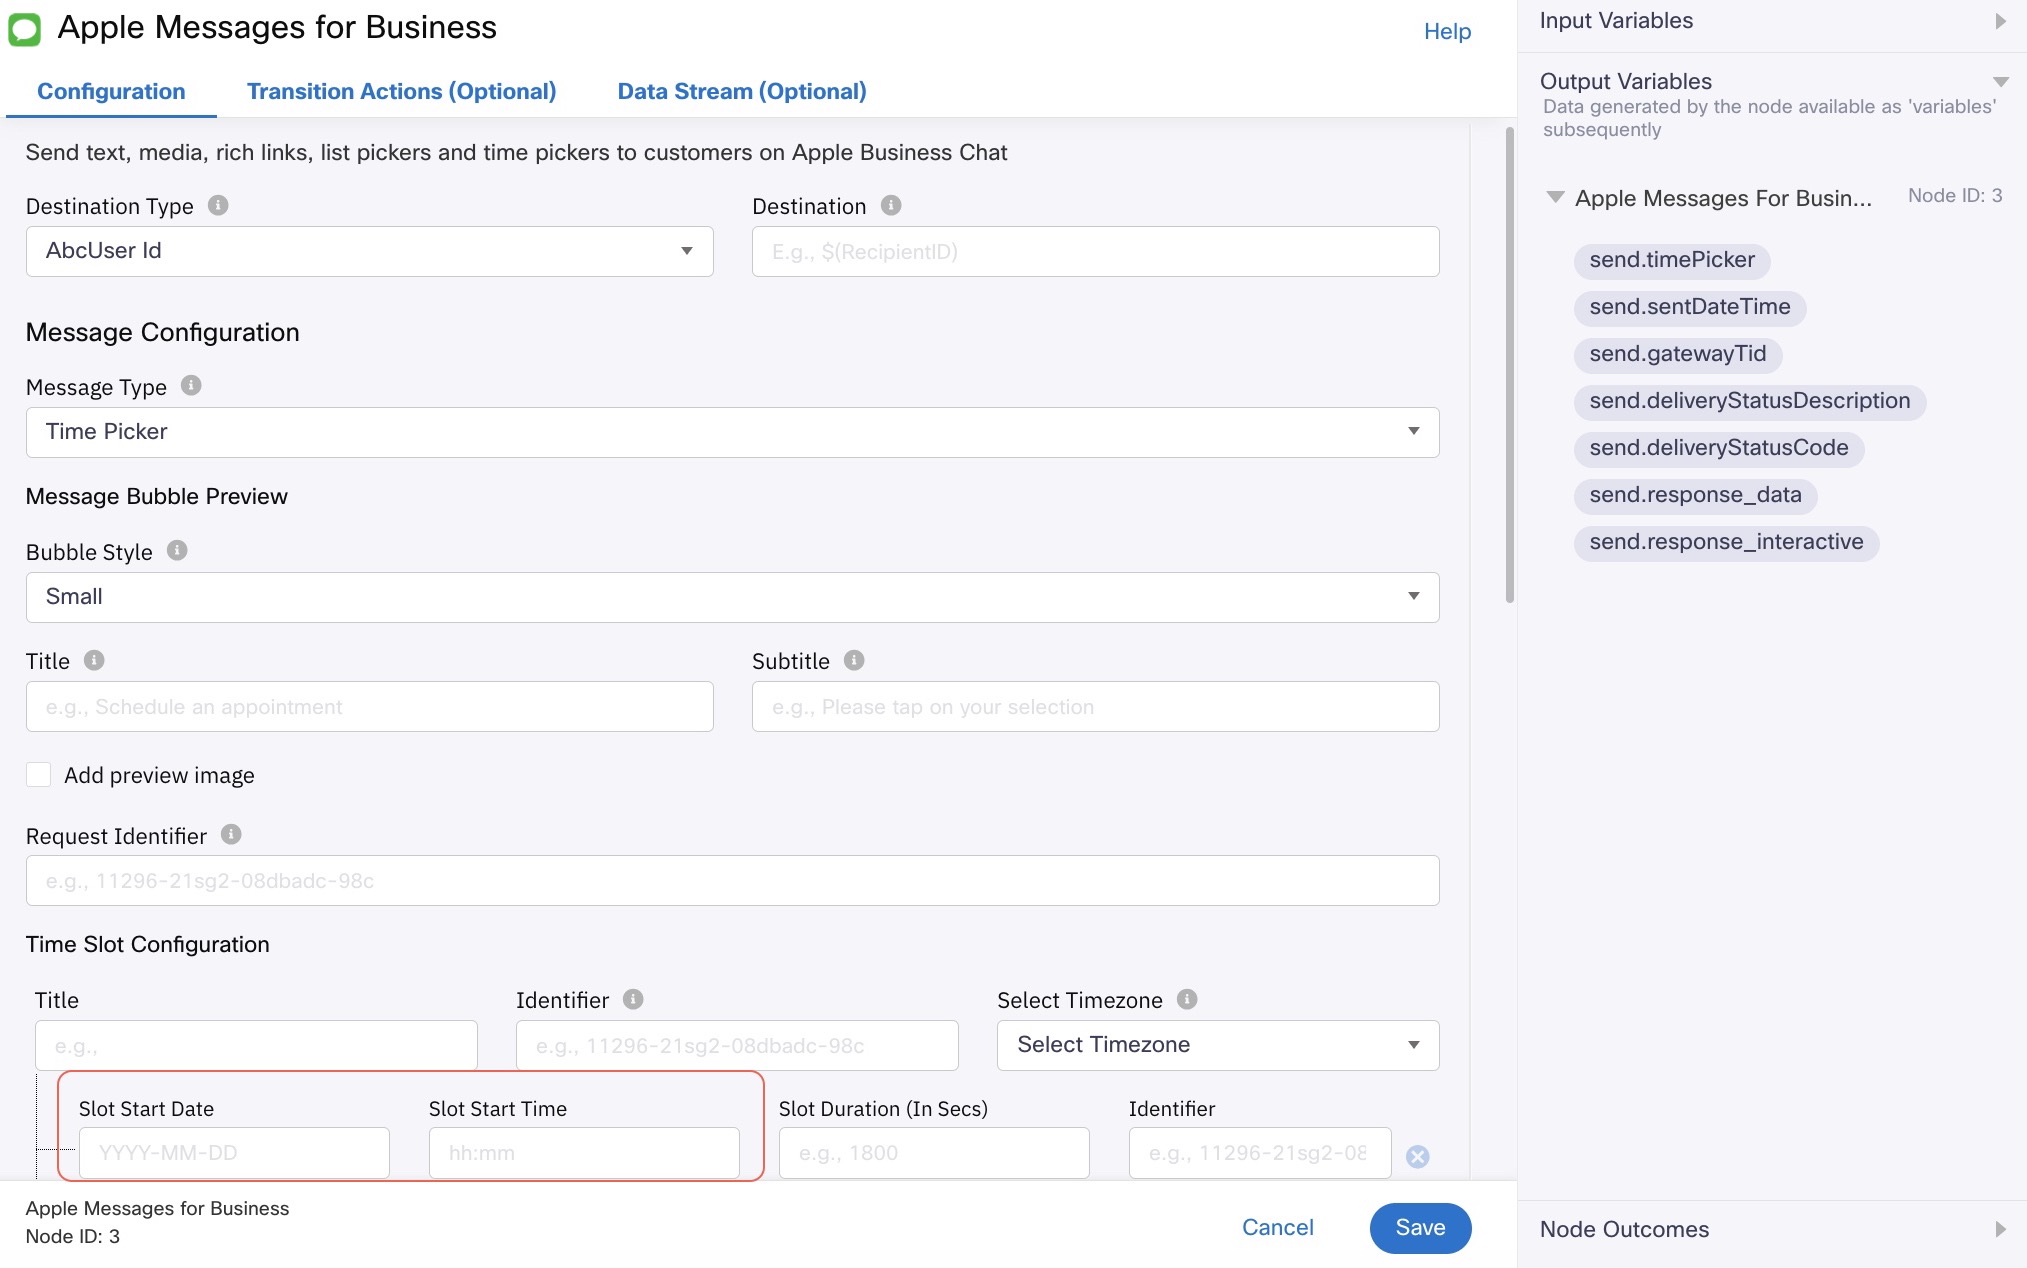
Screenshot of Node Configuration Page.
- In the Location Details area:
- Specify the Title, Latitude, Longitude, and Radius.
- In the Message Reply Configuration, area:
- From the Message Bubble Preview dropdown, select Small, Icon, or Large.
- In the Title field, specify the title.
Note
The messages app uses these configurations to set the style and content for the reply message bubble when the customer’s device receives a Time picker.
- If you wish to send a Typing Indicator, select the Send typing indicator before sending the message checkbox.
- Click Save.The Time picker is configured.
Output Variables
Output variables that are specific to Time Picker
- send.timePicker- please find the sample payload reference.
For more information, you can access the Common Output variable section
{
  "data": {
    "version": "1.0",
    "requestIdentifier": "21d4a1c4-327c-ba35-45b1-36a050b15ad2",
    "event": {
      "timezoneOffset": -100,
      "identifier": "fd296699-6ad1-4c96-af78-ae10dee1f19c",
      "title": "NHS Appointments",
      "timeslots": [
        {
          "duration": 1800,
          "startTime": "2019-01-01T15:30+0000",
          "identifier": "0"
        },
        {
          "duration": 1800,
          "startTime": "2019-01-02T16:30+0000",
          "identifier": "1"
        },
        {
          "duration": 1800,
          "startTime": "2019-01-03T16:30+0000",
          "identifier": "2"
        }
      ],
      "location": {
        "title": "5 St Johns Street",
        "latitude": 51.5209041,
        "longitude": -0.1025591,
        "radius": 16
      }
    }
  },
  "useLiveLayout": true,
  "replyMessage": {
    "style": "small",
    "title": "Selected time",
    "alternateTitle": "06-Aug-2018 at 10:00 AM"
  },
  "requestIdentifier": "b0291fd1-d2ac-4109-bd53-9258d6748619",
  "receivedMessage": {
    "style": "small",
    "title": "NHS Appointment",
    "subtitle": "Available appointments at your locall GP",
    "imageIdentifier": "a9b37a98-92a2-4f65-b74a-6a0cabf51b93"
  }
}
Configuring a Payment
Here are the steps:
- After specifying the general settings, from the Message Type dropdown box, select Payment.
The fields pertaining to Message Bubble Configuration, Payment Request - Line Items, Payment Request - Total, and Payment Request - Shipping Methods appear below. - In the Message Bubble Configuration area:
- Enter a Title for the Received Message and Reply Message
- In the Payment Request - Line Items area:
- Enter the Request Identifier. This is returned in the interactive response and can be used to correlate the user response to an interactive message.
- Select the Input Type: Static or Dynamic. Type can be configured static and configured in here, or dynamic in which case, the variable containing the entire JSON of line items need to be passed.
- Select the Line Item Type, a Label for the individual components of the invoice, and the Amount for the individual item.
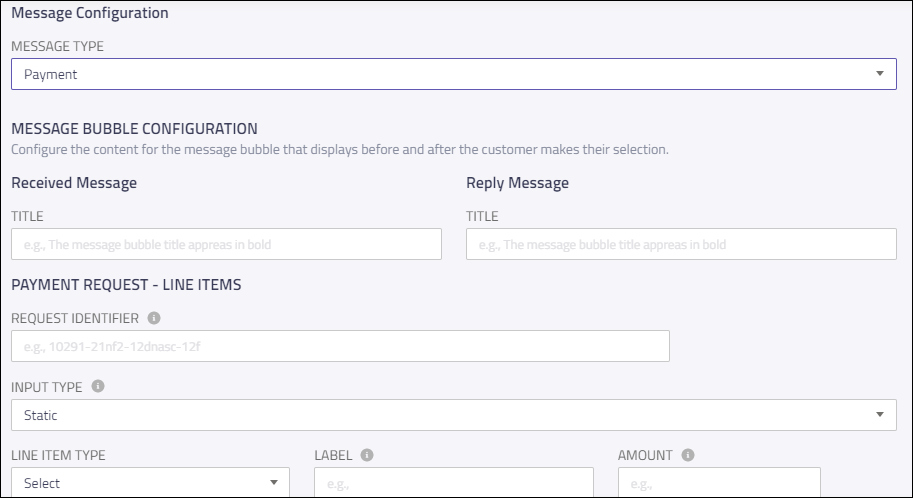
Payment Configuration
- In the Payment Request - Total area:
- Select the Type, a Label for the total component of the invoice, and the Total amount of the invoice.
- In the Payment Request - Shipping Methods, area:
Label - the name of the shipping method
Amount - the cost of shipping
Detail - additional comments if any
Identifier - a unique random number that is used as a correlation id in callback payload.
Select the Country Code and the corresponding Currency Code. Select the required contact fields (Billing Fields and Shipping Fields) that you need from your customer for payments and delivery. - Click Save to complete the configuration.
Configuring a Classical Authentication(Deprecated)
Here are the steps to configure:
- After specifying the general settings, from the Message Type dropdown box, select Authentication.
The fields pertaining to Message Bubble Configuration and Scope appear below. - In the Message Bubble Configuration area:
- Enter a Title, Subtitle, and Image for the Received Message and Reply Message.
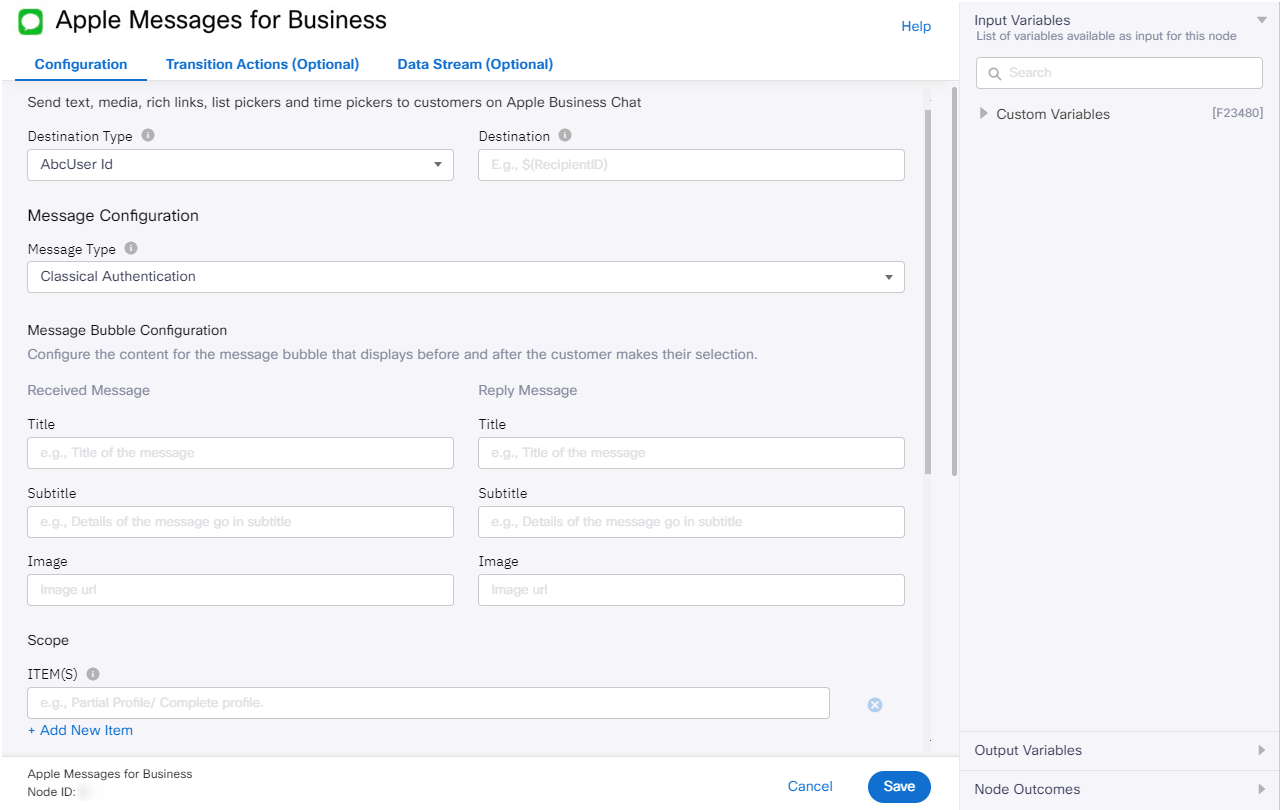
Classical Authentication Configuration
- In the Scope area:
- In the Item(s) field, provide the desired scope of the access token returned in the response. For example, Partial profile or Complete profile. This is returned in the interactive response and can be used to correlate the user response to an interactive message.
- Enter a Request Identifier. This is returned in the interactive response and can be used to correlate the user response to an interactive message.
- Select the appropriate Response Type based on the oAuth provider.
- Click Save to complete the configuration.
Configuring Transitions
As part of configuring transition actions, you can configure on-enter/on-leave operations. However, configuring these are optional.
Here are the steps:
- On the Apple Messages for Business screen, click the Transition Actions tab.
- On the Transition Actions tab, click Add Action.
The Transition Actions area appears. - On the Transition Actions area:
- From the Time dropdown box, select On-enter or On-leave. For example, On-enter.
- From the Acton dropdown box, select an action choosing from the pre-built options.
Tip
To delete an event, click the delete button corresponding to that event. See the image below.

Delete Button
- Finally, click the Save button at the bottom.
The transition actions are configured.
Configuring a Form Message
As part of configuring a form message, Messages for Business Forms allow you to create rich, multipage interactive forms for users on iOS and iPadOS devices to capture information in a structured manner. You need to specify the JSON object, that you wish to send. In addition, you can send typing indicators.
Please find the sample payload reference:
{
  "data": {
      "requestIdentifier": "76dbffd0-7f2b-4c92-a396-ae533d8a68e7_1",
      "dynamic": {
          "private": true,
          "data": {
              "startPageIdentifier": "0",
              "showSummary": true,
              "splash": {
                  "header": "Hello! How may I help you?",
                  "splashtext": "Kindly fill the form to raise your complaint",
                  "buttonTitle": "Continue",
                  "imageIdentifier": "vimg3"
              },
              "pages": [
                  {
                      "pageIdentifier": "0",
                      "type": "select",
                      "title": "Select the Defective Product",
                      "subtitle": "Select one of the purchased products for which theres a complain?",
                      "multipleSelection": false,
                      "items": [
                          {
                              "title": "Tulips Vacuum Cleaner",
                              "value": "vacuum",
                              "identifier": "101",
                              "nextPageIdentifier": "1",
                              "imageIdentifier": "vimg1"
                          },
                          {
                              "title": "Tulips Air Fryer",
                              "value": "airfryer",
                              "identifier": "102",
                              "nextPageIdentifier": "2",
                              "imageIdentifier": "vimg2"
                          }
                      ]
                  },
                  {
                      "pageIdentifier": "1",
                      "type": "select",
                      "title": "Details of the complaint",
                      "subtitle": "Please choose one or more of the following as applicable",
                      "multipleSelection": true,
                      "nextPageIdentifier": "3",
                      "items": [
                          {
                              "title": "Vacuum motor is not working",
                              "value": "motor",
                              "identifier": "201",
                              "imageIdentifier": "vimg1"
                          },
                          {
                              "title": "Vacuum hose is leaking",
                              "value": "hose",
                              "identifier": "202",
                              "imageIdentifier": "vimg1"
                          },
                          {
                              "title": "Package doesnt have vacuum cleaner",
                              "value": "hose",
                              "identifier": "203",
                              "imageIdentifier": "vimg1"
                          }
                      ]
                  },
                  {
                      "pageIdentifier": "2",
                      "type": "select",
                      "title": "Details of the complaint",
                      "subtitle": "Please choose one or more of the following as applicable",
                      "multipleSelection": true,
                      "nextPageIdentifier": "3",
                      "items": [
                          {
                              "title": "Air fryer is not heating up",
                              "value": "heat",
                              "identifier": "301",
                              "imageIdentifier": "vimg2"
                          },
                          {
                              "title": "Power plug is damaged",
                              "value": "plug",
                              "identifier": "302",
                              "imageIdentifier": "vimg2"
                          }
                      ]
                  },
                  {
                      "pageIdentifier": "3",
                      "type": "picker",
                      "nextPageIdentifier": "4",
                      "selectedItemIndex": 2,
                      "subtitle": "Select Your Preferred Resolution",
                      "items": [
                          {
                              "title": "Refund",
                              "value": "refund",
                              "identifier": "401"
                          },
                          {
                              "title": "Replace",
                              "value": "replace",
                              "identifier": "402"
                          },
                          {
                              "title": "Alternate Purchase",
                              "value": "alt",
                              "identifier": "403"
                          },
                          {
                              "title": "Keep it",
                              "value": "manage",
                              "identifier": "404"
                          }
                      ]
                  },
                  {
                      "pageIdentifier": "4",
                      "type": "datePicker",
                      "title": "Delivery Date",
                      "subtitle": "When did you receive the product?",
                      "nextPageIdentifier": "5",
                      "hintText": "Select the date of delivery",
                      "options": {
                          "startDate": "01/22/2022",
                          "maximumDate": "09/21/2022",
                          "minimumDate": "01/01/2020",
                          "dateFormat": "",
                          "labelText": ""
                      }
                  },
                  {
                      "pageIdentifier": "5",
                      "type": "input",
                      "title": "Additional Details",
                      "subtitle": "Please provide additional details if any",
                      "options": {
                          "required": false,
                          "inputType": "multiline",
                          "maximumCharacterCount": 500,
                          "keyboardType": "UIKeyboardTypeEmailAddress",
                          "placeholder": ""
                      },
                      "submitForm": true
                  }
              ]
          }
      },
      "images": [
          {
              "url": "https://media.croma.com/image/upload/v1663261950/Croma%20Assets/Small%20Appliances/Vacuum%20Cleaners/Images/259150_qs58bu.png",
              "identifier": "vimg1"
          },
          {
              "url": "https://media.croma.com/image/upload/v1632142476/Croma%20Assets/Small%20Appliances/Fryers%20and%20Grills/Images/243342_osqmdr.png",
              "identifier": "vimg2"
          },
          {
              "url": "https://res.cloudinary.com/jerrick/image/upload/f_jpg,fl_progressive,q_auto,w_1024/609a695d49932b001dce1ce5.jpg",
              "identifier": "vimg3"
          }
      ]
  },
  "receivedMessage": {
      "title": "Raise a complaint",
      "subtitle": "Please fill the form to raise your complaint",
      "style": "",
      "imageIdentifier": "vimg3"
  },
  "replyMessage": {
      "title": "Youve successfully submitted the form",
      "subtitle": "Thanks for your patience. You ll hear from us shortly",
      "style": "",
      "imageIdentifier": "vimg3"
  }
}
Here are the steps for configuring a Form Message:
- After specifying thegeneral settings Form Message from the Message Type dropdown box. Apart from the common fields, the “Form Elements” field is displayed.
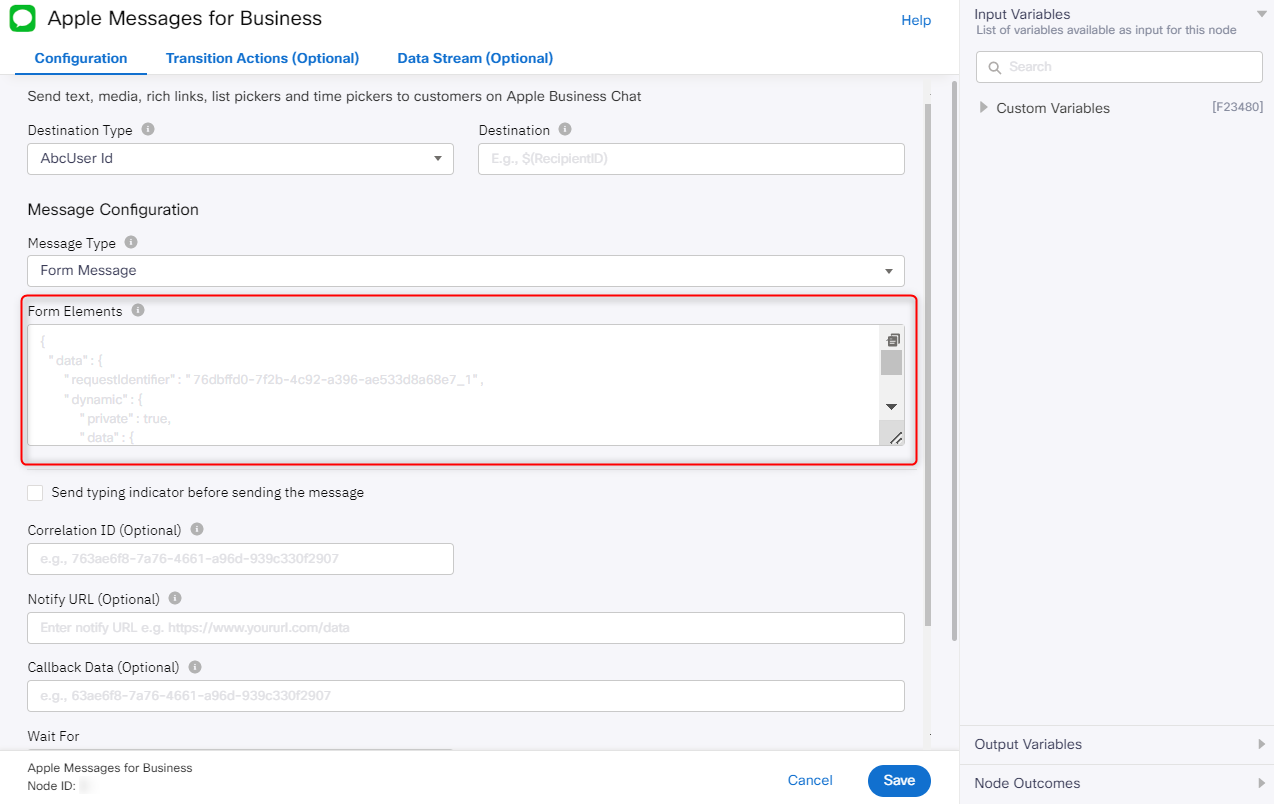
Screenshot of Form Elements.
- In the Form Elements, provide the complete JSON object for Form Message. You can copy the payload from send node configuration.
- Select the Send typing indicator before sending the message to send a Typing Indicator
- Optionally, provide details for:
- Correlation ID
- Notify URL
- Callback Data
- Select an option from the dropdown menu for Wait For.
- Select an option from the dropdown menu for Expiry.
- Click Save to complete the configuration
Notify URL
You can choose to notify a URL with the delivery report for your preferred channel. This field accepts only a valid URL or a variable. If an invalid URL is passed in an API request or via a variable, then such a request will not be considered eligible for retries.
Validations for Notify URL field:
- It is an optional field for all the channels. Send node can be executed without including these values.
- The notify URL should be updated with the proper URL format. The system returns the error message when the Notify URL field is not updated correctly as ‘Invalid URL: field accepts only valid URL or variable.’
- When you provide a space in front of the URL, the system displays the 'Invalid URL: field accepts only valid URLs or variables' error message.
- When you provide space at the end of the URL, the system trims and ignores the space, and the URL receives delivery receipts (DRs).
- Select the Enable Notify URL Auth checkbox to activate the authentication of the notify URL.
- There is no maximum length validation defined for this field.
- Variables can be added to this field.
Note:
Notify URLs track the status of delivery receipts (DRs) for sent messages.
If Enable Notify URL Auth is enabled for your node and an Auth ID that is random, invalid, or deleted is used, the payload will be parked in Webex Connect and not forwarded to the receiver's server. However, this does not impact the delivery of the message.
If Enable Notify URL Auth is not enabled, the payload is forwarded to the receiver's server regardless of any invalid Auth ID used.
Configuring an iMessage App
iMessage App provides a unique user experience with custom interactive messages. As part of configuring the iMessage App, you need to configure message bubble settings and may choose to enable the use of live layout. In addition, you can send typing indicators.
Here are the steps for configuring an iMessage App :
- After specifying the general settings, select iMessage App from the Message Type dropdown box, The fields pertaining to Message configuration, and Message bubble configuration are displayed in addition to the common fields.!
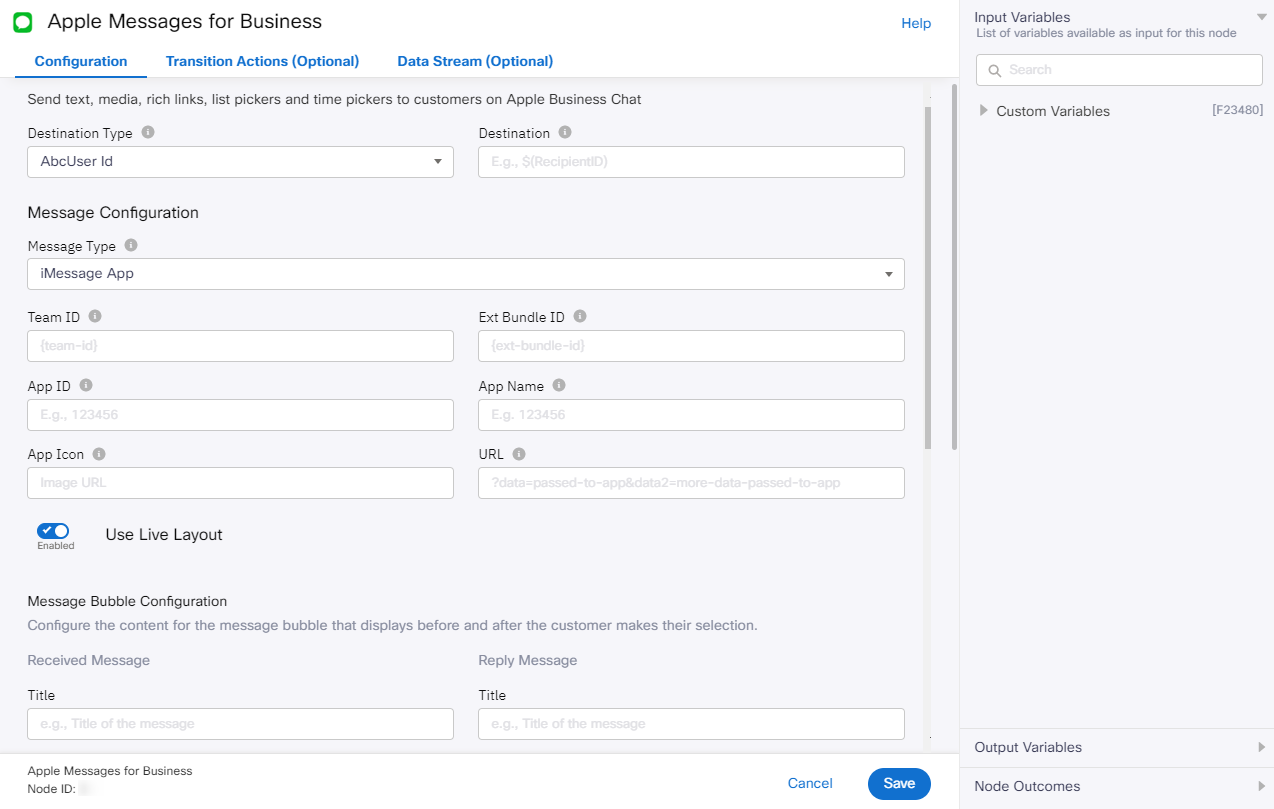
Screenshot of Configuring an iMessage App.
- In the Message configuration, enter the following details :
- Team ID
- Ext Bundle ID
- App ID
- App Name
- App Icon
- URL
- Toggle on to enable Use Live Layout sein
- In the Message Bubble Configuration area, provide the following details:
- Received Message
- Title
- Subtitle
- Reply Messages
- Title
- Subtitle
- Image URL(optional)
- Received Message
- Select the Send typing indicator before sending the message , to send a Typing Indicator
- Optionally, provide details for:
- Correlation ID
- Notify URL
- Callback Data
- Select an option from the dropdown menu for Wait For.
- Select an option from the dropdown menu for Expiry.
- Click the Save button to complete the configuration.
Configuring a New Authentication
As part of configuring the New Authentication, you need to configure the bubble settings and scope. In addition, you can send typing indicators. As part of configuring the New Authentication, you need to configure mainly the message bubble settings, scope, and request identifier. In addition, you can send typing indicators.
Here are the steps for configuring a New Authentication:
- After specifying the general settings], select New Authentication from the Message Type dropdown box. The fields pertaining to Message Bubble Configuration, Scope, Request Identifier, and optionally additional parameters are displayed.
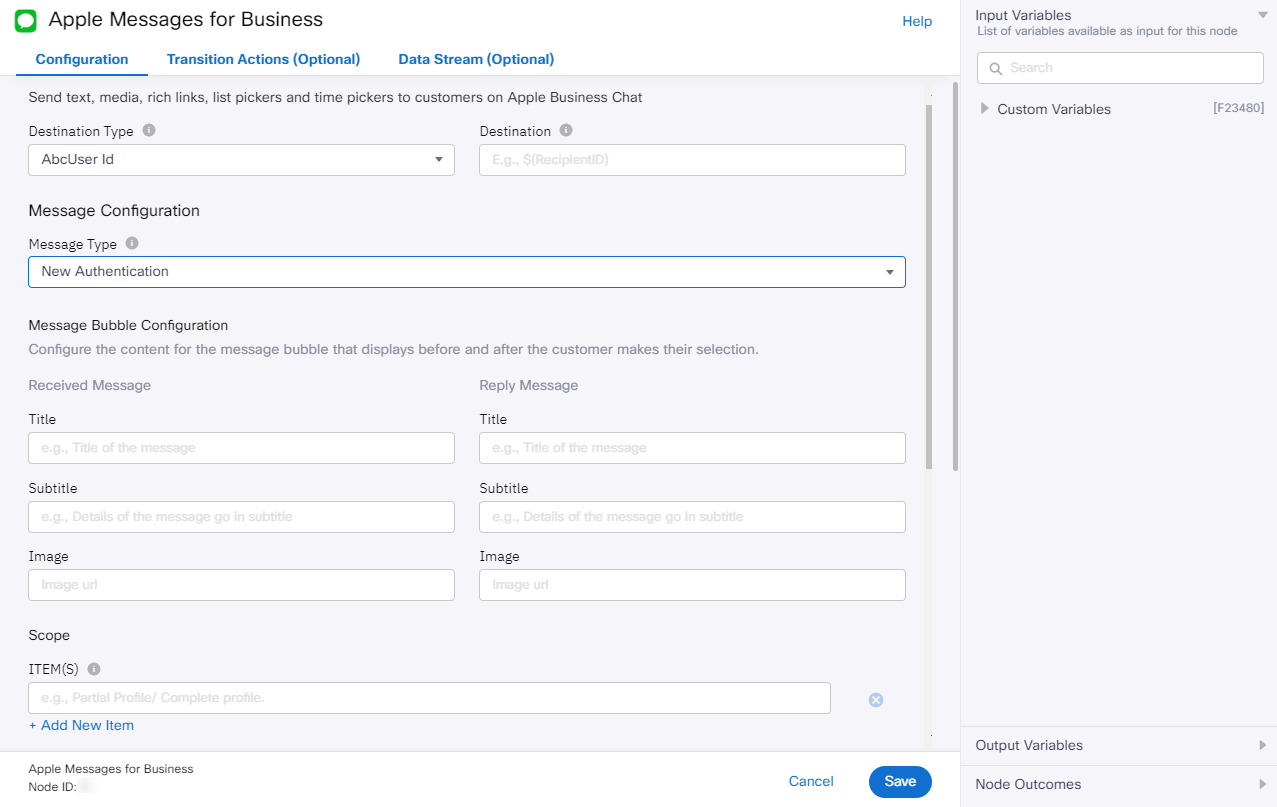
Screenshot of Configuring a New Authentication.
- In the Message Bubble Configuration area, provide the following details:
- Received Message
- Title
- Subtitle
- Image URL
- Reply Messages
- Title
- Subtitle
- Image URL
- In the Scope area:
- In the Item(s) field, provide the desired scope of the access token returned in the response. For example, Partial profile or Complete profile.
- Specify Request Identifier
- Specify Additional Parameters (optional)to provide details of custom oAuth.
- If you wish to send a Typing Indicator, select the Send typing indicator before sending the message checkbox.
- Optionally, provide details for:
- Correlation ID
- Notify URL
- Callback Data
- Select an option from the dropdown menu for Wait For.
- Select the option from the dropdown menu for Expiry.
- Click the Save button to complete the configuration.
Configuring a Quick Reply
Quick Reply provides a simple way for you to make an inline choice with a single tap during an ongoing conversation. You can have two or five customizable choices, and you can select only a single. As part of configuring the Quick Reply, you need to configure the message settings. In addition, you can send typing indicators.
Here are the steps for configuring a quick reply:
- After specifying the general settings, select Quick Reply from the Message Type dropdown box. The fields pertaining to Message Configuration, and Request Identifier are displayed.
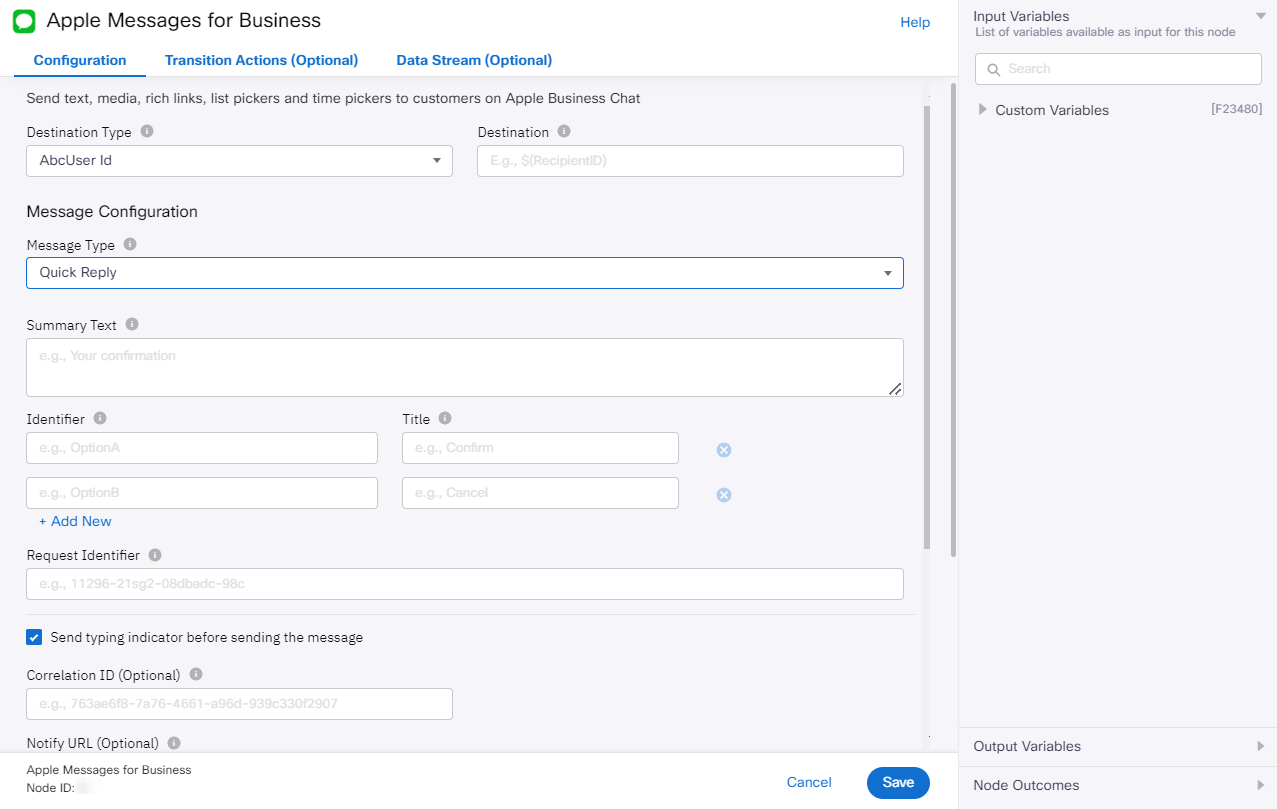
Screenshot of Configuring a Quick Reply
-
Enter the Summary Text that can be used for device notification.
-
Enter the Identifier and Title of the Quick Reply button.
-
Enter the Request identifier to correlate the user response to the interactive message.
-
Select the Send typing indicator before sending the message to send a Typing Indicator
-
Optionally, provide details for:
- Correlation ID
- Notify URL
- Callback Data
-
Select an option from the dropdown menu for Wait For.
-
Select an option from the dropdown menu for Expiry.
-
Click the Save button to complete the configuration.
Output Variables
Output variables that are specific to Quick Reply:
- send.quickReplies- refer sample payload added below.
For more information, you can access the Common Output variable section.
{
  "data": {
    "version": "1.0",
    "requestIdentifier": "21d4a1c4-327c-ba35-45b1-36a050b15ad2",
    "quick-reply": {
      "summaryText": "Summary text",
      "items": [
        {
          "identifier": "0",
          "title": "Yes"
        },
        {
          "identifier": "1",
          "title": "No"
        }
      ]
    }
  }
}
Common Output Variables
| Message Type | Output Variables | Description | Example |
|---|---|---|---|
| send.sentDateTime | Time, when the message was sent from the platform in GMT timezone. | send.sentDateTime : 2023-03-12T14:42:49.514Z | |
| send.gatewayTid | Gateway transaction ID for debug purposes | send.gatewayTid : 84d941eb-a71f-4aed-8e45-ffbd90ab3129 | |
| send.deliveryStatusDescription | Status of the message delivery | send.deliveryStatusDescription : Success | |
| send.deliveryStatusCode | Status code of the message delivery | send.deliveryStatusCode : 7300 | |
| send.response_data | Response information as received from Connect gateway | send.response_data : [{"code":"1001","transid":"84d941eb-a71f-4aed-8e45-ffbd90ab3129","description":"Queued"}] | |
| send.response_interactive | Currently not in use | send.response_interactive : null |
Node Outcomes
| Node Edge | Outcome Description |
|---|---|
| Green | onSuccess- this is success event |
| Red | onError onPolicyFail-this is onpolicyfail event |
Updated 3 months ago
