Logbooks
Create logbooks to store custom logs for each node.
Logbooks allow you to record custom data generated during the flow runtime. The schema of the Logbook needs to be defined before you can start using it within a Flow. In addition to the data points to be stored as part of the logbook, you can also define the file rotation & file shipping policies.
Logbooks can periodically be shipped to an SFTP or AWS S3 location.
Note
The use of 'Local' as a file destination for logbooks is no longer supported and is deprecated for new logbook configurations. Existing logbooks that are already configured with 'Local' as file destinations will continue to be supported until updated, but we recommend switching to S3 or SFTP.
To capture data, you need to configure data points in Logbook. Following are the possible tasks that you can perform for Logbooks:
- Configure New Logbook
- Declare attributes to be captured during runtime
- Configure File Type and set Delimiter
- Configure Rotation Policy and File Destination
- Logbook Locking
- Map Logbook to Flow
Timezone for Logs in Logbooks
The same timezone configured in the Tenant Settings is applicable to the logs within the Logbooks.
Configure New Logbook
- Navigate to Tools > Logbooks
Note
This option is visible only if the logbooks feature is enabled for your tenant in the admin portal. You will receive email notifications when the logbooks feature is enabled or disabled.
- On the Logbooks page, click Add Logbook.
- On the Configure New Logbook page, enter the Name of the logbook.
- Enter Description of the logbook for easy identification.
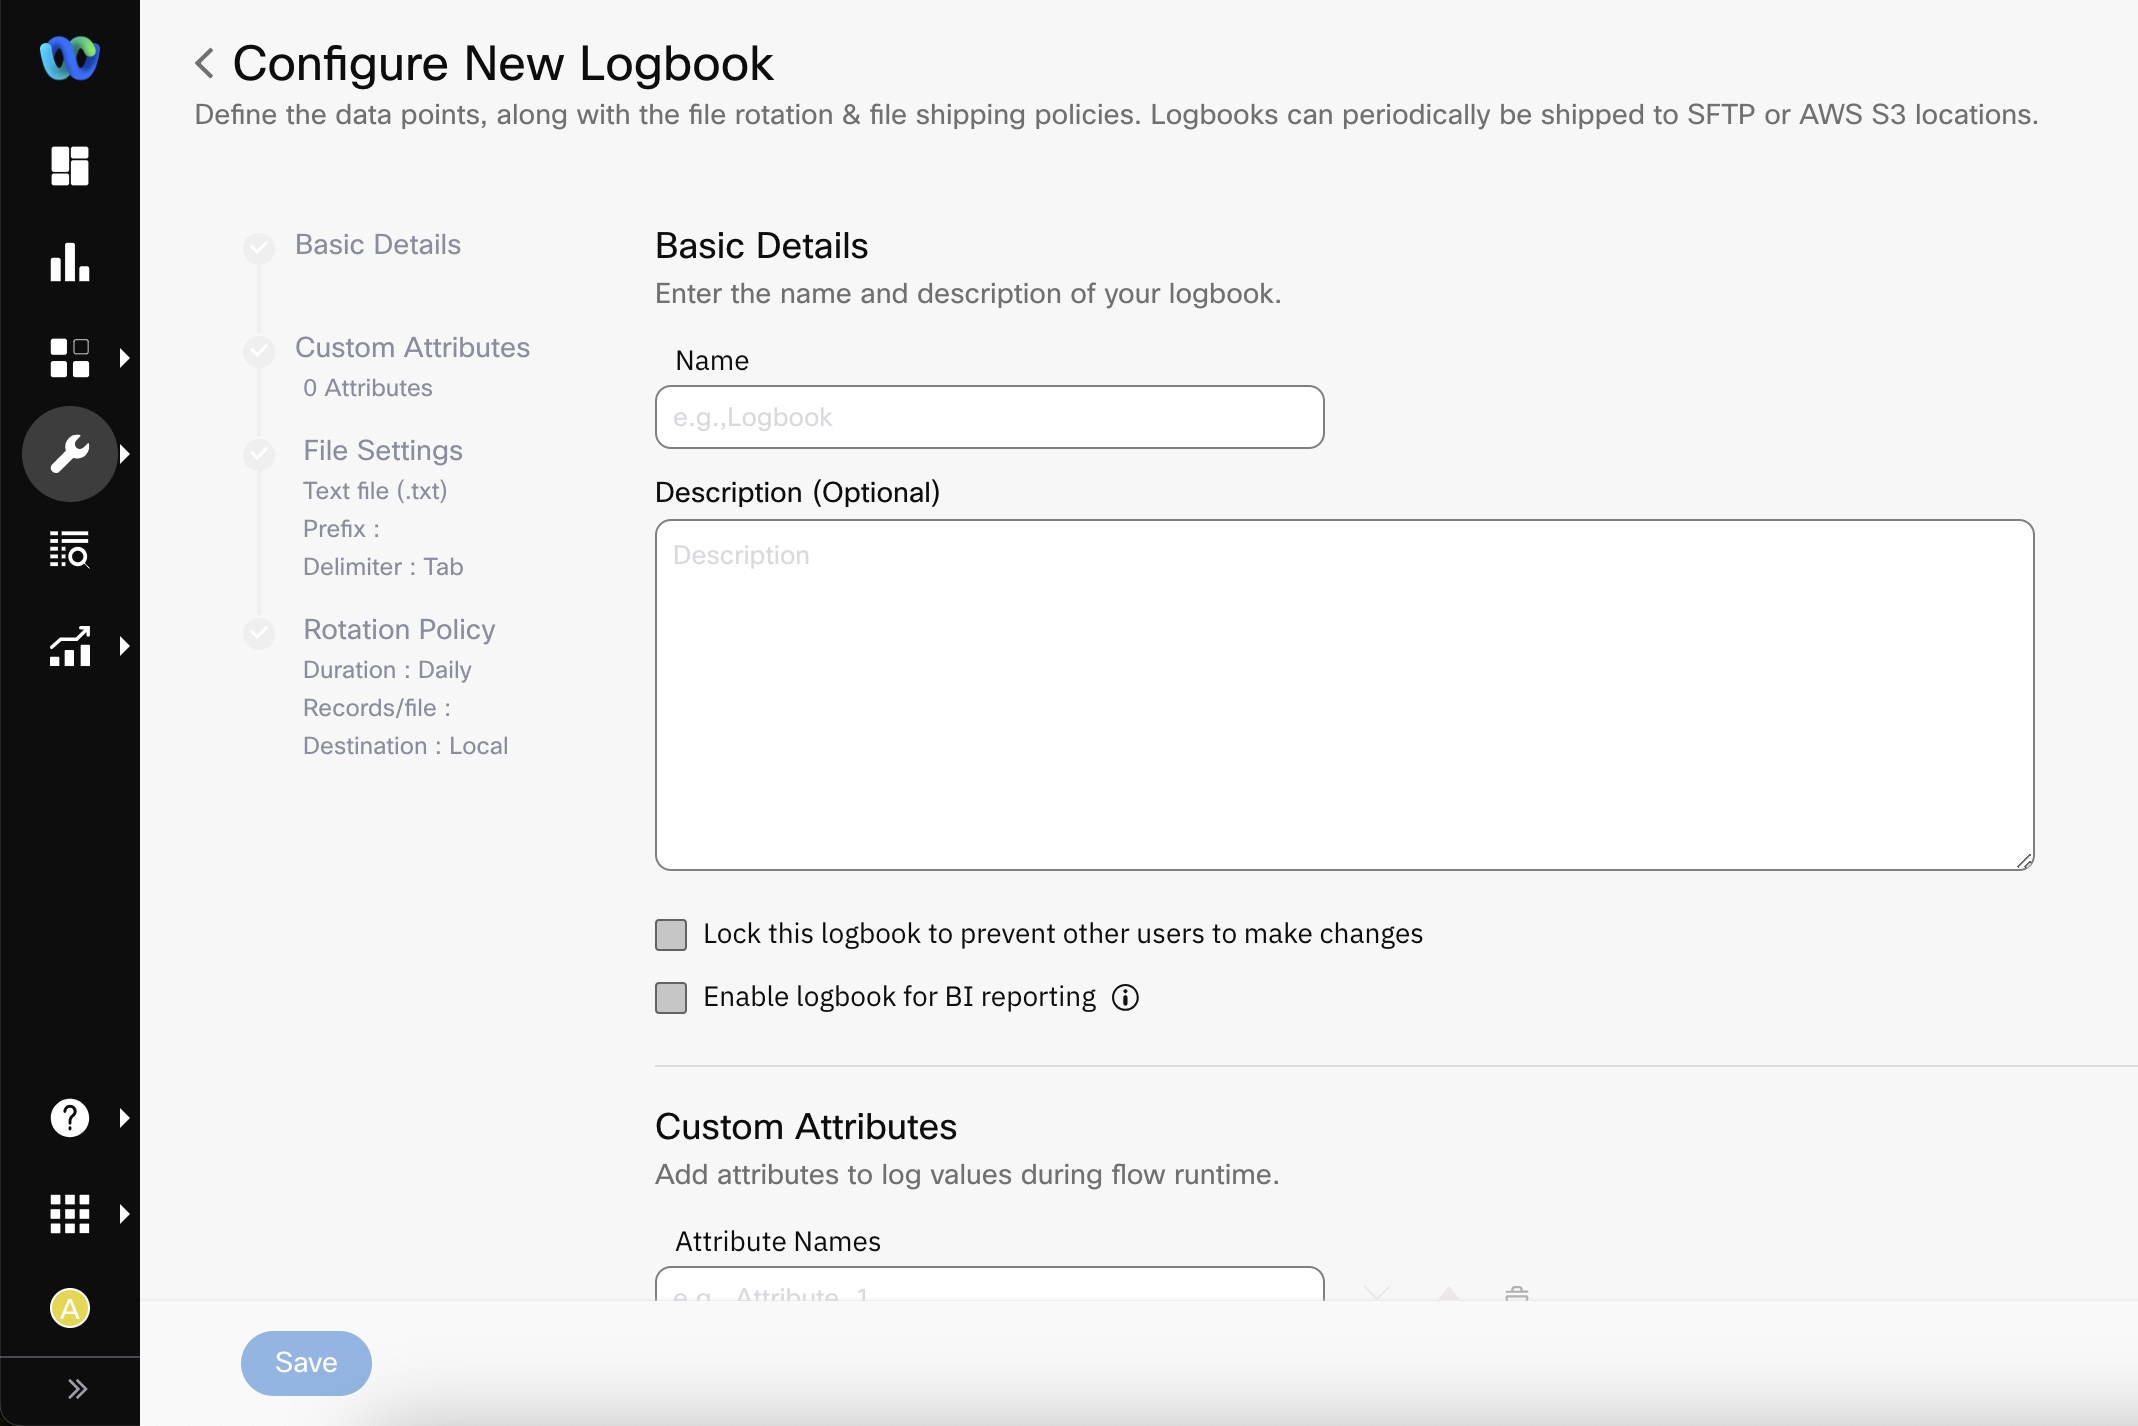
Basic Details of the logbook
- Enable the logbook that you have just created.
Note
If the logbooks feature is disabled, it does not delete any existing logbooks. When the feature is re-enabled, you will continue to see them with the latest configurations. The logging of data will stop on the day the feature is disabled and resume on the day when it is re-enabled.
Declare Attributes to capture during runtime
Custom attributes are used to capture log values during flow runtime. Click ADD ATTRIBUTE to add an attribute textbox. You can change the order of the attributes using up and down arrow keys; use the corresponding 'x' to remove the attribute from the list of custom attributes.
We now allow underscores in the custom attribute names of logbooks. User can define the custom attributes with underscores for new logbooks and existing logbooks as well. Any changes made to the current logbook structure, will create a new file.
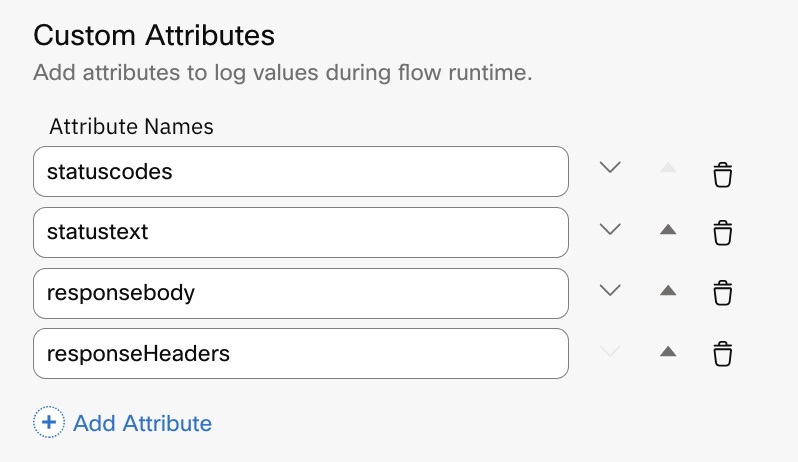
Screenshot displaying the list of Custom Attributes
Configure File Type and Set Delimiter
In the File Settings section, define the file type for the logbook and the prefix of each file generated as declared in the rotation policy.
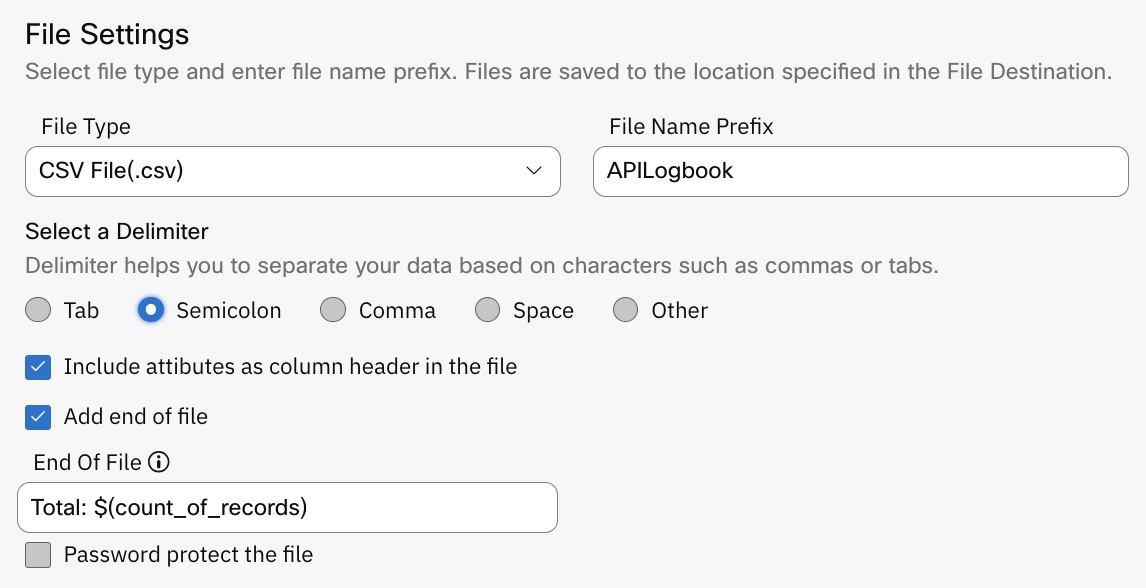
Screenshot displaying the File Settings
| Parameter | Description |
|---|---|
| FILE TYPE | Select the logbook file type to save the data. You can save the logbook in .CSV or .TXT format. |
| FILE NAME PREFIX | This prefix is added to the logbook files when files are generated. E.g: APILOGBOOK20181219123906747.txt |
Note
From 6.2.0, No spaces are allowed in the 'FILE NAME PREFIX' field for new configurations. All the old configurations will continue to work as is.
Logbook names
The format of the log file is based on the prefix supplied, along with the date and time of the file generated.
For example, if the file generated is API20181218112337213.txt, then API is the prefix, 20181218 is the date and 112337213 is the time in hours, minutes and seconds
Select a Delimiter
Delimiter helps you to separate your data based on characters.
Please select your Delimiter carefully to avoid conflict with the actual data. Data points are not enclosed within quotes limiting you from making a distinction between the delimiter and the actual data in some cases if the delimiter is likely to be a part of your content.
| Parameter | Description |
|---|---|
| Tab, Semicolon, Comma, Space, Others | Select one of the delimiters types to place between data (separator). |
| Include attributes as column header in the file | Check this option of include the customer attribute as headers of the data being captured in the logbook. |
| Add end of file | Check this option and enter the content or variable to be placed at the end of the file. E.g: Total: $(count_of_records) or End of Records. |
| Password protect the file | Check this option to create password-protected logbooks. You are required to enter a password in the textbox provided. Hereafter, log files will be zipped and password protected with the passcode provided. |
Configure Rotation Policy and File Destination
The Rotation Policy is used to schedule logbook file generation. A new file is generated if the file exceeds maximum records per file, or the duration of each cycle is reached. You can now provide an email / a notify URL to get notifications on the file exports scheduled on Logbooks. The notification is triggered at the end of each export cycle, relaying the outcome of the file export process.
Under 'File Destination' you can configure Destination path to drop the log file once it is created, You can define the Notification path to receive a notification when a logbook is created and placed at the selected destination (SFTP/AWS S3).
Note
- Local storage option stores the data at Webex Connect's end. The standard retention policy for local storage is 30 days.
- The use of 'Local' as a file destination for logbooks is no longer supported and is deprecated for new logbook configurations. Existing logbooks that are already configured with 'Local' as file destinations will continue to be supported until updated, but we recommend switching to S3 or SFTP.
File Destination is a toggle button. You can either enable or disable it based on your requirements. If it is disabled, the Logbook is not exported to any location.
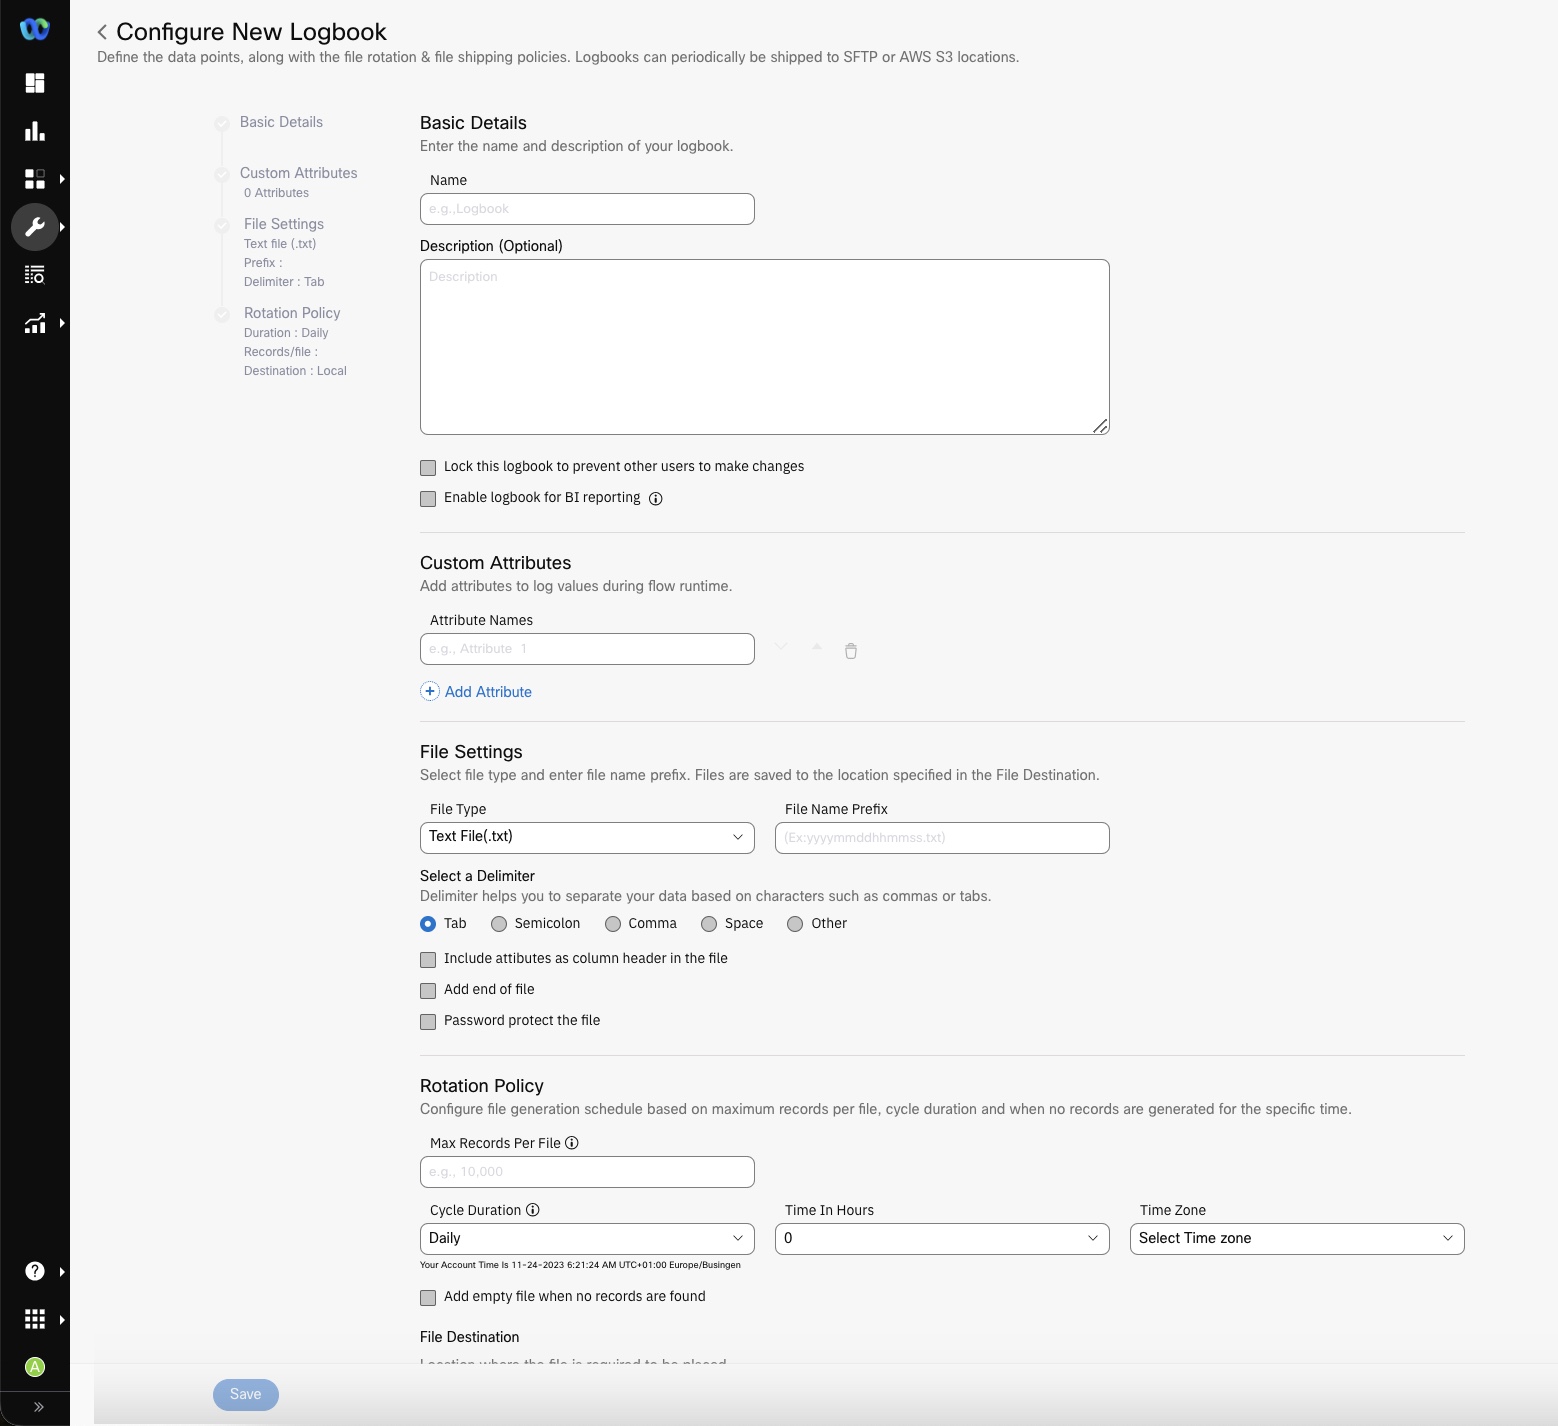
Screenshot of Configuring New Logbook
Setting Logbook File destination is now optional, if a logbook is created for Embedded BI reporting. Users are no longer required to mandatorily choose a ‘File destination’ while creating a Logbook for Embedded BI.
A dropdown option "Select Time Zone (the text is indicative only)" adjacent to the "Time in Hours" field helps the user define the time with the time-zone in which he would prefer doing the rotation policy. The rotation policy refers to time when you want to export or load the logbook on SFTP, S3 file destination.
This change will not impact the existing logbooks automatically without the user changing the existing time zone. Also, the time zone selection is only shown when the cycle duration selected are daily or hourly interval as per the tenant time zone settings, but not as per the server time zone.
The tenant account timestamp will also be displayed below the cycle duration field as text.
Note
After this deployment the default time zone will be displayed as UTC for the existing logbooks (can be changed manually, if required) and for any new logbook created by the user you will get the “Select Time Zone” option (without any default selection).
Note
The FTP feature is no longer supported for new configurations, because Data sent via FTP is vulnerable to sniffing, spoofing, and brute force attacks, among other basic attack methods.
The feature will work as is for the existing customers.
| Parameter | Description |
|---|---|
| Max Records per File | Define the maximum number of records per file. A new file is generated once the file reaches the defined threshold. |
| Cycle Duration | Applicable only when cycle duration is selected as Interval - Format (HH:MM). |
| Cycle Duration - Daily | Contains the details of duration in hours along with the timezone at which the file is generated. |
| Cycle Duration - Hourly | Contain the details of duration in minutes along with the timezone at which the file is generated. |
| Add empty file when no records are found | If checked, an empty file is generated, even in case of no transaction ( based on cycle duration). |
Assume that you have configured a schedule in the logbooks and the time zone selected in Rotation Policy is included under DST (Day light saving time zone). In this case, there is a possibility that the scheduled file delivery can be skipped because of DST adjustment in the time zone.
For instance, say you are in Ireland, where daylight savings events occur at 3:00 AM, GMT. If you have a logbook schedule that initiates everyday at 3:15 AM, then on the day of the beginning of daylight savings time, the schedule will be skipped, since, 3:15 AM never occurs that day. If you have a schedule that triggers every 15 minutes of every hour of each day, then on the day and time that daylight savings ends, there will be an hour of time for which no schedule executes. This is because, when 3:00 AM arrives, it will become 1:00 AM again, however all of the scheduling during the 1:00 AM hour has already occurred, and the trigger’s next initiation time was set to 3:00 AM. This is why, for the next hour, no schedule execution will occur.
File Destination
Choose a destination to place the log file once it is generated as per the settings above.
| Parameter | Description |
|---|---|
| Destination | The destination to store the log file once the logbook is generated. You can set the destination to 'SFTP or AWS S3'. You can upload the private key (example: AWS based Open SSH key files like rsa512.ppk, rsa256.ppk, ecdsa521.ppk, ecdsa384.ppk, ecdsa256.ppk, ed25519.ppk, ECDSAprivate.ppk, EDDSA255private.ppk) for SFTP configuration, when you select the File Destination as SFTP using the Upload button. |
| FILE ROTATION NOTIFY URL | A notification is sent at the defined URL when a new log fine is generated. If an invalid URL is passed in API request or via a variable, then such request will not be considered eligible for retries. |
| Notify on Email | A notification is sent at the provided email address when a new log file is generated. |
Logbooks Access Restrictions
A read-only user is not allowed to create new logbooks or manage any existing logbooks. However, a read-only user is allowed to download logbook files from the platform.
Logbook Locking
Users can now lock logbooks created by them to restrict other users from accessing, editing, or deleting their logbooks. Only the user who created the logbook and the owner of the tenant can lock the logbook. The lock is aimed at restricting unintended editing of logbook schema, and/or viewing, download and deletion of the logbook by other users. The locked logbooks will be available for use within flows (i.e., adding data to logbooks) for all platform users.
The user (i.e. the creator of the logbook) and owner of the tenant can select "Lock/Unlock" option from the action dropdown to lock/unlock the logbook.
Once a logbook is locked, the lock icon will appear adjacent to it and other users will only get the option to “View”, instead of Edit/Delete/View.
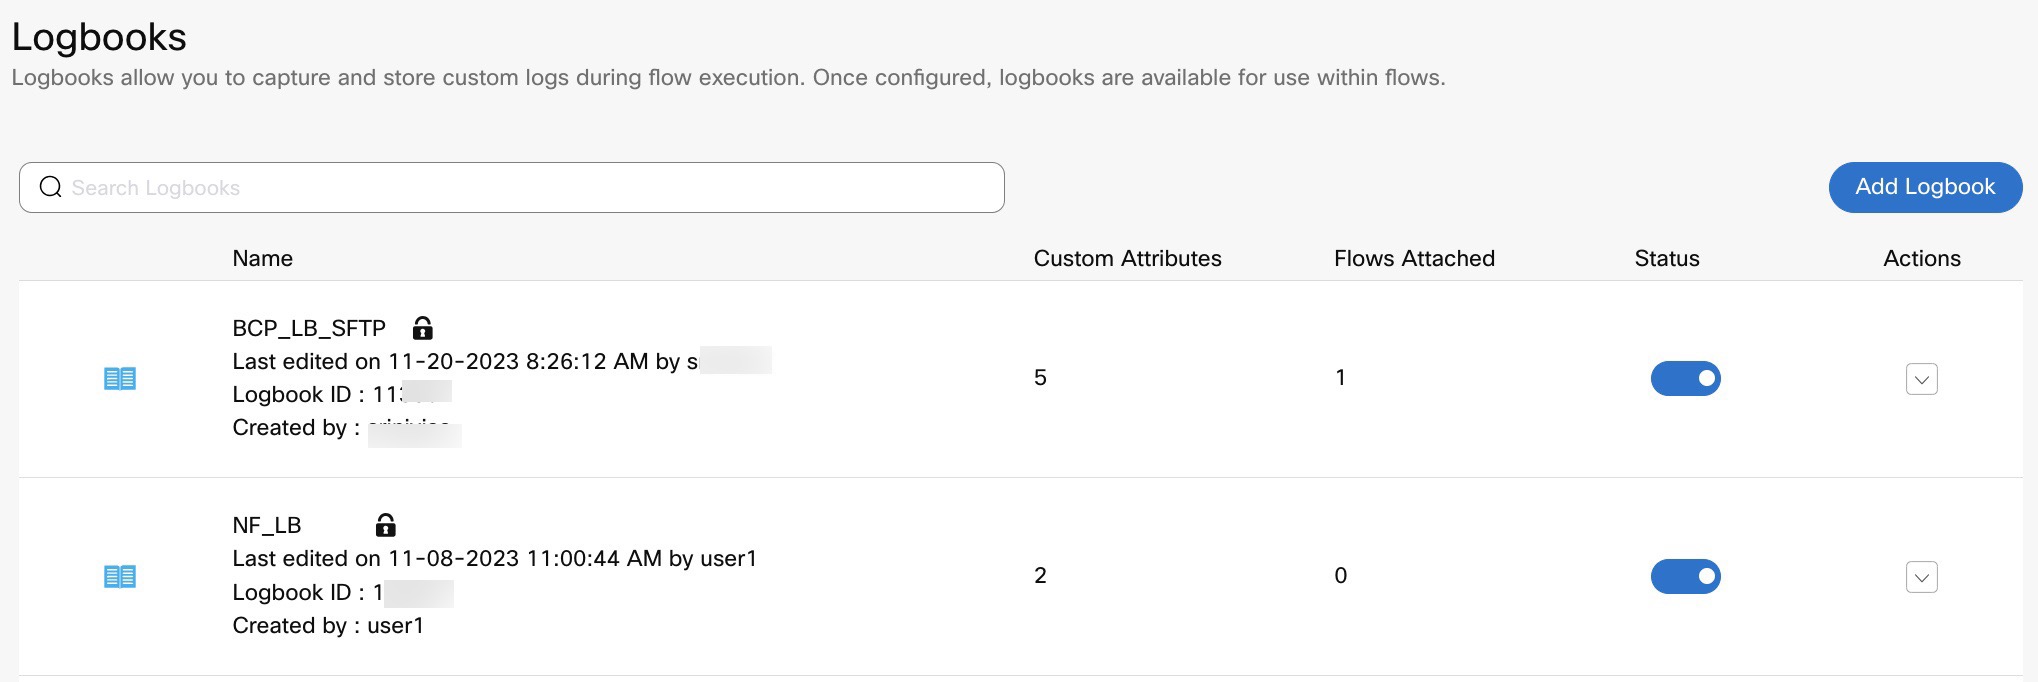
Screenshot displaying the list of Logbooks
Once you click View button, the logbook schema will open in View (read-only) mode where you cannot make any modifications or add/delete any attributes such as Name, Description, Custom Attributes etc. Whereas the creator and owner of the tenant will have full access of the logbook.
Note
There will be no such restriction on logbooks attaching to flows.
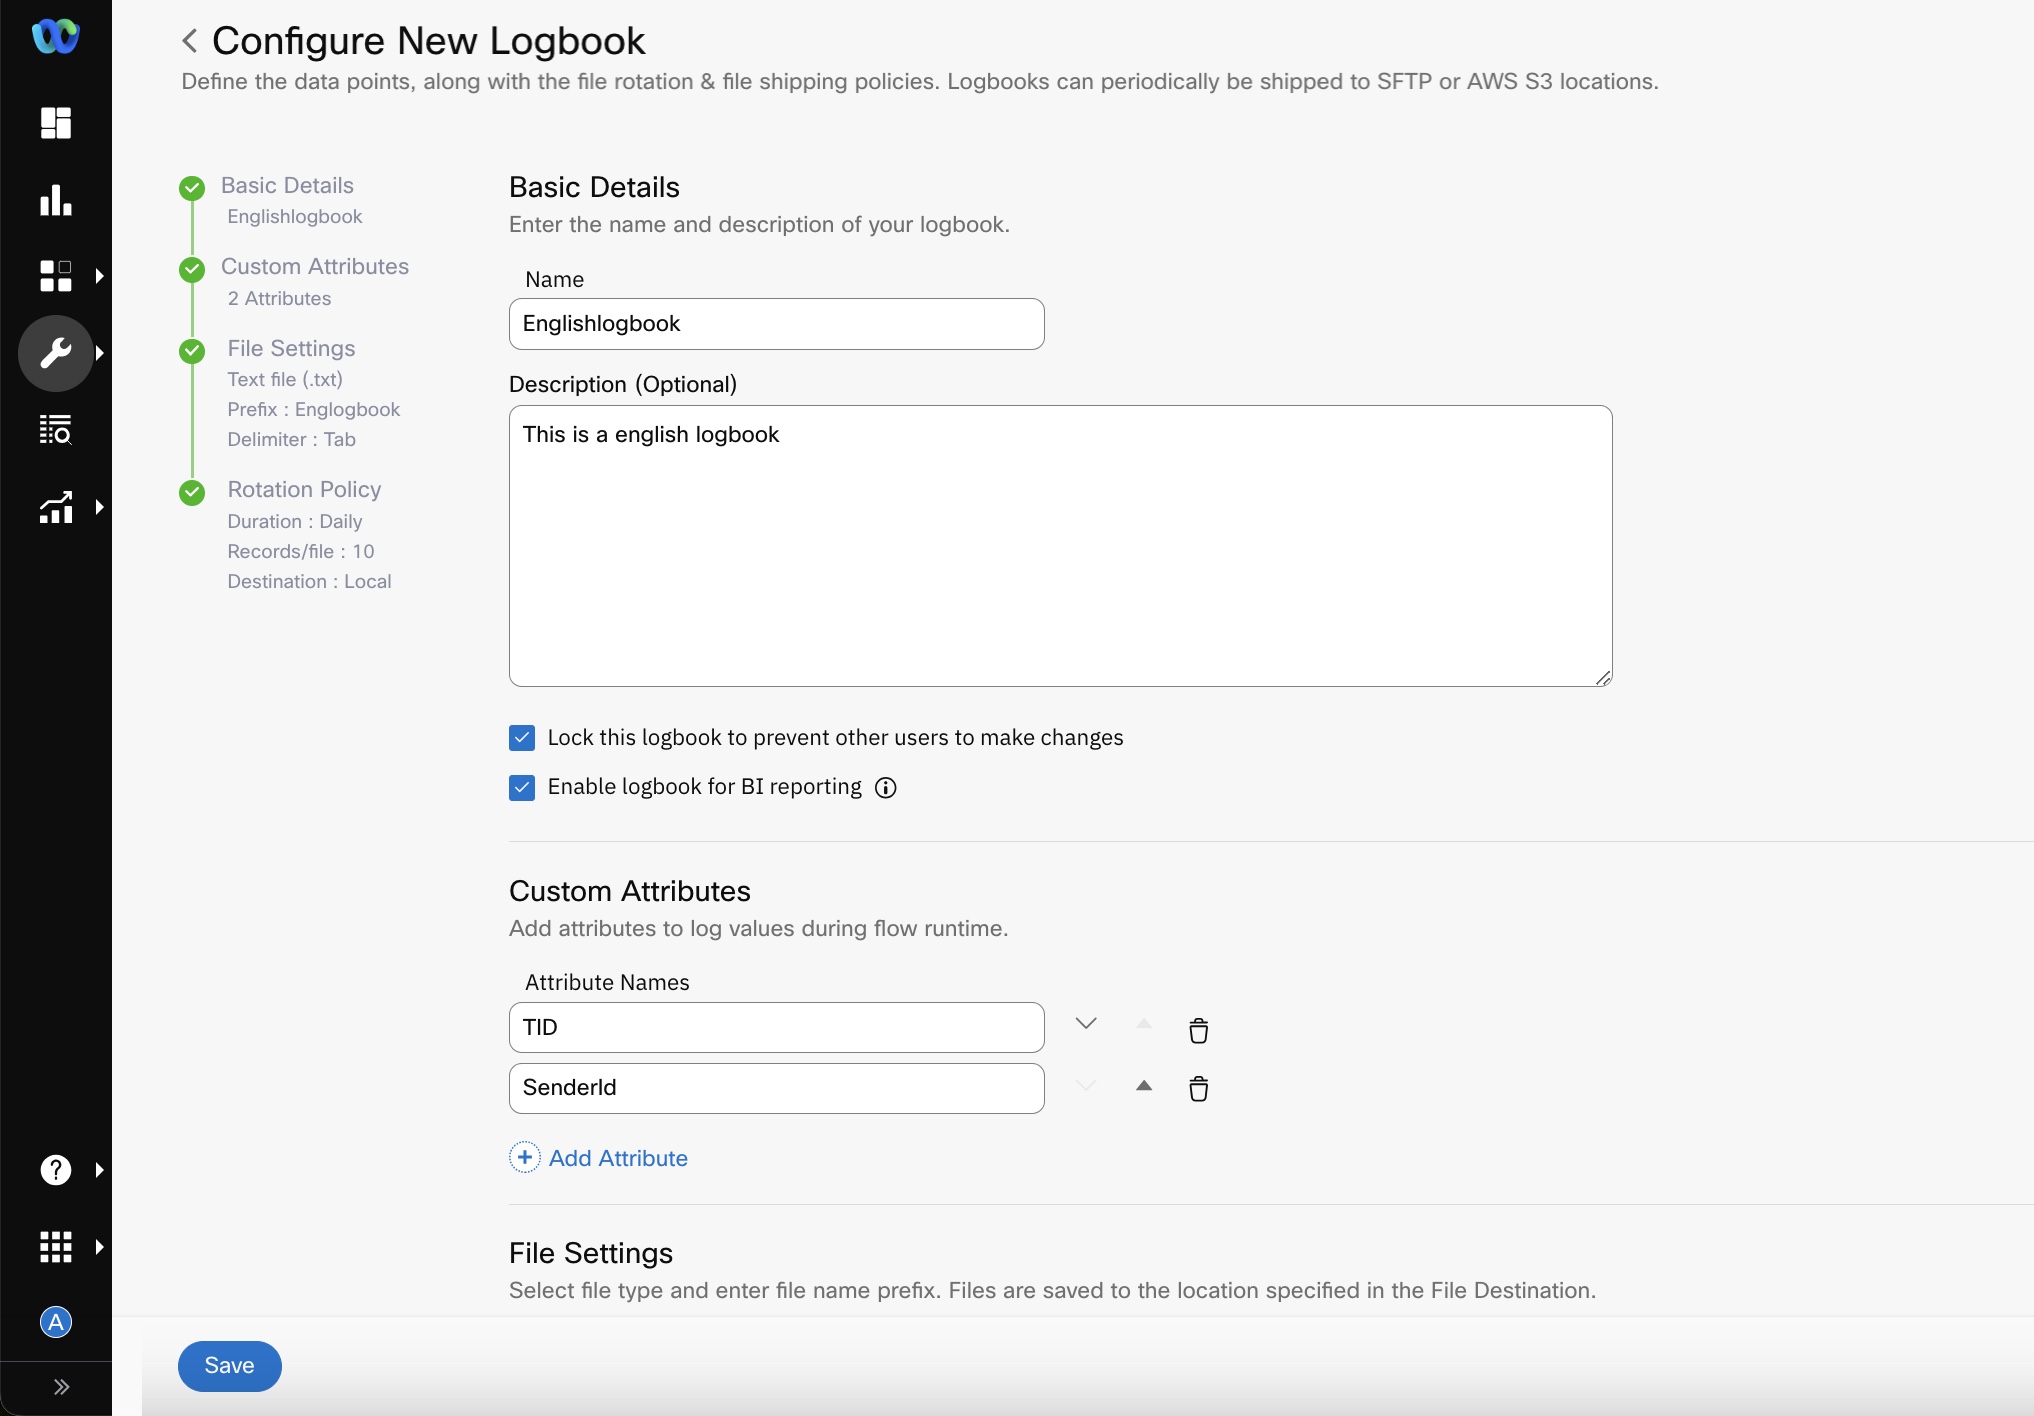
Screenshot of Configuring the New Logbook
Some of the fields such as File Destination Details which mentions destinations such as SFTP, S3 where the logbook is to be exported, will also be hidden or shown in encrypted format as it contains key value pairs (personal info such as user name, pwd, secret key, S3 access key etc).
Once locked, logbook will not be accessible by any user except the owner unless unlocked. Only the owner of the tenant can "unlock" the logbook, other than the user who created it.
Map Logbook to Flow
After you have created a logbook, you must map it to the flow in which you want to use the logbook.
- Open the required flow.
- Go to Flow Settings.
- Go to the Custom Logs tab.
- Select the logbook that you want to add to the flow in the Logbook dropdown list.
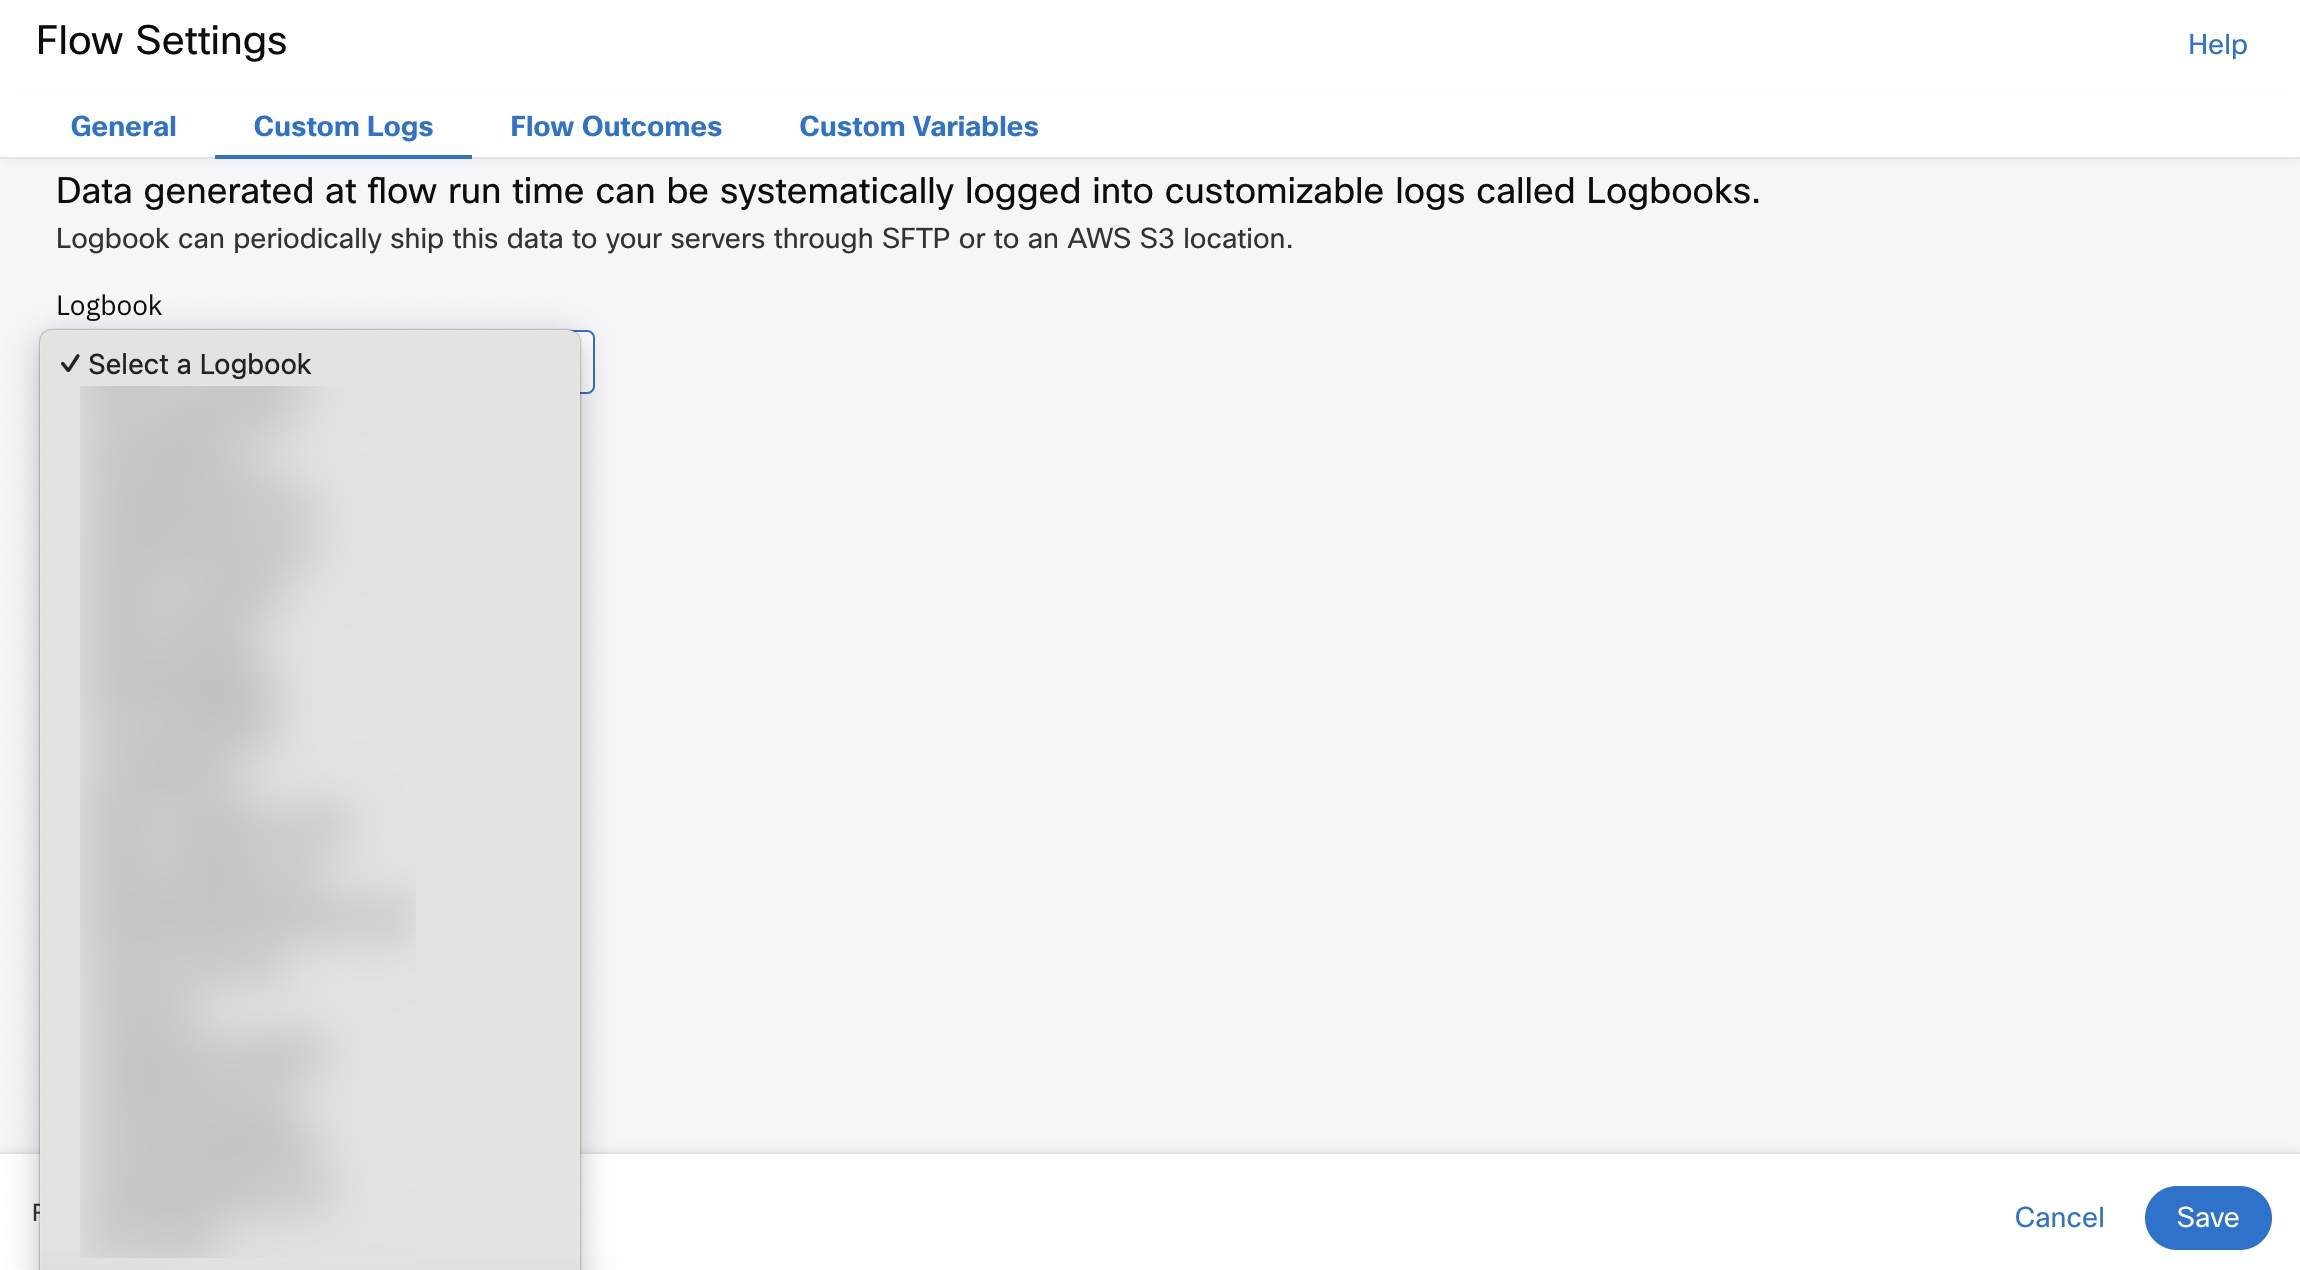
Screenshot of Mapping Logbook to Flow
- Click Save.
If the logbooks feature is disabled for your tenant, you can still see any existing mappings in this tab, along with a message “Logbook is disabled for the tenant. Flow runtime data will not be logged into the mapped logbook. To enable logbook please reach out to your account manager.”
Note
If you do not have any logbooks mapped to flows, this tab is not visible.
Role-Based Access for Logbooks
The tenant owner has the ability to select the reports which are accessible by the users on the tenant.
- From the User Profile menu select Teammates.
- Click Edit next to the required user.
- In the Edit User screen, within the BI Reporting section, you can do the following:
- Enable/Disable View Reports
- Enable/Disable Edit Mode
- Select the required logbook(s) from Reports Accessible dropdown. Only the reports which are provisioned for the selected user are visible in this dropdown.
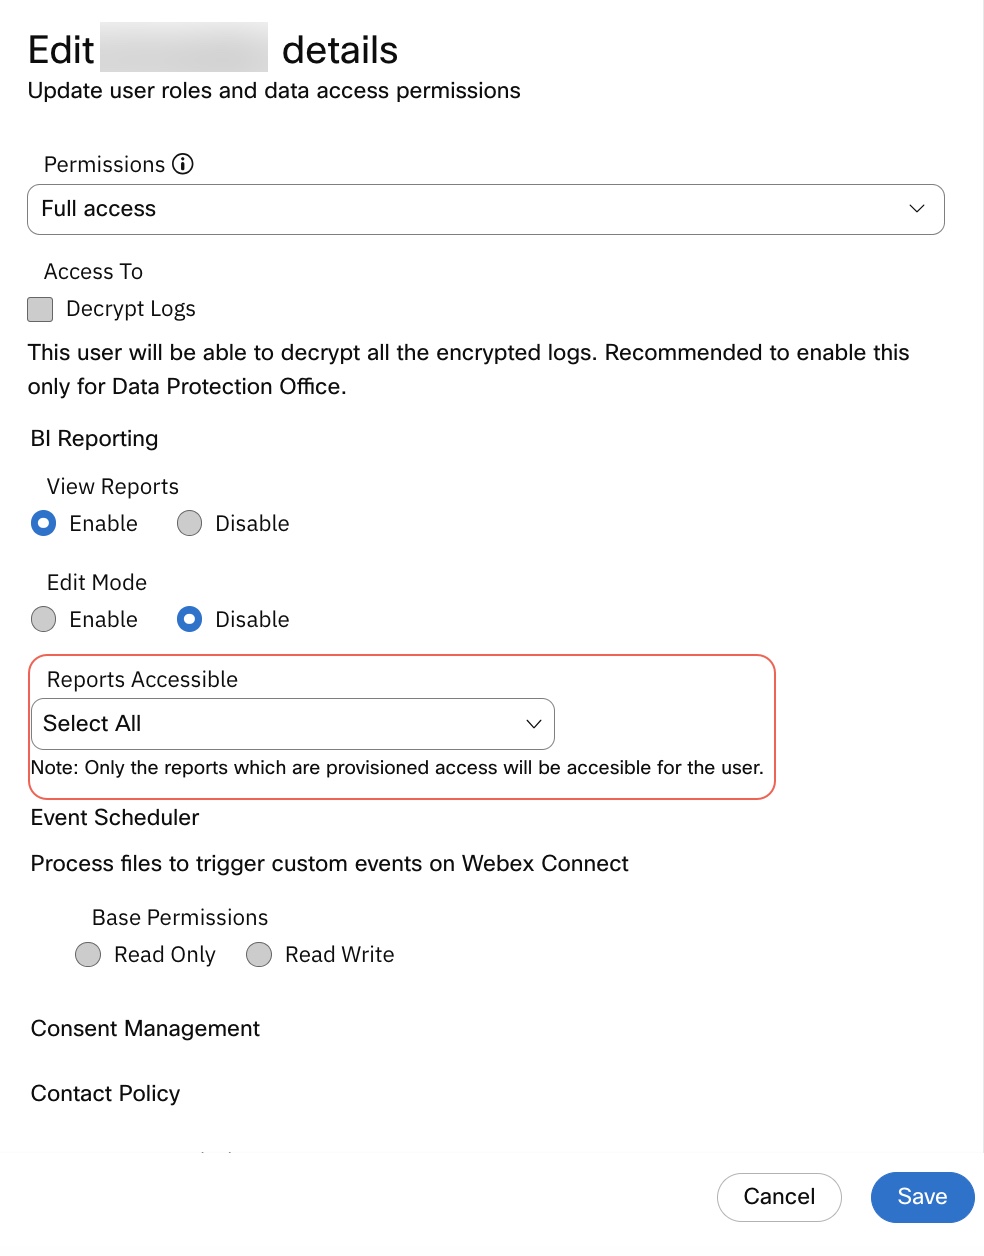
Screenshot displaying how to edit user roles for access to Logbooks
Logbook Error Codes
For more information about logbook error codes, refer this link.
Voice Channel Header Descriptions
| Header Name | Header Descriptions |
|---|---|
| Transaction ID | This is the transaction id of the node |
| SourceTID | Unique Transaction of the event/channel/integration that triggered the flow/rule |
| Call TID | Unique transaction ID of the inbound/outbound node |
| Correlation ID | Correlation Id configured for reference in the flow/API |
| Source | Number which has triggered the call |
| Channel | Channel name which is used in the transaction. In this case it will be voice |
| Asset | The number from which the call is made. This is the asset purchased or added to your Webex Connect tenant |
| Asset Name | NA for voice |
| Event Description | The description of the event that triggered the channel |
| Date | Date on which the transaction was triggered |
| Time | Time on which the transaction was triggered |
| Timezone | Timezone of the connect tenant deployment |
| MSISDN | The customer number to which the call is made |
| FromNumber | The number from which the outbound call is initiated |
| ToNumber | The number or batch of numbers to which the outbound call is made |
| Trombone Release | When the party B (agent) exits the call. |
| Trombone Connected | When the Webex Connect platform sends an outbound call to the customer and the customer asks to talk to an agent |
| Duration | Call duration in seconds |
| Call Type | Denotes if the call type is Inbound or Outbound or Trombone |
| FlowName | Name of the flow |
| FlowId | Unique id of the flow |
| OfferedAt | The timestamp when the call is initiated |
| AnsweredAt | The timestamp of when the call was answered |
| EndedAt | The timestamp of when the call was ended |
| MachineDetected | This denotes if the call was answered by Voicemail. If Voicemail is detected then value will be 1. |
| CallDuration | Contains the call duration in seconds |
| CauseCode | This contains the call disconnect cause code. Click here for all the cause codes |
| CauseDescription | This contains the call disconnect reason. Click here for all the cause codes |
Updated 6 months ago
