Q&A bots
Q&A Bots
Q&A bots are knowledge-driven bots whose knowledge base consists of a Q&A corpus. This corpus is used to resolve any incoming user utterances by providing the appropriate response.
Creating a Q&A bot
Use this procedure to create a Q&A bot.
- Log in to the Bot platform. The dashboard screen appears.

Create a bot
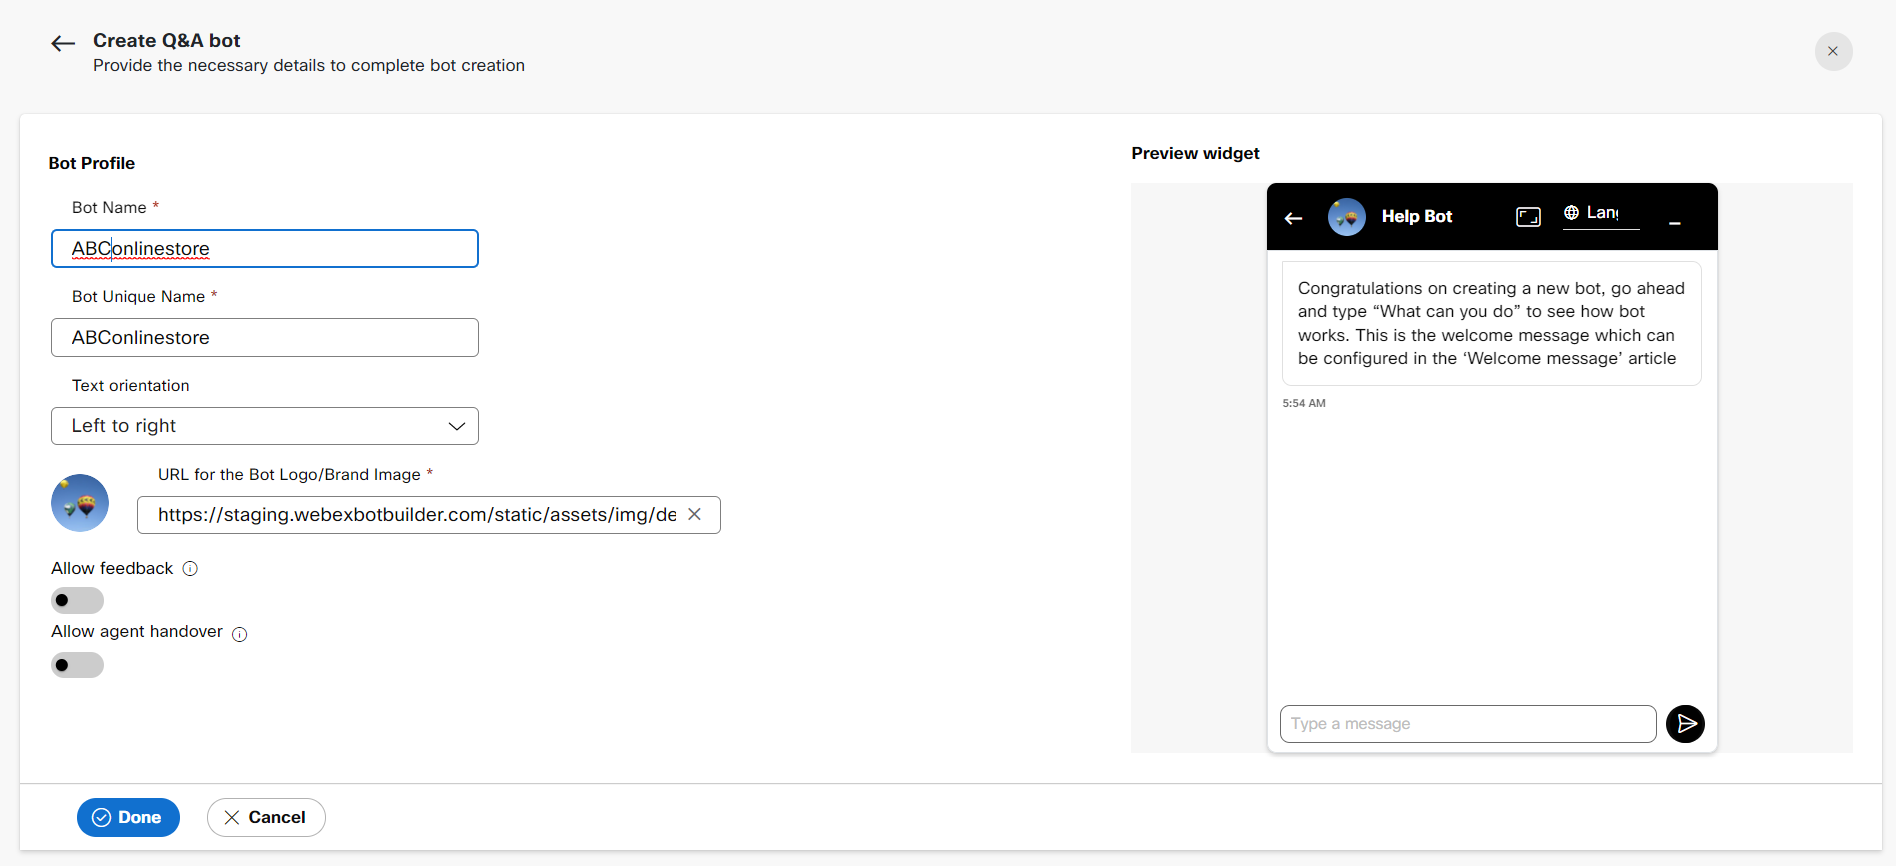
- Click +New Q&A Bot. The Bot Profile screen appears.
Note: Navigate to the Task Bots, Smart bots, Router bots and NLP Pipelines tabs to create task, smart, router and NLP Pipeline bots respectively.
3. Specify this information:
Bot Name
The name of the bot.
Bot Unique name
A unique name for the bot.
Text orientation
Display of text format on the platform. Possible values:
Left to right (English)
Right to left (Arabic)
URL for the Bot Logo/Brand Image
The URL from where the bot logo or image defaults.
4. Select the Allow Feedback toggle to request feedback from consumers for every bot message.
5. Select the Allow agent handover toggle to transfer the conversation to a human agent when a consumer wants to talk to an agent.
6. Click Done. The bot is created successfully, and you are redirected to the Knowledge base screen.
For Q&A bots, all developers need is a set of training data in the form of questions, its variations, and the answers. This is a powerful, yet simple way to build bots without writing any code. The two main sections required to build a functioning Q&A bot are:
- Bot configuration or Settings
- Knowledge base or Articles
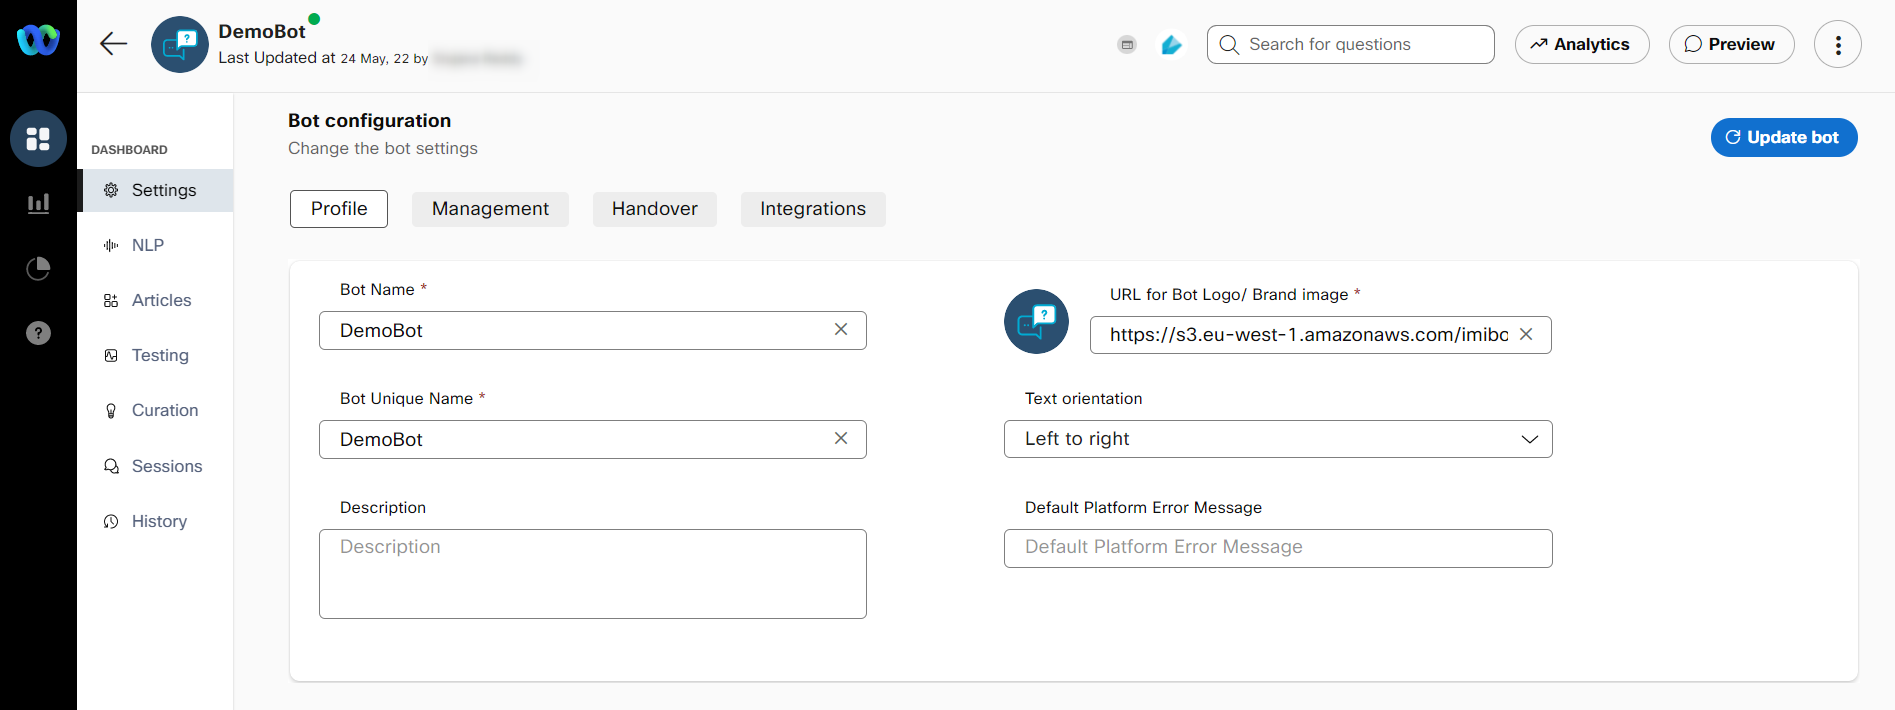
In addition to these sections, Q&A bots have NLP section for configuring a text-processing pipeline and additional knowledge bases. Q&A bots also have the following sections for bot management:
Settings (Q&A bots)
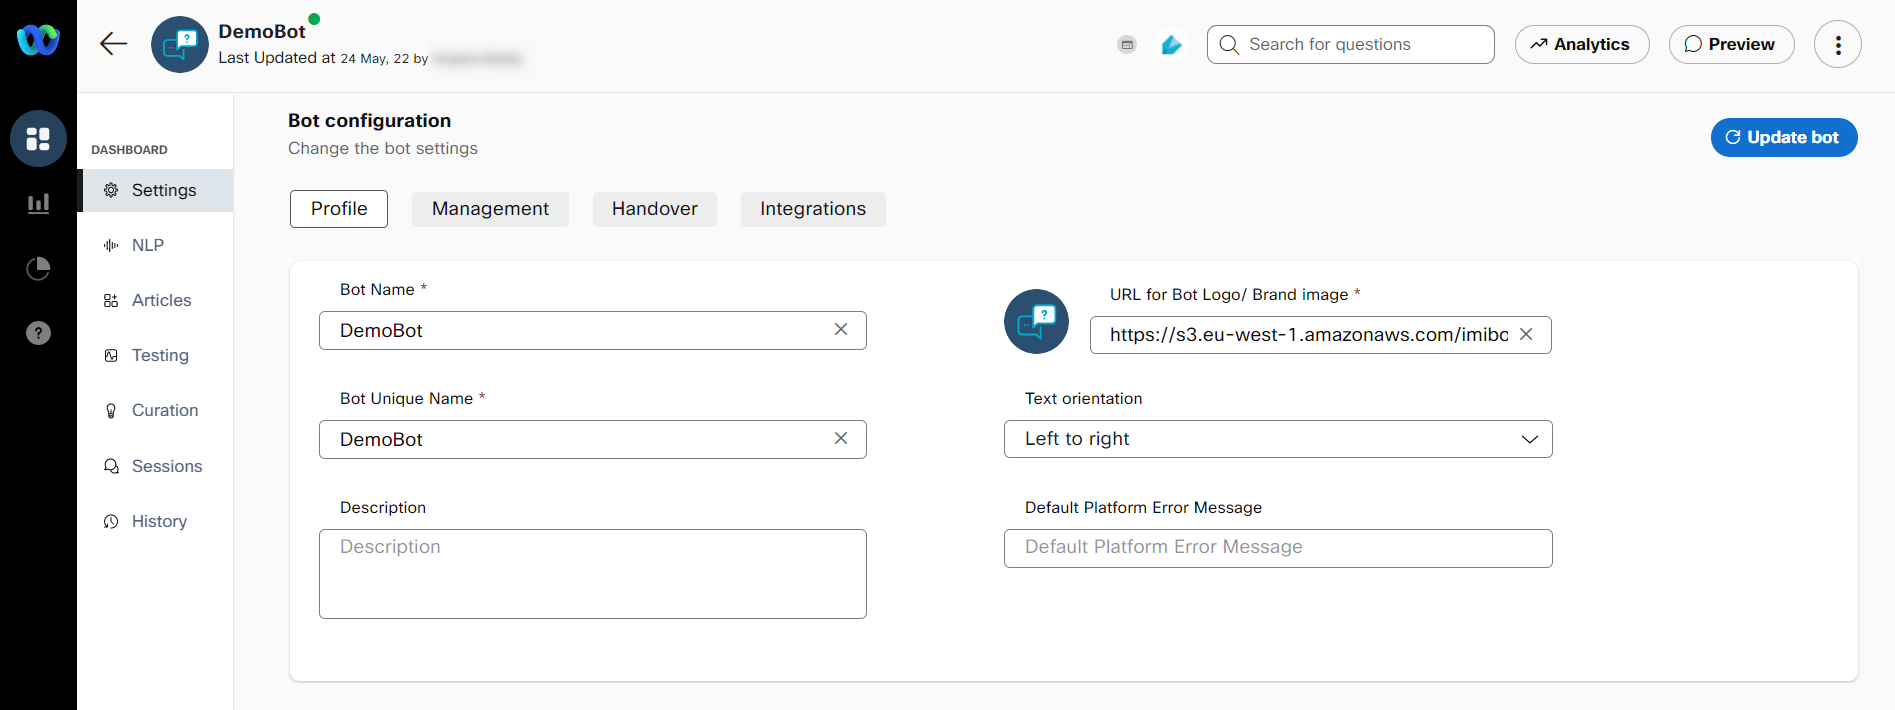
The Settings section has all the bot level settings. All these configuration information has been further categorized into 5 sections:
- Profile
- Management
- Handover
- Integrations
Profile
This tab contains settings related to the bot’s profile, which captures all vital details about the bot.
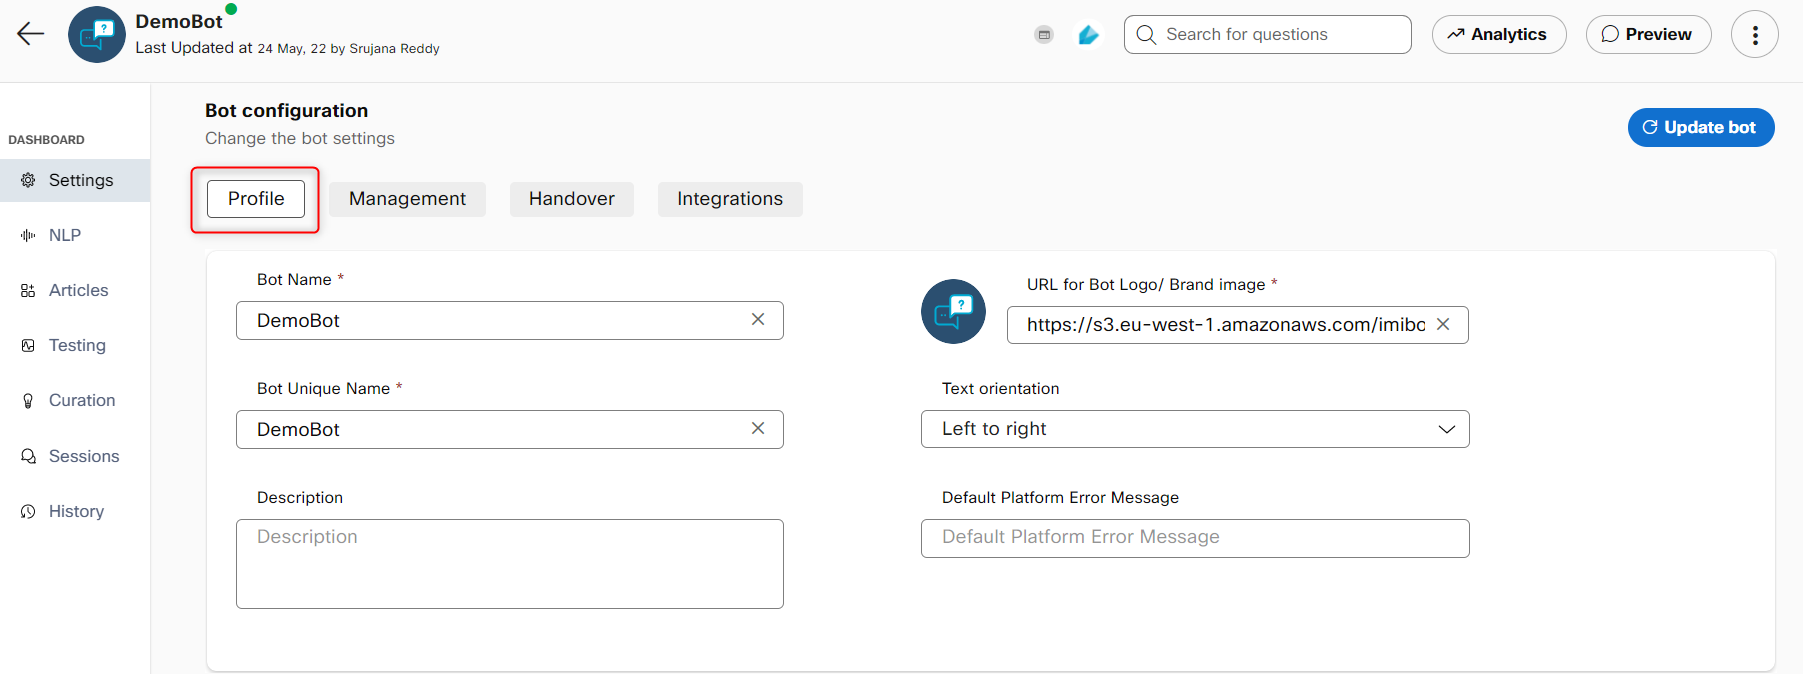
Profile settings of a bot
The following table describes about each field on the Profile tab:
| Field | Description |
|---|---|
| Bot Name | Display name for the bot. When the bot is accessed, the name of the bot will be displayed in the bot chat window beside the bot logo. Also, this is the name by which the bot is identified in other sections on the platform such as in Analytics, Reports, etc. |
| Bot Unique Name | A unique name for the bot that appears in the Bot URL that is used to chat with the Bot. This name is auto-generated from the Bot Display Name but can be edited by the developer. The Bot Unique Name needs to be unique across an enterprise. |
| Bot Description | Additional information about the bot functioning. |
| URL for the bot/Brand Image | The URL for the bot logo. The logo is displayed at the top left corner beside the bot name in the bot chat window. |
| Default Platform Error Message | This is the message that bot will respond with whenever it encounters an input that is not covered by its scope or 'common sense' intents |
| Text orientation | Display of text format on the platform. Possible values: Left to right (English) Right to left (Arabic) |
| Time zone | Time of a particular country/city. This field is displayed only on the Profile tab of task bots. |
Management
This tab captures information about bot sessions' functioning and closing.
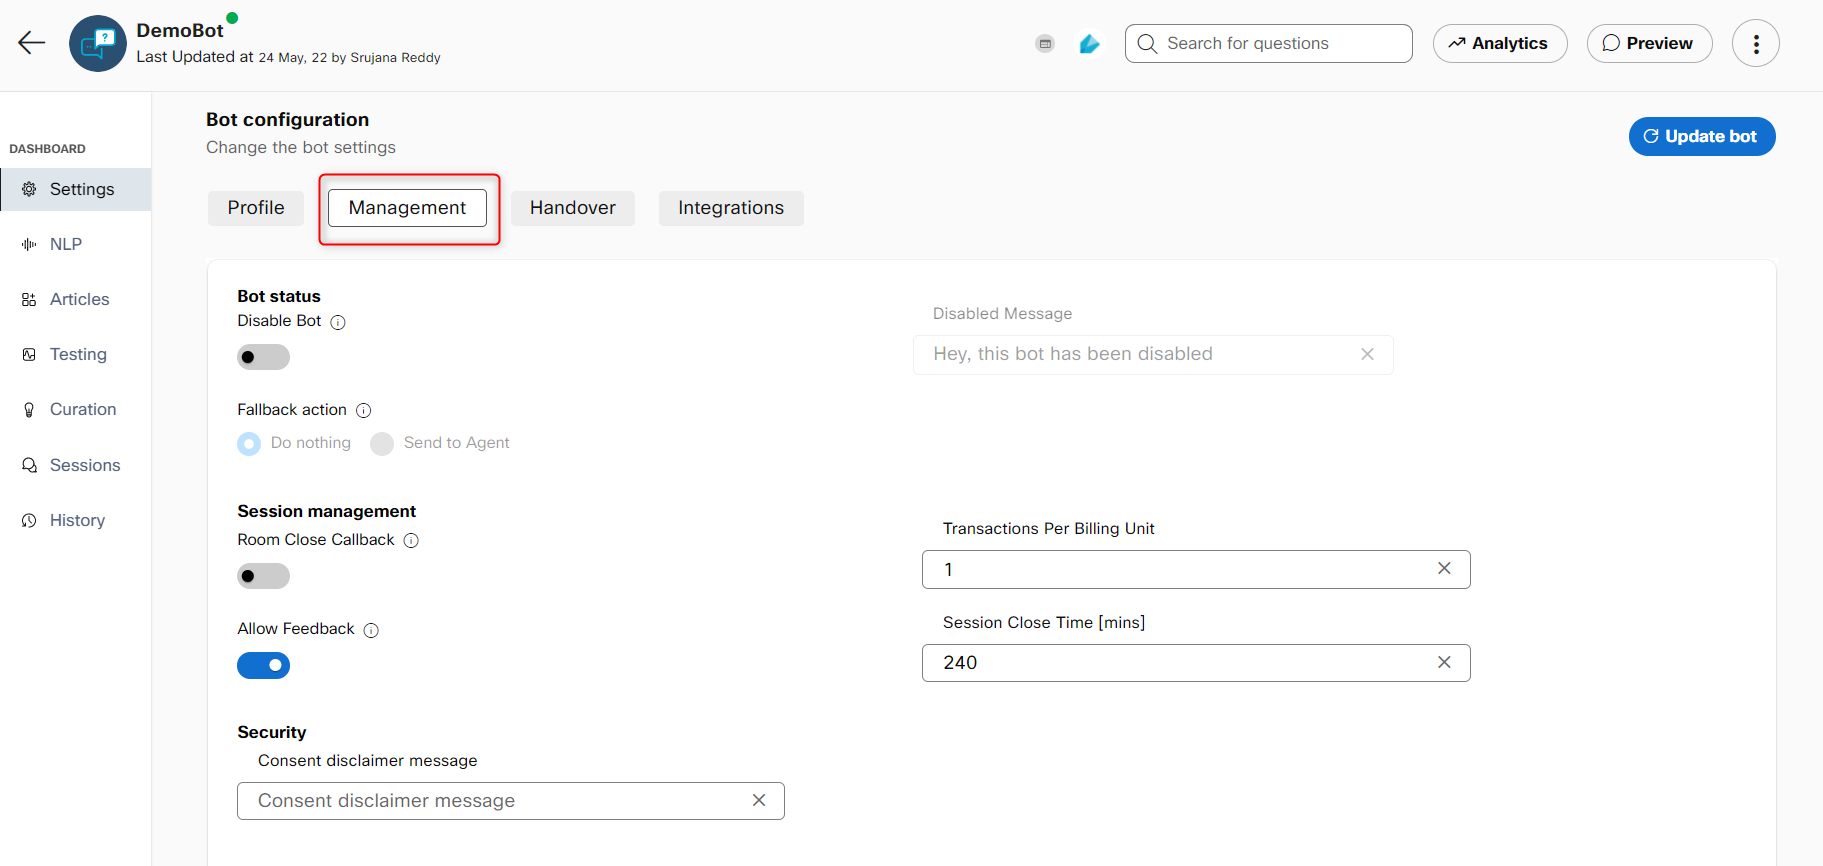
Management settings
The following table describes about each field in this tab.
| Field | Description |
|---|---|
| Disable bot | Turn on this toggle to make the bot unavailable. |
| Disabled message | The message that must be displayed to consumers who try to access the disabled bot. Note: This field is enabled only when the Disable bot toggle is turned on. |
| Fallback action | Select this option to take an appropriate action on the incoming messages to the bot. Possible values: Do nothing: No action is taken. Send to Agent: The chat is handed over to an agent based on the incoming messages to the bot. |
| Room Close Callback (Session management section) | Trigger callback API before a room is about to close. |
| Allow Feedback | Turn on this toggle to request feedback from users about usefulness of every bot reply. The consumer is given options to determine whether the bot response was useful or not after every bot message in a session. |
| Session close time (mins) | The session time-out (in minutes), after which the session will be closed automatically in the scenario of user inactivity. The default value is set at 240 minutes |
| Transactions Per Billing Unit | The number of transactions that can be performed for every billing unit. |
| Consent disclaimer message (Security section) | The disclaimer message for the consent. This field is available only if you enable the Advanced data protection option. This option has moved to the backend. When this is set to True, you can view this field. |
Handover
This section contains settings related to the bot’s handover, which decides when a user will be handed over to a human agent.
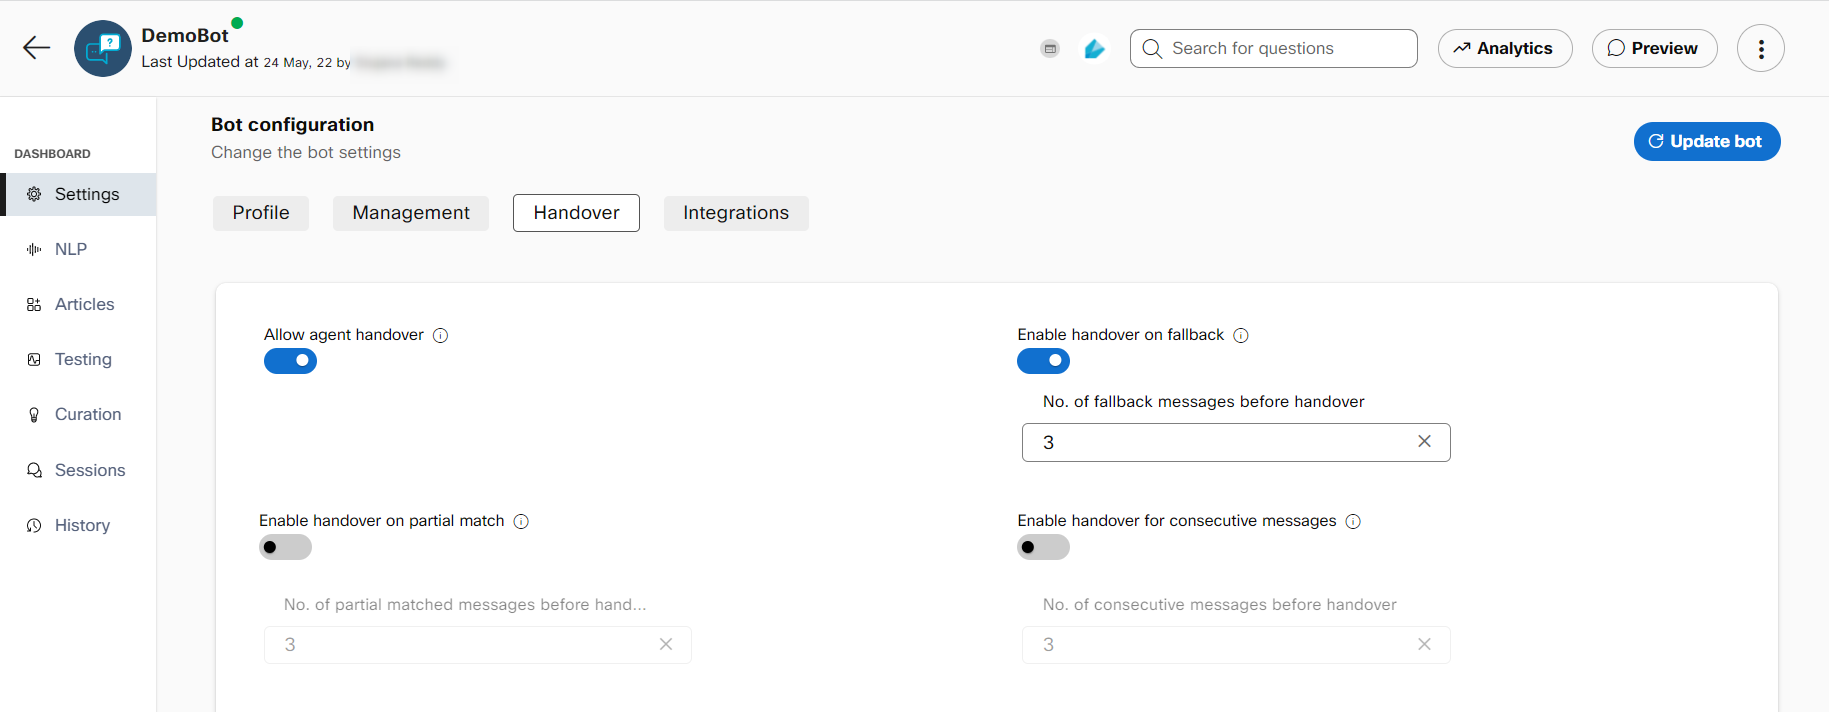
| Field | Description |
|---|---|
| Allow agent handover | Transfer the user to an agent when the bot isn’t able to handle their queries or if they explicitly ask for it. When the agent handover toggle is disabled, developers can use the response of this article to specify that no human handover provision is available. In such cases, subsequent consumer messages will be addressed by the bot even after invoking ‘Talk to an agent’ article. Enabling the agent handover setting will hand over consumers to the configured customer care platform on invoking this article. If the bot corpus is exported as a CSV, the file will not contain this article. |
| Enable handover on fallback | A number of consecutive fallback messages in a session can trigger an agent handover. This number is configurable in the provided text box. |
| Enable handover on partial match | A number of consecutive partial matches in a session can trigger handover. This number is configurable. |
| Enable handover for consecutive messages | Consecutive repeated messages in a session can trigger agent handover. The number of repetitions needed for this trigger is configurable. |
Integrations
The Integrations tab provides the bot developer with the ability to quickly deploy
the same bot across several channels such as Skype, Line, Viber, Facebook Messenger,
Slack, Alexa, Google home and several others.
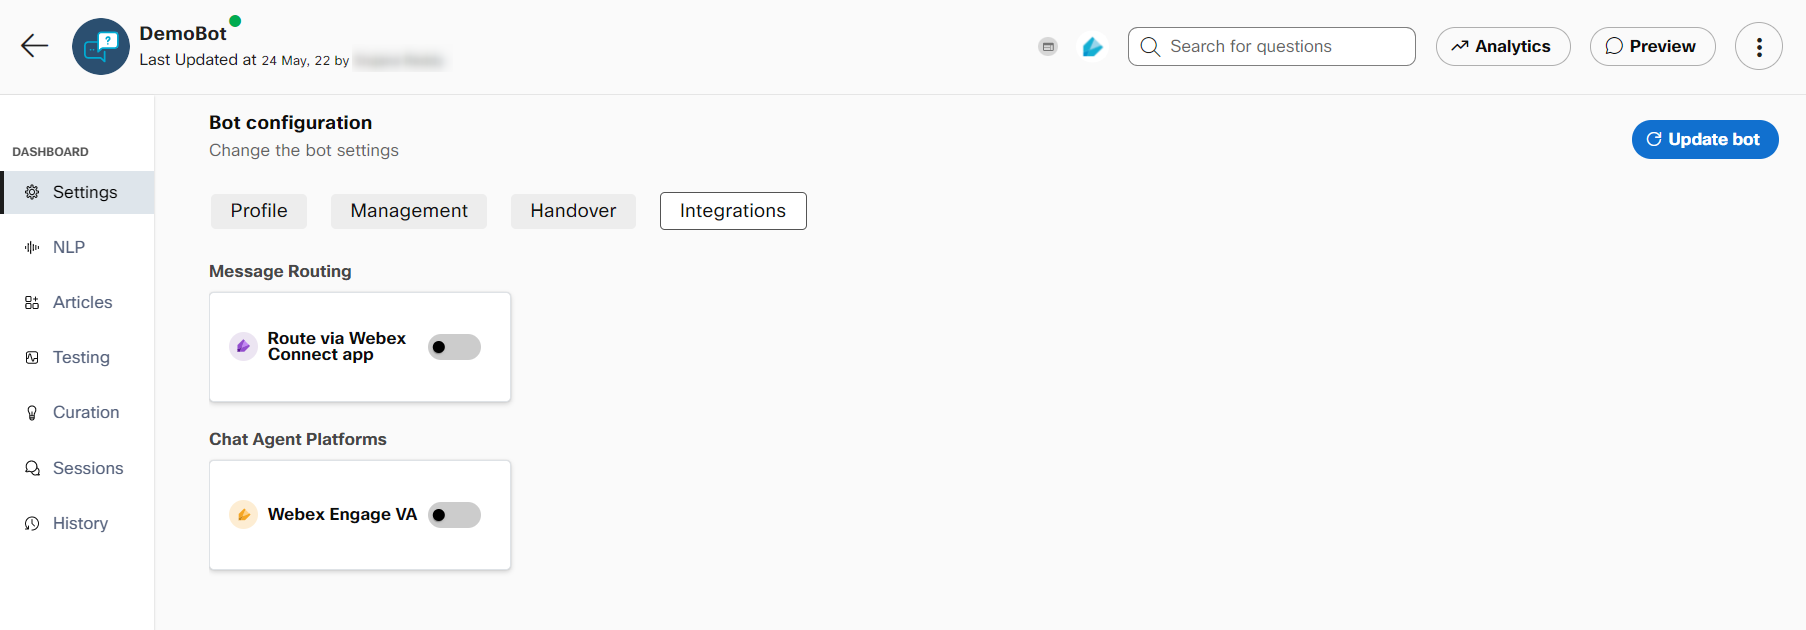
Route via Webex Connect app
Real-world solutions will require DB lookups, fulfilment, and communication with external systems, which is achieved through connect flows. Route via Webex Connect app toggle is used as a message routing option in both Q&A and Task bots to test connect flows end-to-end for the web channel.
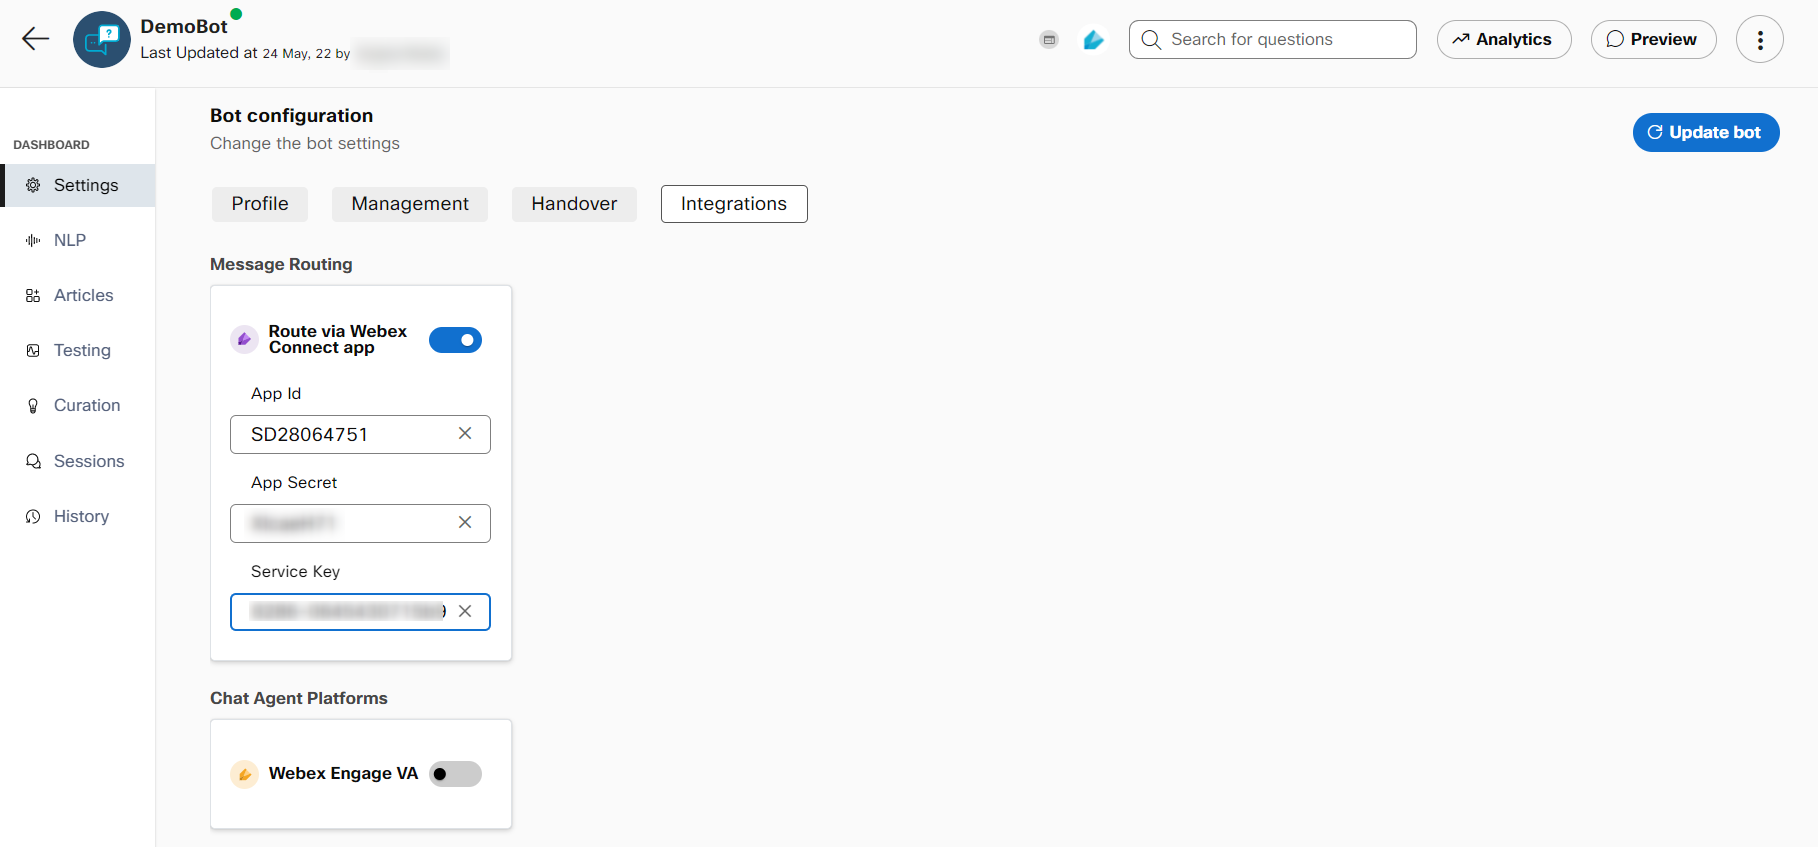
When this is toggled off, the bot preview will query the bot. If this toggle is enabled, you can configure the app created in Webex connect on the Webex Bot builder by providing the app ID, app secret (client key), and service key in which bot flows are created. Once these details are provided and the bot is updated, any message sent to bot preview will be redirected to connect app and service that is configured. The response in the bot preview will depend on the connect flow that is configured . This allows you to test and share (via preview link available in the Bot builder) the overall connect flow.
Routing via Webex Connect app
Use this procedure to route consumer messages via Webex Connect app.
- Select a specific Q&A or task bots whose consumer messages must be routed via imiconnect app from the dashboard screen of the Bot builder. The Bot Configuration screen appears.
- Click the Integrations tab. The following screen appears.

- Enable the Route via Webex Connect app toggle. Enabling this toggle displays the following fields.
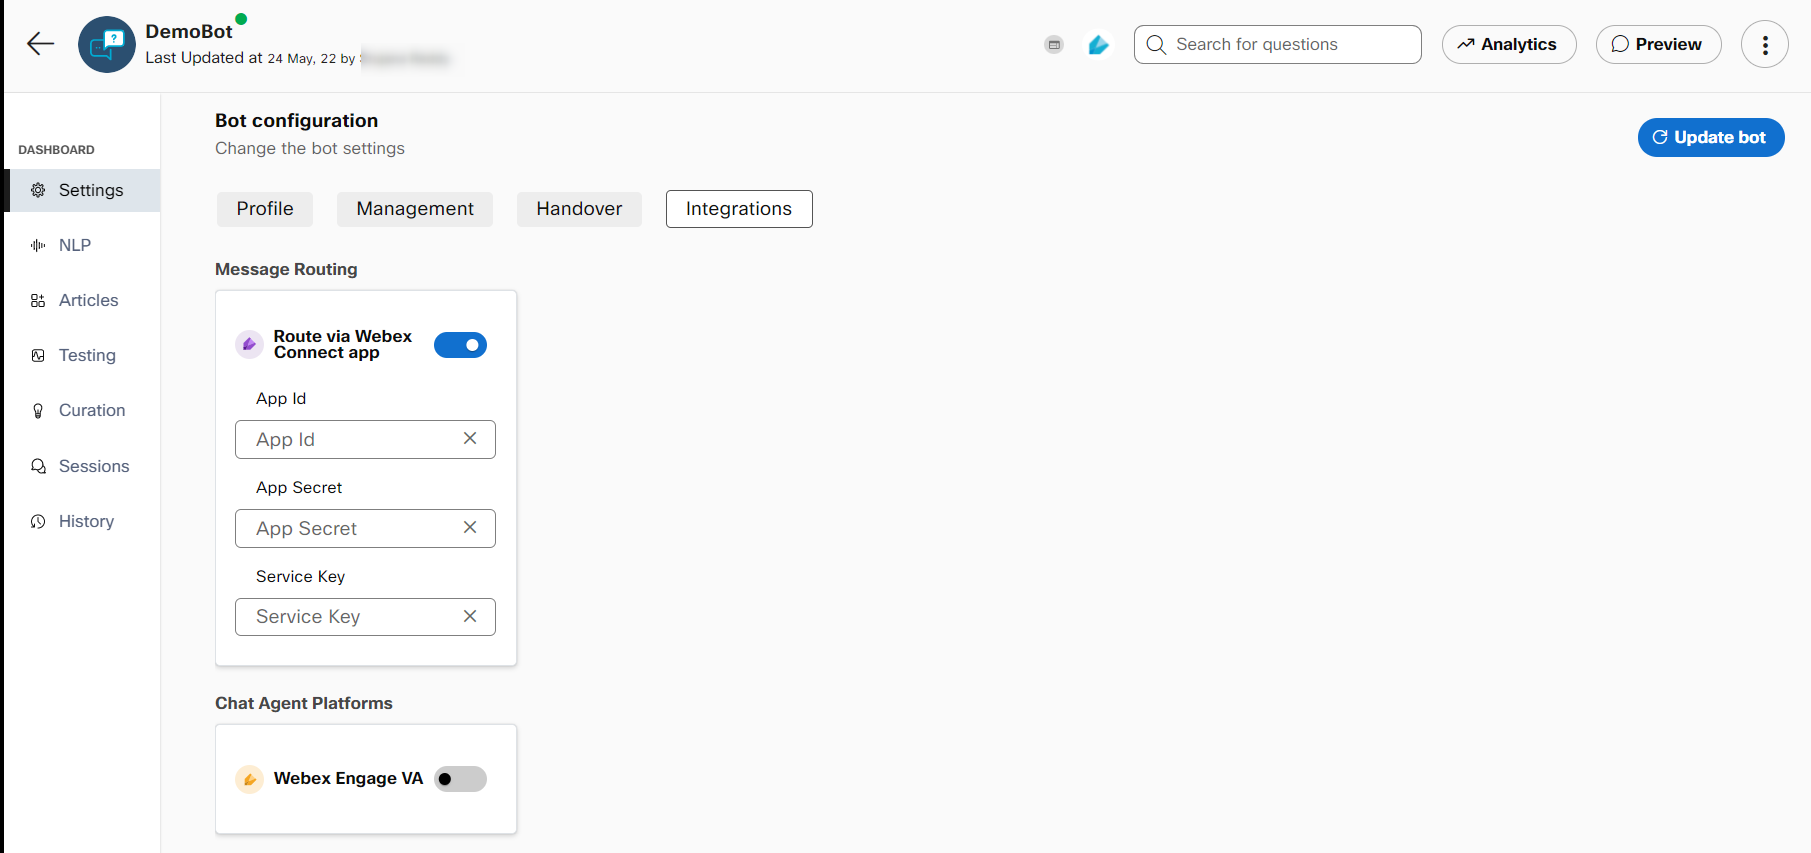
Fields displayed by enabling the Route via imiconnect app toggle
- Specify this information:
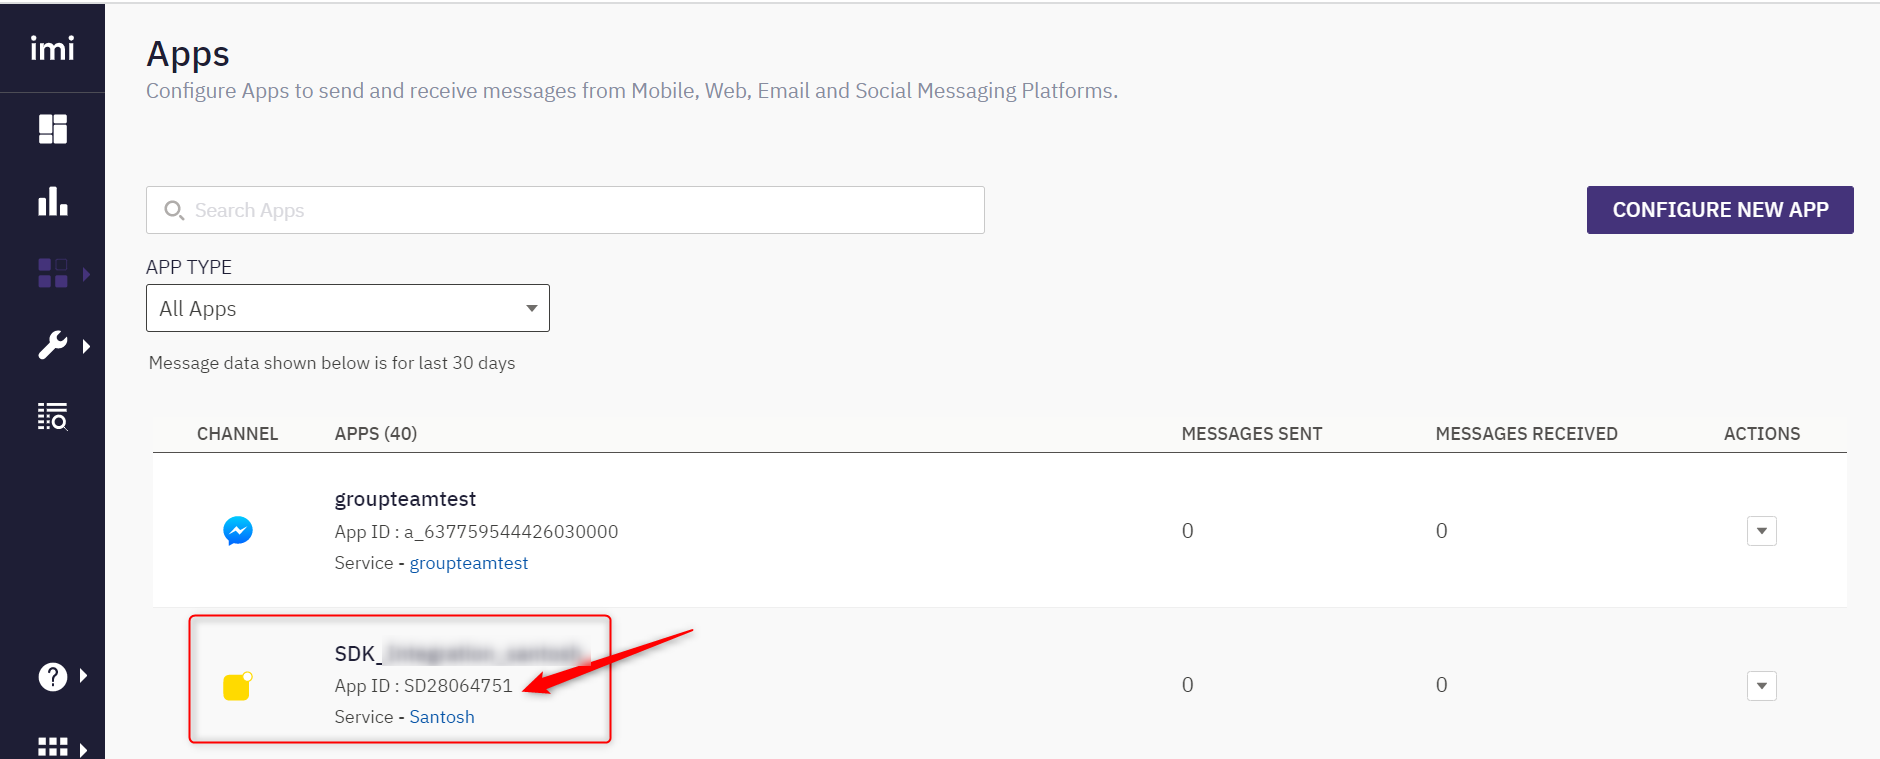
App Id
The App Id of the digital channel. This Id is obtained from the imiconnect application.
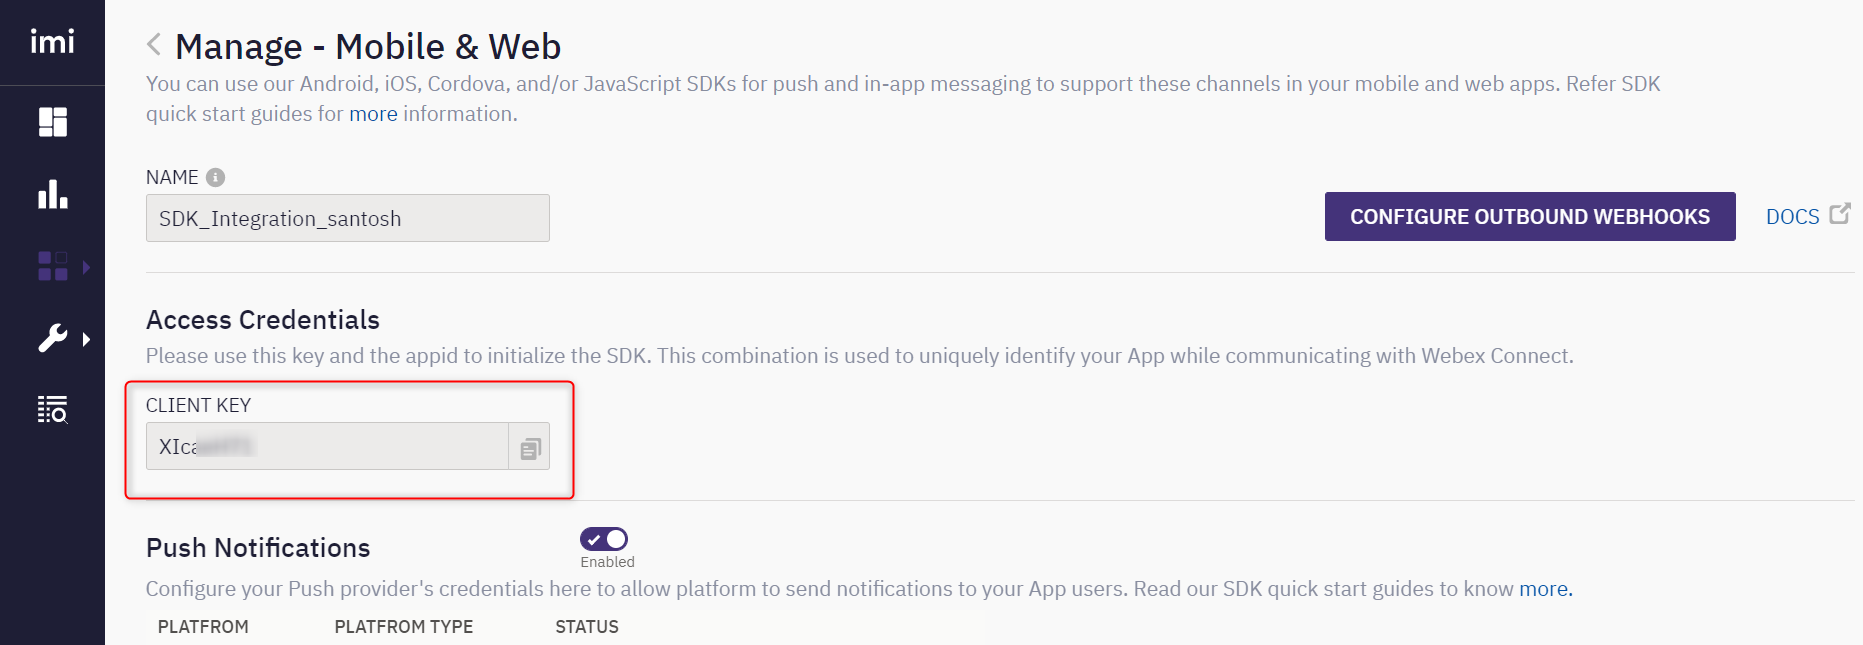
App Secret
The client key that is obtained from the imiconnect application.
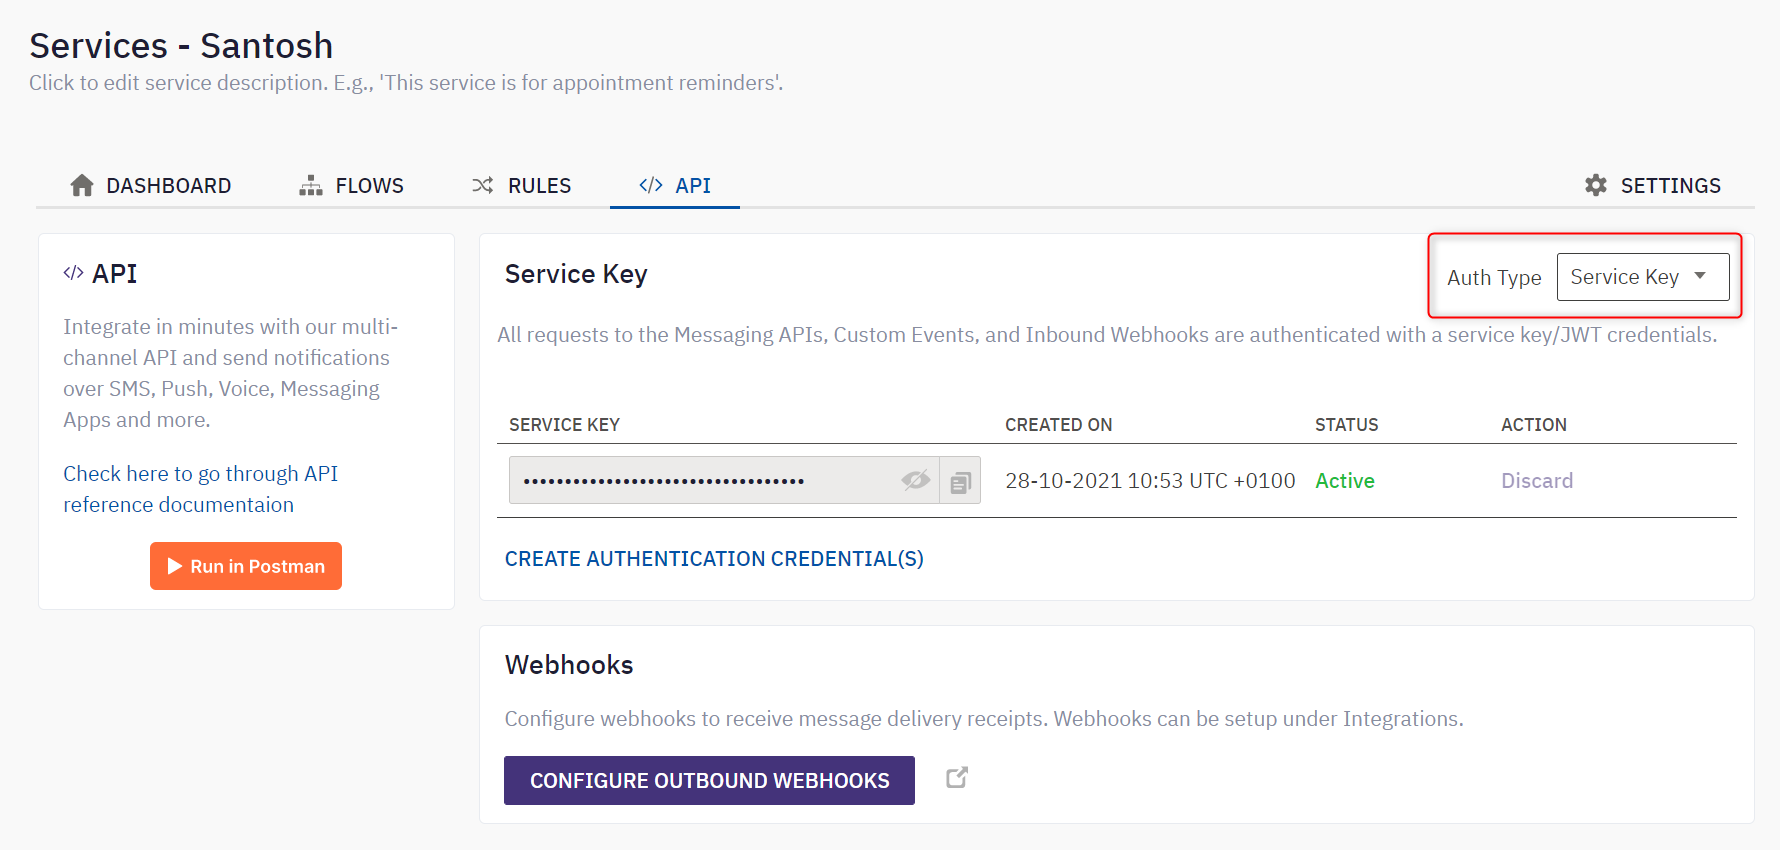
Service key
The service key in which the bot flows are created in imiconnect.
- Click Update Bot. The following window is displayed prompting the disablement of Allow feedback toggle on the Management tab of the Bot configuration screen. This toggle is disabled automatically, enabling the route via imiconnect app toggle. As long as the Route messages via imiconnect app toggle is enabled, you cannot use the Allow feedback toggle.
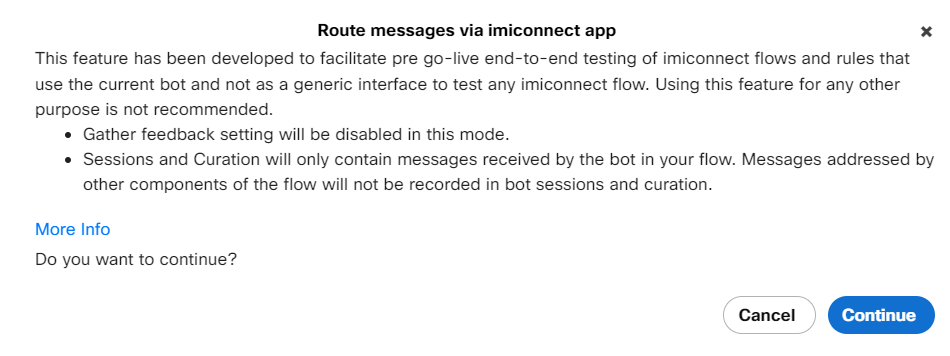
- Click Continue.
Once the bot settings are updated, you can view the icon indicating the enablement of Route via imiconnect app toggle on the bot dashboard screen as follows
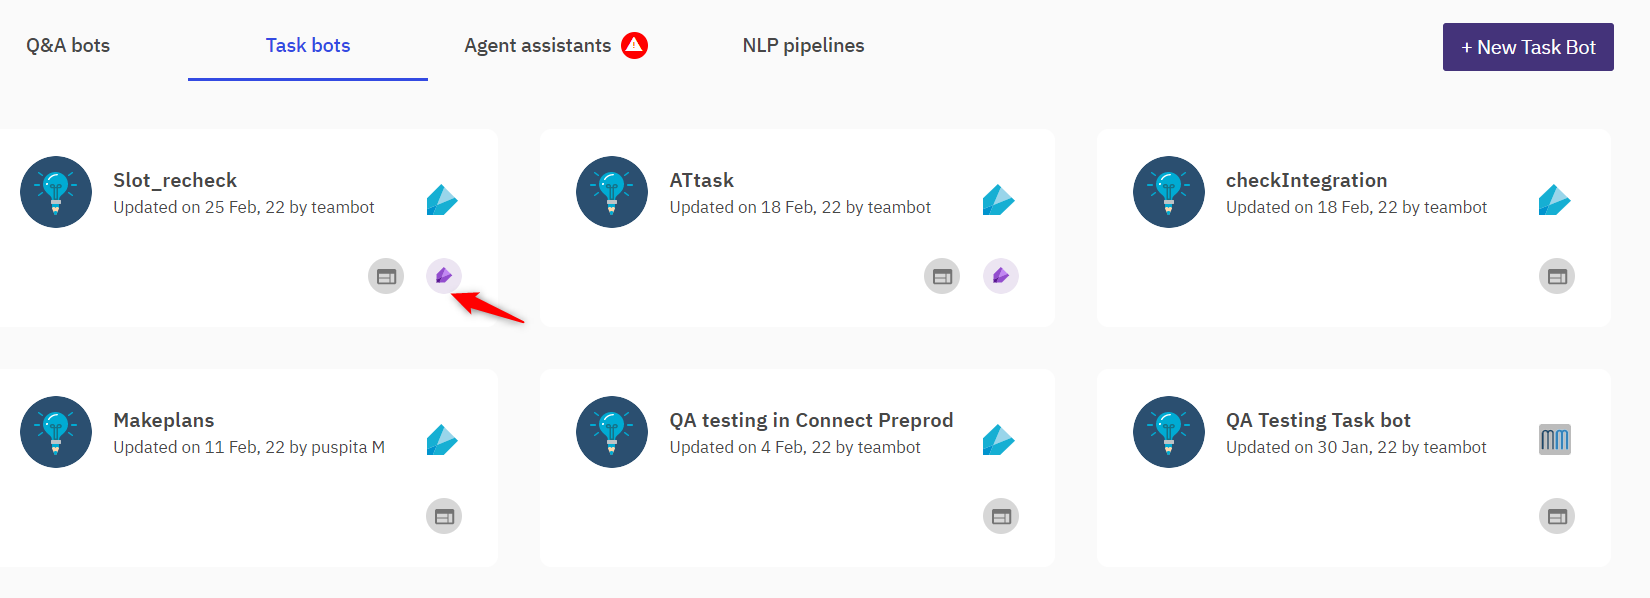
Icon indicating the Route via imiconnect app toggle enablement on the bot dashboard screen
An announcement is logged on the preview widget of the bot if the imiconnect flow or rule is configured in the bot's setting.
For more information, see routing via imiconnect app
For more information, see Using bot as a virtual agent in Webex engage
Articles
Articles form the crux of Q&A Bots. An article is the combination of a question, its variations & response to this question. Each article has a 'Default question' that serves as an identifier for that article in sessions, curation, and other places in the bot. All the articles configured in a bot together constitute the Bot’s knowledge base or corpus. Every user’s query is compared to this knowledge base and the answer that returns the highest confidence level is returned to the user as the response of the bot.
Rasa and Mindmeld NLU engines require a minimum of two training variants (utterances) for an article to be a part of a corpora’s trained model. In the Q&A bot, if Rasa or Mindmeld NLU engine is selected and if an article has less than two variations, Train and Save and Train buttons are made unavailable. When you rest the pointer on these unavailable buttons, a message is displayed to resolve the issues before training. There is also a warning icon displayed corresponding to the article with issues. The issues are resolved by adding more than two variants for an article. Once the issues are resolved, the Train and Save and Train buttons. are made available. Having two variants is not applicable for the default articles – partial match message, fallback message, and welcome message.
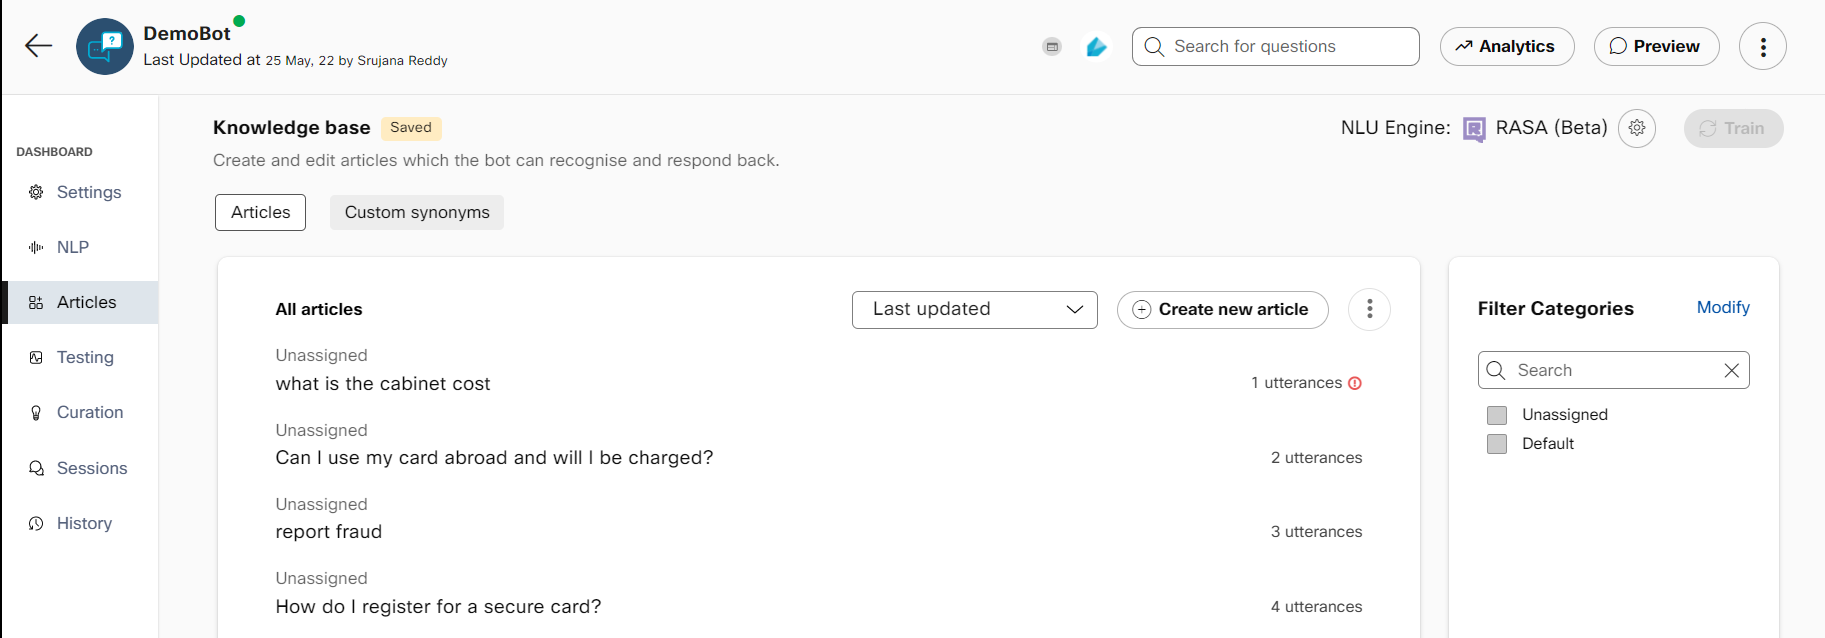
Less than two variants in an article
The response designer page covers different types of responses available in the Response portion of each article and how they can be leveraged for a rich channel-aware user experience.
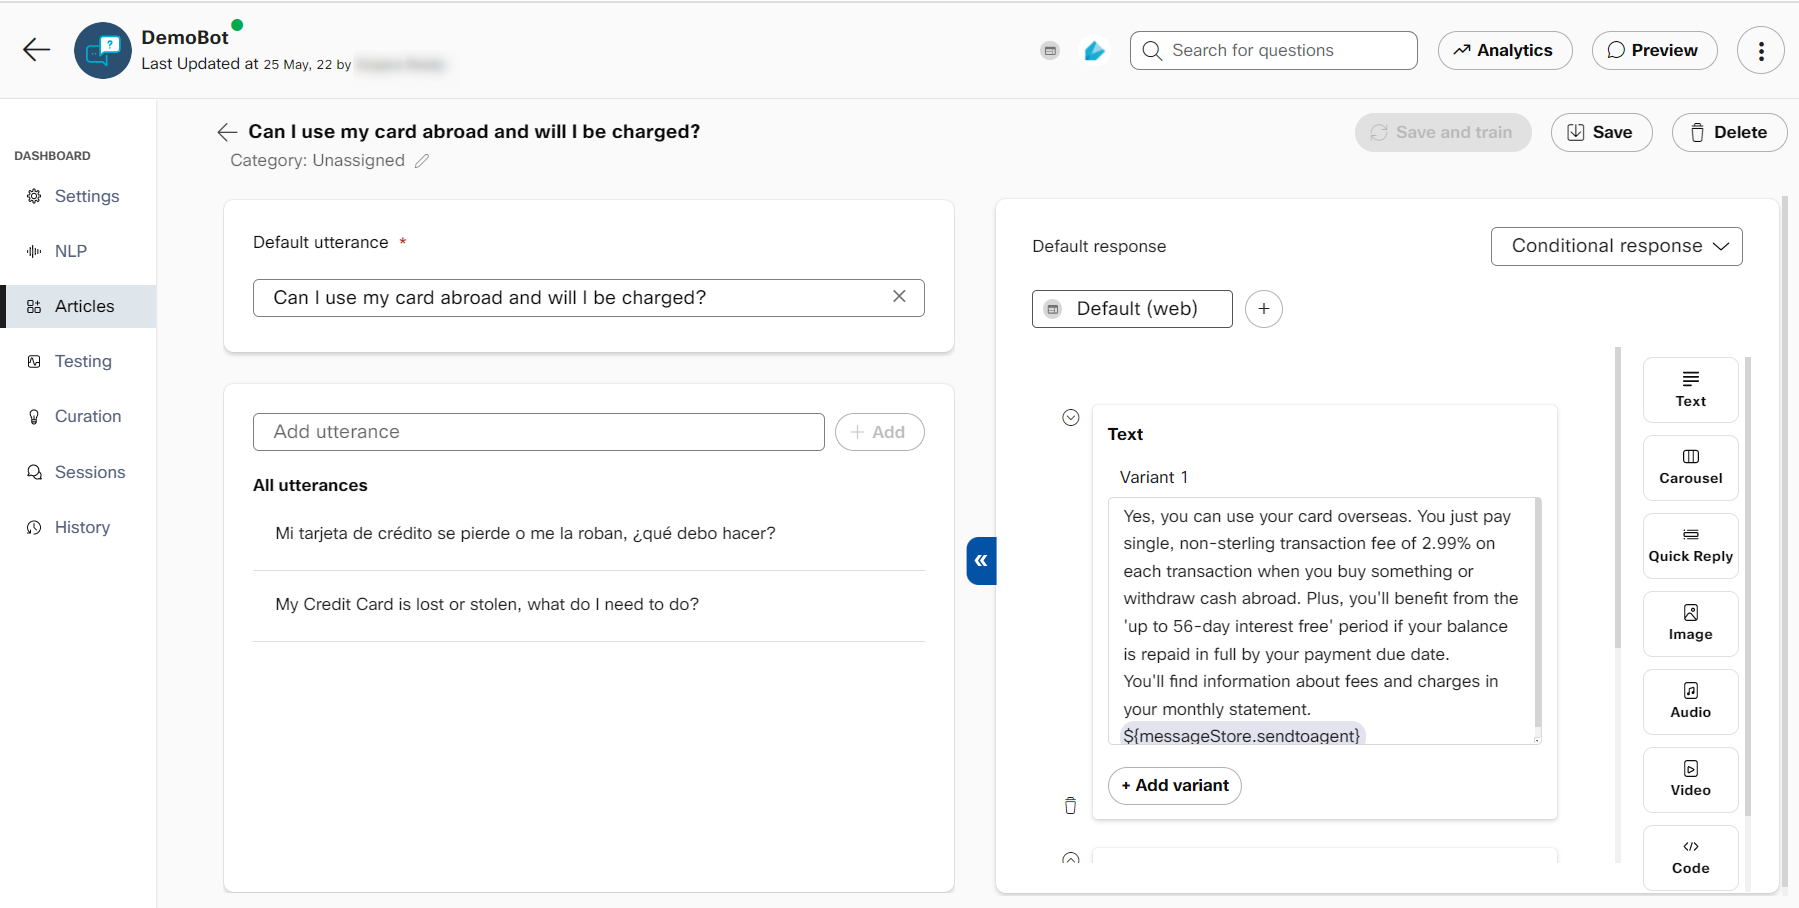
Each article is comprised of question variants (left) and the response for the article (right)
Users can classify articles into categories of their choice and all uncategorized articles are classified as ‘unassigned’. There are four default articles that are available for every bot, right from the time of creation. These are:
- Welcome message: This contains the first message that users will see when they converse with the bot.
- Fallback message: Contains response displayed when the bot is unable to understand the user's question.
- Partial match: When the bot recognizes multiple articles with a very small difference in scores (as set in handover and inferences settings), the partial match message is shown with matched articles as options. The text response displayed along with these options can be configured here.
- What can you do?: Here users can configure their bot's capabilities. This will be displayed whenever the end-users question bot capabilities.
In addition to these, the 'Talk to an agent' default article is added if agent handover from 'Handover and inference' settings is enabled.
All new bots also have four small talk articles that handle user utterances for:
- Greetings
- Thank you
- The bot was not helpful
- Goodbye
These articles and responses will be available in the bot knowledge base by default on creating a new bot and can be modified or removed altogether
Default articles
Welcome message, fallback message, talk to an agent, and partial message default articles cannot be deleted.
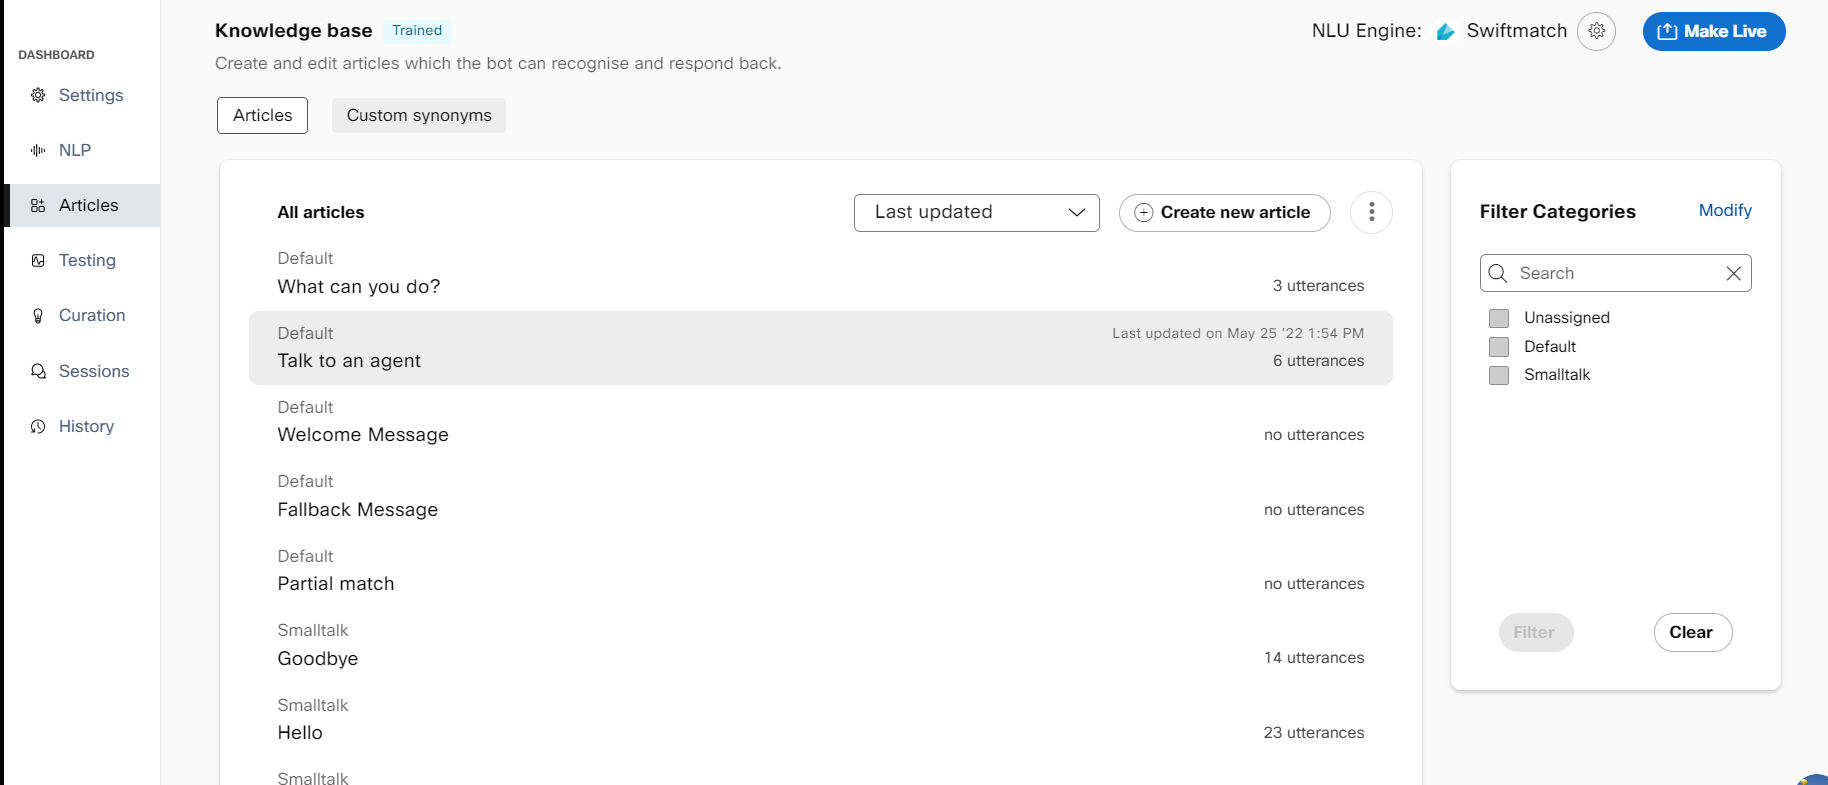
Bot corpus with default and small talk articles when a bot is created
Creating an article
Users can create articles one at a time on the platform UI or import them en masse from an excel file, a URL that contains their FAQs, or from IMI content catalogues.
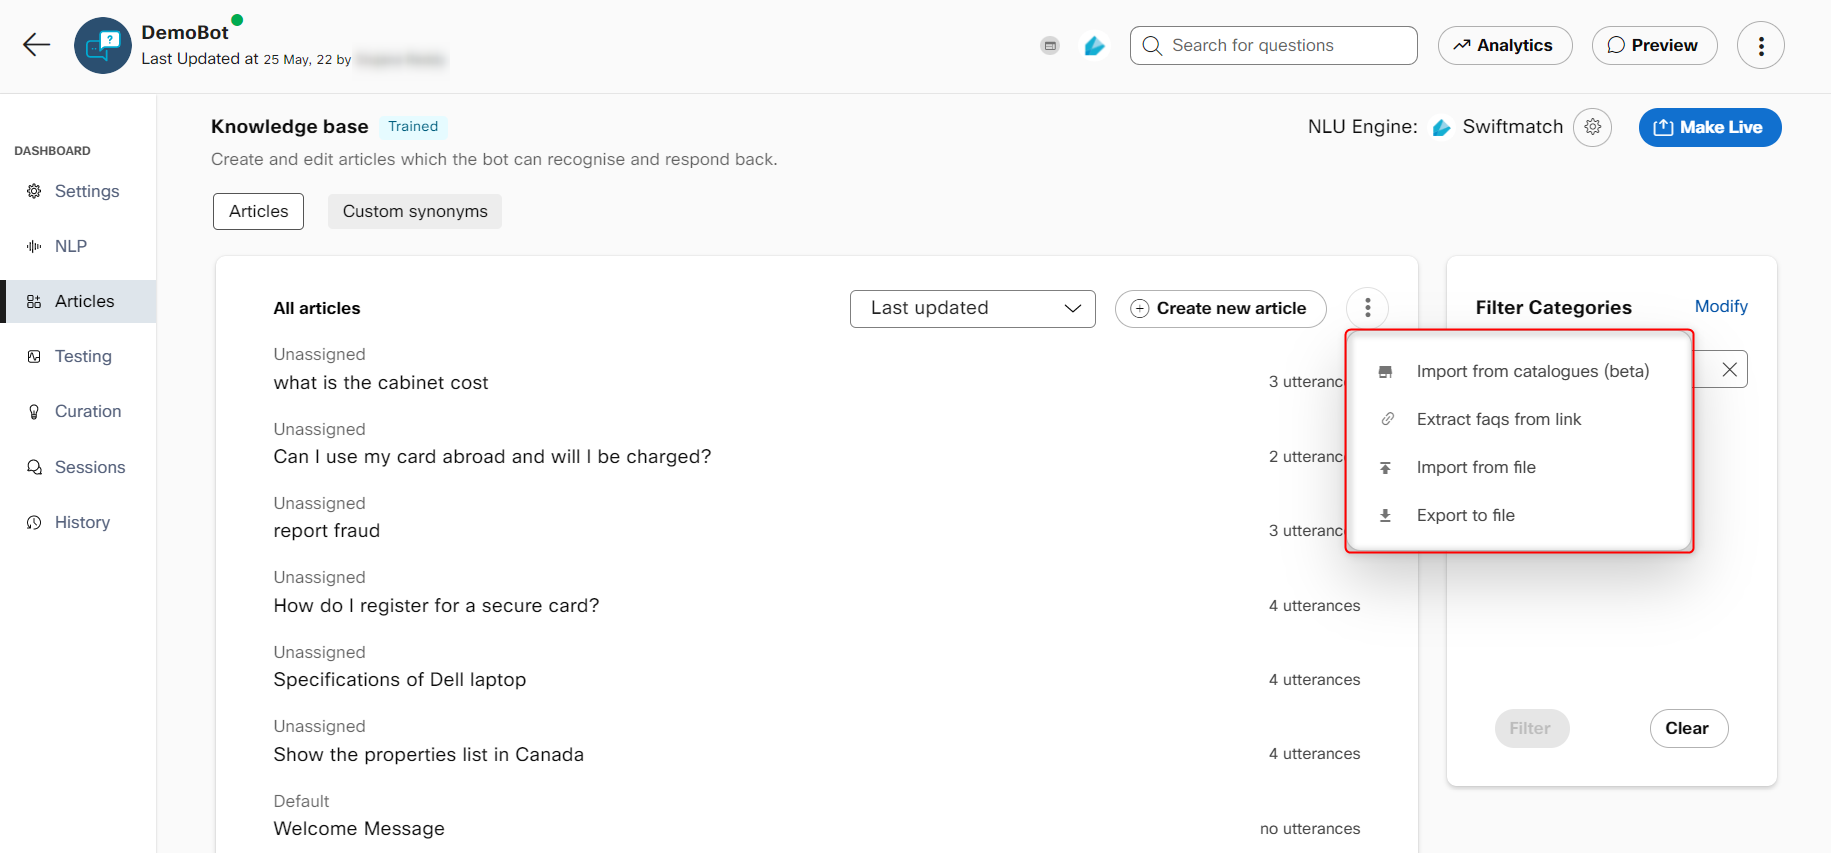
Different ways to create articles in a Q&A bot
Create article using UI
- Navigate to the articles section and click on + Create new article
- Fill in the default question and utterances that consumer may enter for this question on the left.
Note: The character limit for training utterances is 1000 whereas the character limit for the default utterance is 64. - Add the response that should be displayed for these questions on the right
- [Optional] Assign this category to an existing or new category by selecting a category on the top left. This step can be skipped here and performed when saving the article.
- Click Save on the top right or Save and train if you want to train your existing model with
the current corpus.
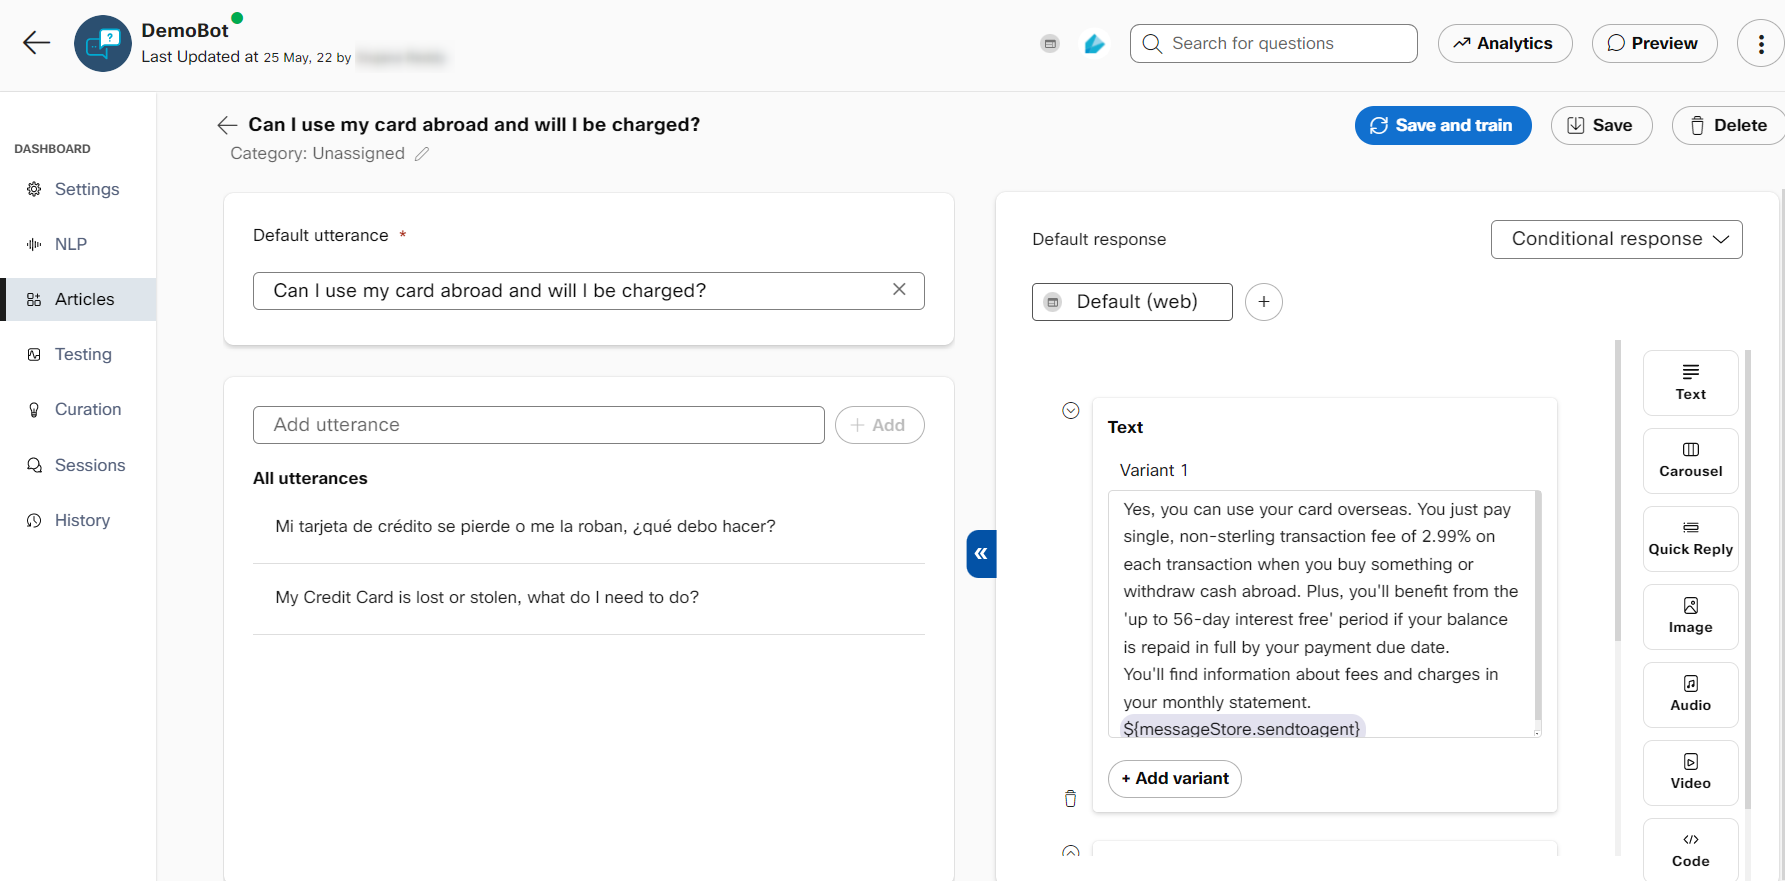
Question variants (utterances) and response configured during a new article creation.
Importing FAQs from link
- Navigate to the articles section and click ⋮ next to the 'Create new article' button.
- Click on the 'extract FAQs from link' option.
- Provide the link that contains your FAQs and click Extract
- Select the FAQs you want to add to your bot from the extracted FAQs and click Import.
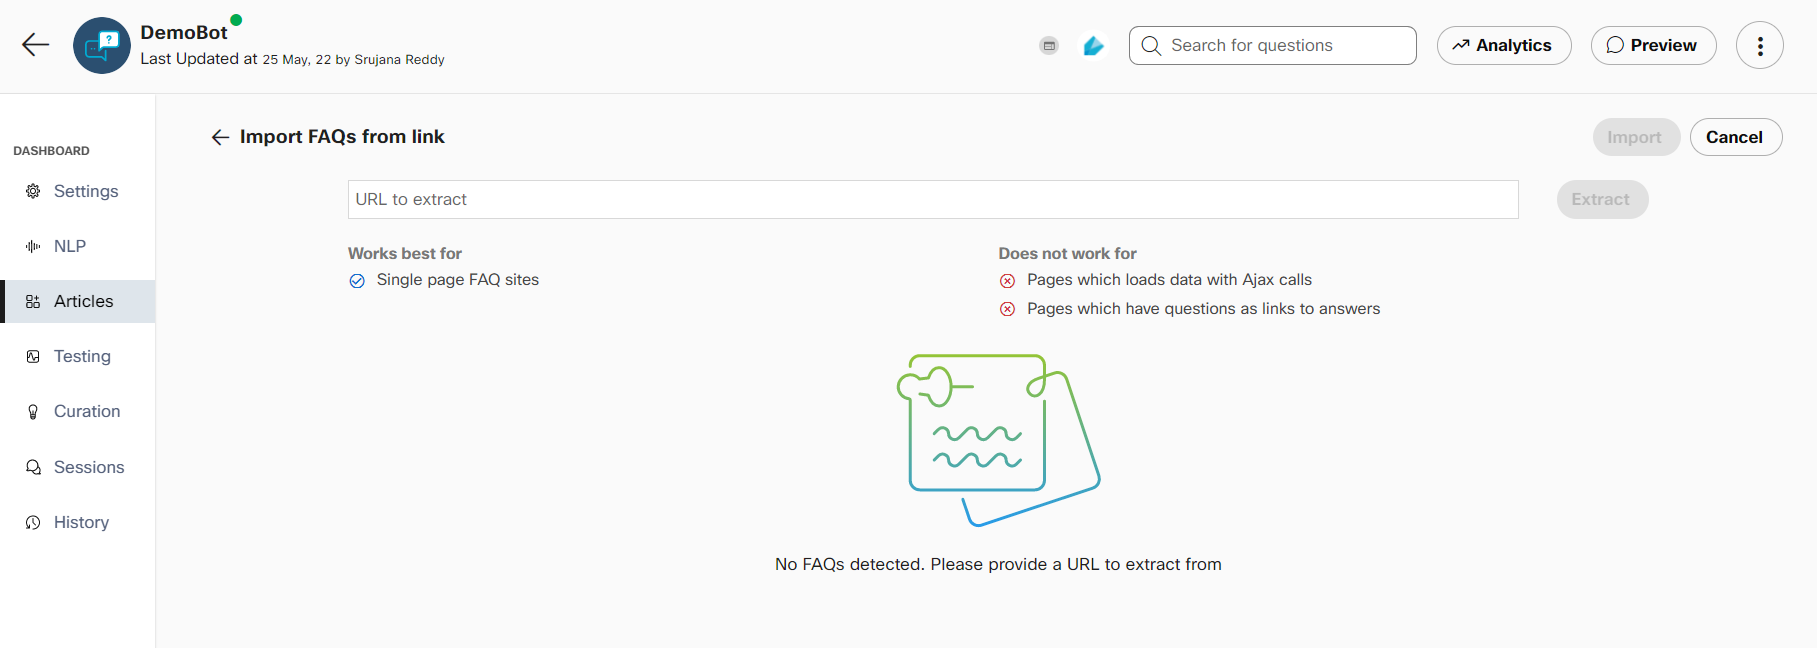
Import FAQs from link
Overwrite current articles
While importing articles from CSV, users have the option to merge new articles with the bot's existing corpus or to completely replace the current bot corpus with articles in CSV. To replace the current bot corpus, you can toggle the 'overwrite current articles' button on in the 'import articles from CSV' dialog box or the 'extract FAQs from link screen'.
Overwrite current articles
When overwriting the bot corpus, all articles except the four default articles present at the time of bot creation will be replaced. Small talk articles will also be replaced.
Importing articles from a file
- Navigate to the articles section and click Import from file. The Import from file window appears.
- Select the CSV radio button to import the articles from the csv file. If you are importing articles from a file in JSON format, select the JSON radio button.
Note:
With CSV, bot developers could only import and export training data along with text responses whereas with JSON, rich responses and responses for different channels can be imported easily.
- Click Browse and select the file (CSV or JSON) that contains all articles
Note: Click Download sample to see the format in which articles must be. - Click Import to view the imported articles on the Knowledge base screen.
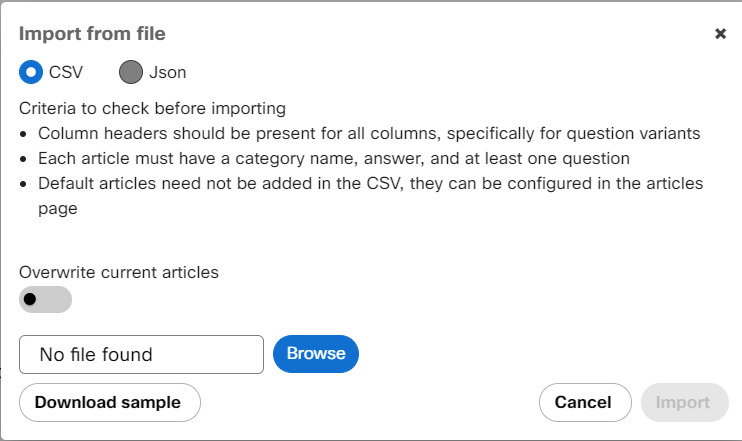
Import articles from CSV dialog box.
The CSV file should contain articles in the following format:
| Category | Response | Question variant 1 | Question variant n |
|---|---|---|---|
| Example category | This is a response | This is a question | This is the same question asked differently |
Exporting articles to a file
- Navigate to the articles section and click Export to file.
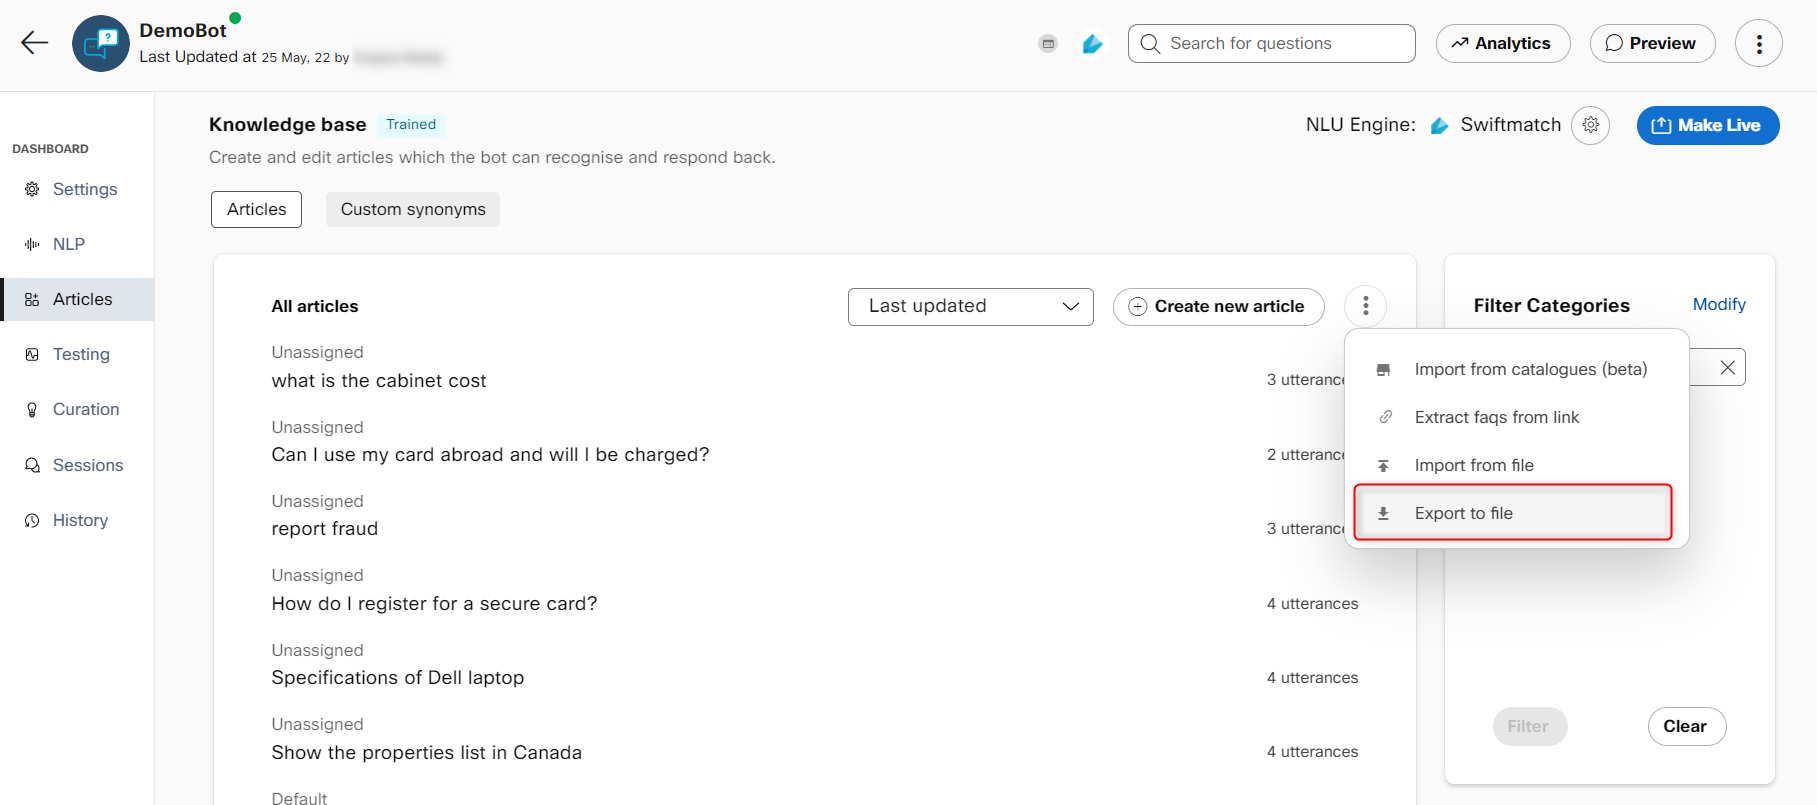
The Export to file window appears.

- Select the CSV check box to export the articles to a csv file. You can also export articles to a file in the JSON format by selecting the JSON check box.
- Click Export to export the articles to a csv or JSON file.
Importing from catalogues
The platform now provides a standard list of articles that can be readily imported into Q&A bots. For now, users can import articles related to 'small talk' and 'banking' domains.
- Navigate to the articles section and click on Import from catalogues (beta)
- Select the categories or individual articles that you want to add to your bot.
- Click 'Done'
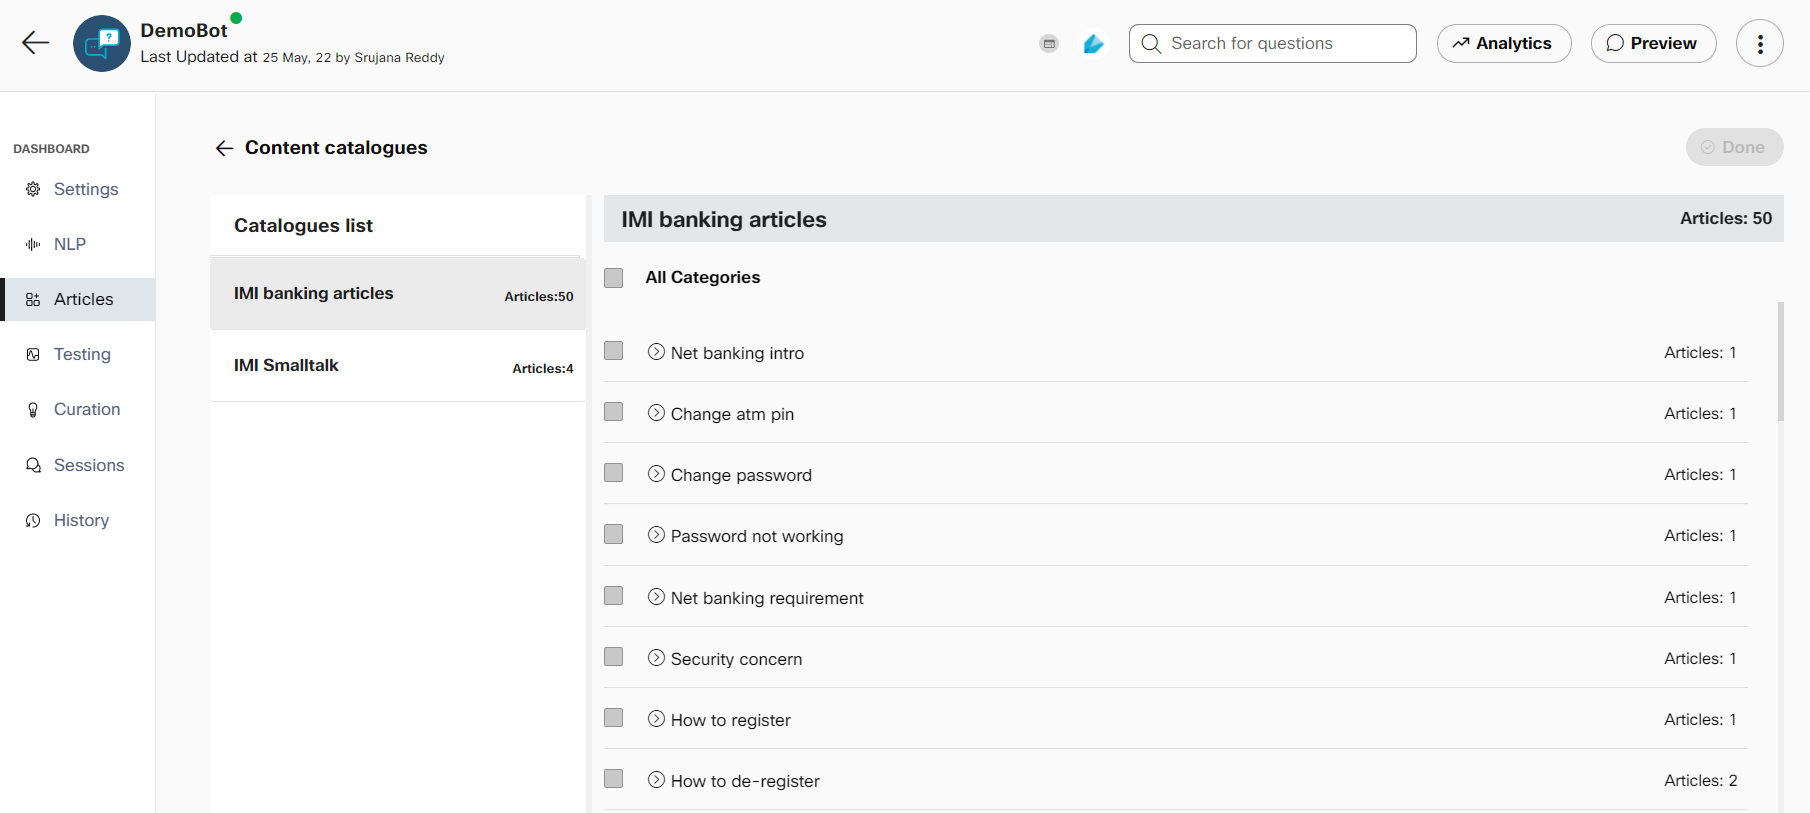
Webex Bot Builder's current catalogues
Custom synonyms
A lot of bot use cases tend to involve words and phrases that may not be a part of the standard English vocabulary or are specific to a business context. For example, you want the bot to recognize “android app”, “iOS app”, etc., as equivalents of “mobile app”. Up until now, a bot builder is forced to enter these terms and their variations as a part of the training utterances in all the articles that reference them.
To overcome this redundant data entry, we have introduced the ability to configure such values and their synonyms in a new “Custom synonyms” tab beside the existing “Articles” within a Q&A bot. Any of the synonyms of each root word gets replaced with the root word at runtime by the platform automatically.

Custom synonyms tab in the articles section
Adding custom synonyms
- Navigate to Custom synonyms tab in the articles section and click on + New root word
- Configure the root word value and its synonyms and click Save
You also have the option to import from and export to a .CSV file.
The bot needs to be trained after adding/modifying custom synonyms in its knowledge base.
NLU engines
Q&A and Task bots use NLU (Natural Language Understanding), which in turn uses the power of machine learning to determine the intent of consumer statements. Swiftmatch, RASA, and Mindmeld are three NLU engines used to assess the intent from the consumer inputs and respond with an accurate response. Swiftmatch is a fast, lightweight training engine that supports multiple languages, whereas RASA is a leading open-source conversational AI framework. Mindmeld (Beta) is an advanced conversational AI framework that produces quality conversational flows and offers various NLU capabilities.
When compared to Swiftmatch, RASA requires more training data to attain high accuracy. Developers can use the NLU engine option on the Articles tab of Q&A bots and the Training tab of Task bots to switch from one engine to another to gauge the bot performance with different engines. Changing the training engine will update the algorithm in the bot’s corpus. Whenever the training engine is changed, the bot must be trained. After training, the inference will be in accordance with the trained model created by the new engine. You can analyze the differences by viewing the similarity scores for transactions in Sessions and by using one-click testing for different engines.
Developers can also test the bot and re-configure the thresholding scores in the ‘Handover and inference’ section of the Bot configuration page, after switching the engine. The scores for the RASA threshold tend to be inversely proportional to the number of intents, i.e., a bot with a large number of intents (100+) will have a relatively lower score under the ‘score below which fallback is shown’ configuration in inference.
Switching between the training engines
Use this procedure to switch between the NLU engines.
- Select the Q&A bot of which you want to change the training engine.
- Click Articles. The Knowledge base screen appears.
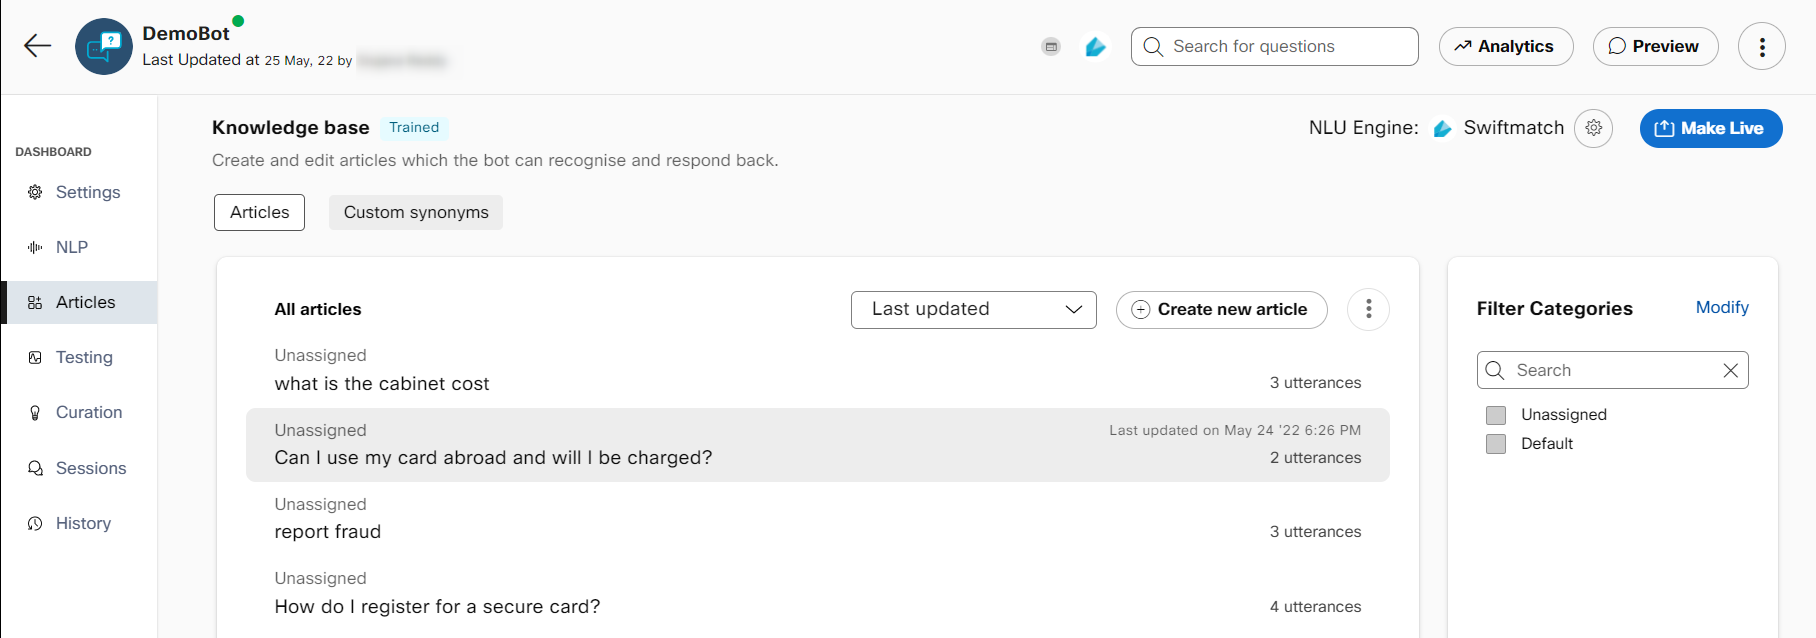
- Click NLU Engine on the right side of the page. The Change training engine window appears
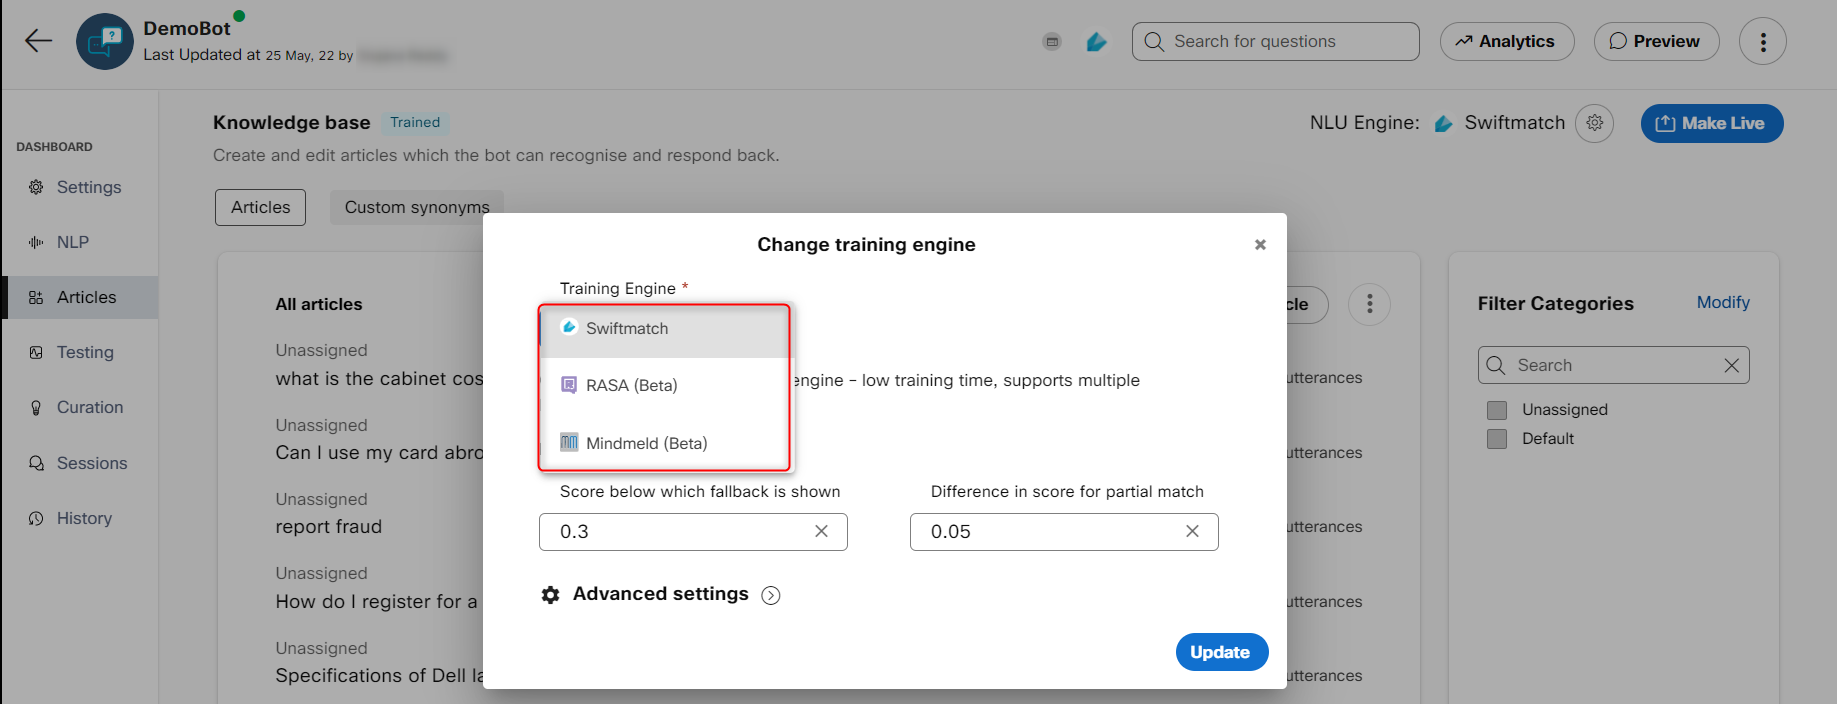
Change training engine in Q&A bot
Note: By default, the NLU engine is set to Swiftmatch for the newly created bots.
4. Select the training engine to train the bot. Possible values:
• RASA (Beta)
• Swiftmatch
• Mindmeld (Beta)
- Specify this information in the Inference section
| Field | Description |
|---|---|
| Score below which fallback is shown | The minimum confidence needed for a response to be displayed to users, below which a fallback response will be shown. |
| The difference in scores for partial match | Defines the minimum gap between confidence levels of responses to clearly display the best match below which a partial match template will be shown |
| No. of results to store for each message | The number of articles for which bot’s calculated confidence scores will be displayed under transaction info in sessions. Note: The number of results to display in the Algorithm section of the Sessions screen has now been limited to 5. The top n results (1=<n=<5) will be available in message transcript reports of Q&A and task bots as well as in the ‘Algorithm results’ section of Transaction info tab in Sessions. |
- Click to expand the Advanced settings section.
Note:
Developers can set different threshold scores for different NLU engines to determine the lowest score that is acceptable to display the bot response.
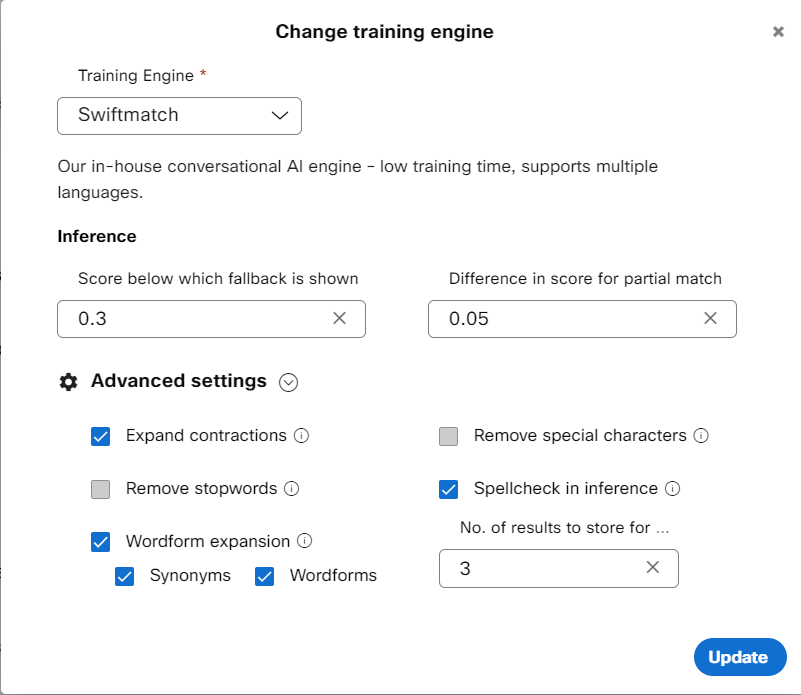
Advanced settings for Swiftmatch in Q&A bots
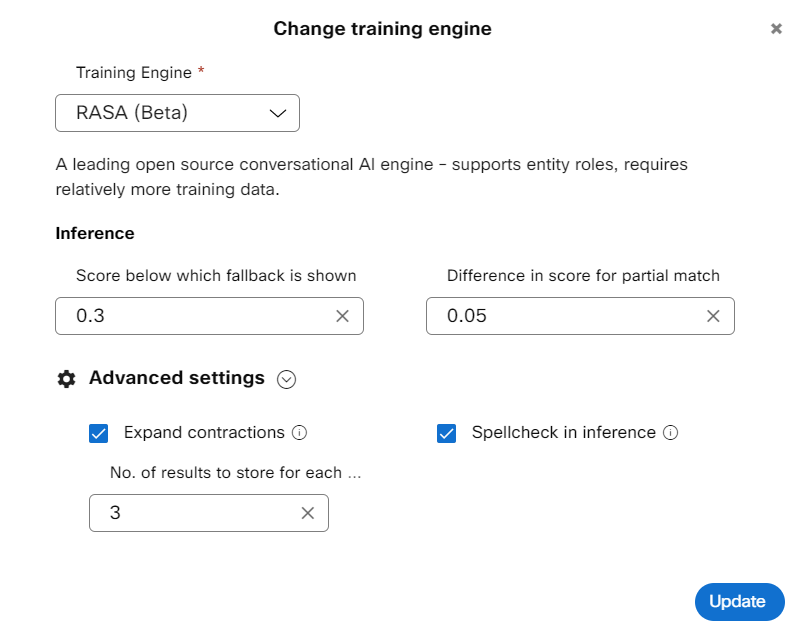
Advanced settings check boxes for Rasa and Mindmeld in Q&A bot
Expand contractions
English contractions in the training data can be expanded to the original form along with the terms in the incoming consumer query for greater accuracy. Example: ‘don’t' is expanded to ‘do not’. If this check box is selected, the contractions in the input messages are expanded before processing. This capability is supported for all three NLU engines.
Remove stopwords
‘Stopwords’ are function words that establish grammatical relationships among other words within a sentence but do not have lexical meaning on their own. When these stopwords such as articles (a, an, the, etc.), pronouns (him, her, etc.) and so on are removed from the sentence, the machine learning algorithms can focus on words that define the meaning of the text query by the consumer. If this check box is selected, the ‘stopwords’ are removed from the sentence at the time of training as well as inference. This NLU engine capability is supported only for Swiftmatch.
Wordform expansion
Expand training data with wordforms such as plurals, verbs, and so on, along with the synonyms embedded in the data. This capability is supported only for Swiftmatch.
Synonyms
Synonyms are alternative words used to denote the same word. If this check box is selected, common English synonyms for words in the training data get auto generated from to recognize the consumer query precisely. For instance, for the word garden, the system generated synonyms can be a backyard, yard, and so on. This NLU engine capability is supported only for Swiftmatch.
Wordforms
Wordforms can exist in various forms such as plurals, adverbs, adjectives, or verbs. For instance, for the word “creation”, the wordforms can be created, create, creator, creative, creatively, so on. If this check box is selected, the words in the query are created with alternative forms of words and are processed to give an appropriate response to consumers.
Remove special characters
Special characters are the non-alphanumeric characters that have an impact on inference. For example, Wi-Fi and Wi Fi are considered differently by the NLU engine. If this check box is selected, the special characters in the consumer query are removed to display an appropriate response. This NLU engine capability is supported only for Swiftmatch.
Spellcheck in inference
Text correction library identifies and corrects the incorrect spellings in the text before inference. This capability is supported for all three engines only if the Spellcheck in inference check box is selected.
- Click Update to change the algorithm in the bot's corpus.
- Click Train. Once the bot is trained with the selected training engine, the Knowledge base status changes from Saved to Trained.
Note: You can Train the bot with RASA and Mindmeld only if all the articles have at least two utterances.
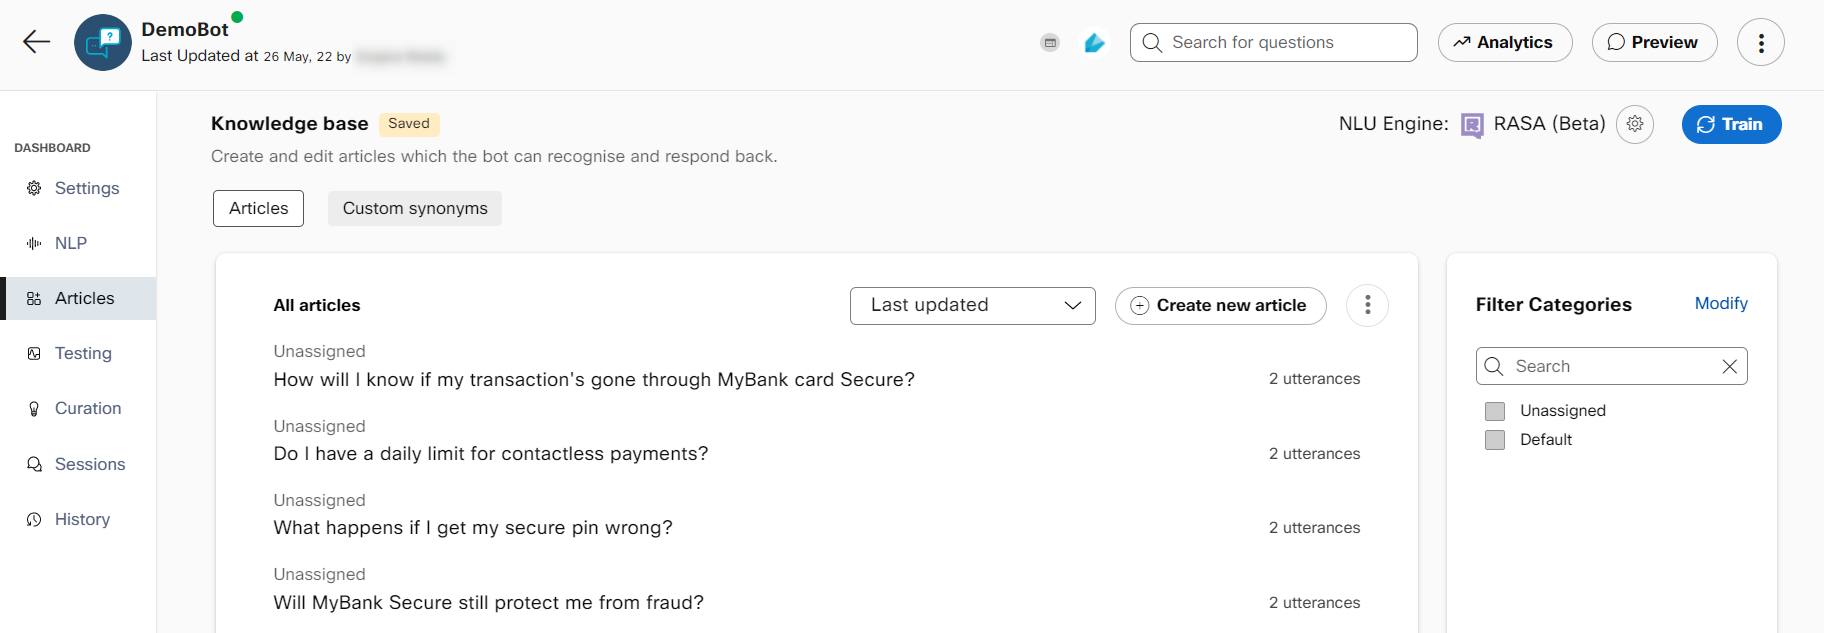
Training
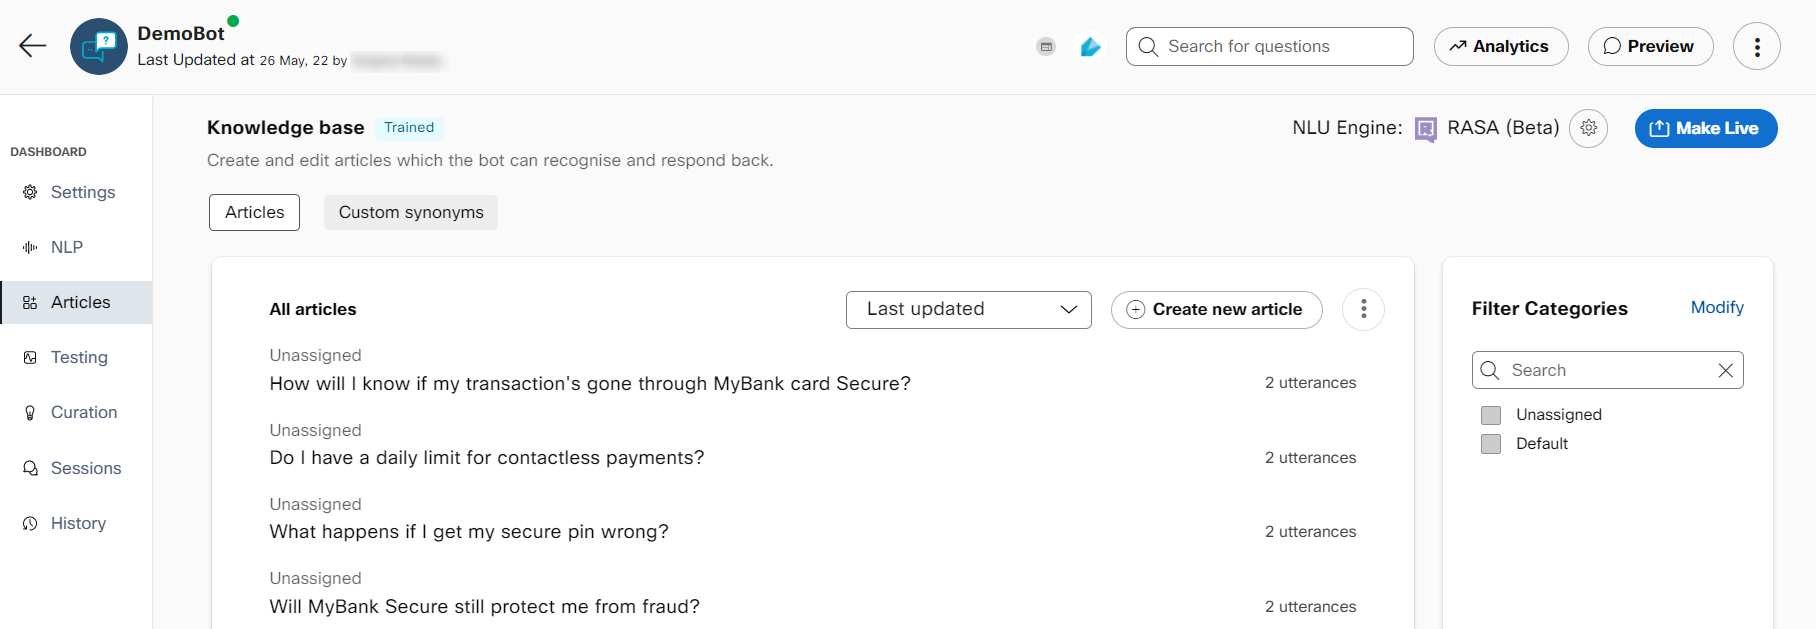
Once all the desired articles are created, users should train their bot and make it live to test and deploy it. To train the bot with its current corpus, click the Train button on the top right. This should change the status to ‘Training’.

Once the training is complete, the status changes to ‘Trained’. User can click the reload icon next to 'Training' to retrieve the current training status.

At this point, users can click the Make Live button to make the trained corpus live and test it in Webex Bot Builder shareable preview or on external channels where the bot is deployed.

Updated about 2 years ago
