Cisco ECE Integration - Deprecated
Deprecation Alert
Please note that the below integration has been deprecated.
Enterprise Chat and Email (ECE) is an offering from Cisco CCE suite that allows customer support agents to respond to customer queries/tickets in real-time on webchat and email.
The Enterprise Chat and Email APIs provide partners & customers with a powerful way to interact with the ECE resources like a case, activity, or customers using the standard HTTP methods (GET, PUT, POST, and DELETE). You can use these APIs for many purposes such as including modern web applications as well as integrating the platform with other applications.
Webex Connect chat engine offers a pre-built connector to integrate with Cisco ECE and enable customer support over digital messaging channels such as SMS, Apple Messages for Business, and WhatsApp.
Channel Support
Webex Connect's Cisco ECE Integration supports the following channels:
- Apple Messages for Business
- In-app Messaging
- Messenger
- SMS
Capabilities
The key capabilities of the Cisco ECE Integration within Webex Connect are as follows:
- Enable customer support over telco, digital messaging, and social channels through Cisco ECE
- Enable customers and agents to share attachments during a conversation
Channel-specific limitations related to the type and format of attachments apply. Attachments are sent in one of the following ways:- Attachment is available online and is sent as downloadable content through a URL
- Attachment is sent in the native file format.
- Notify agents about the customer-related events such as:
Customer started/stopped typingCustomer uploaded attachmentCustomer accepted attachmentCustomer rejected attachment.
The events may vary based on the communication channel.
- Notify customers about agent-related events such as:
Agent started/stopped typingChat startedChat assignedChat transferredChat closedAgent uploaded attachmentAgent accepted attachmentAgent rejected attachment.
The events may vary based on the communication channel.
- Capture channel-specific customer details such as mobile number in case of SMS, or user name and locale in case of Messenger
- Trigger pre-chat and post-chat flows on Webex Connect from Cisco ECE
- Examples of pre-chat flows include customer identity and verification before handing over the chat to the agent
- Examples of post-chat flows include customer satisfaction surveys or feedback forms.
- Chatbot integration for customer self-service
Enable customer self-service over supported channels by integrating Webex Connect with Bot or any other third-party chatbot with a seamless handover from chatbots to live agents on Cisco ECE when human intervention is needed. - Automated Language detection
Webex Connect supports automatic language detection and routing of messages to relevant teams on the Cisco ECE. - System messages
The chat engine allows you to configure additional messages that can be automatically sent to the customers, like the welcome message, chat transferred from one agent to another.
Integrate Cisco ECE with Webex Connect
To set up a Cisco ECE integration in Webex Connect:
- Sign in to Webex Connect with your credentials.
- Navigate to Assets > Integrations on the left navigation bar.
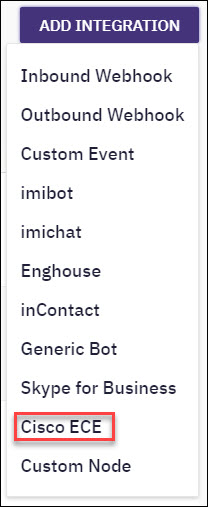
List of Integrations
- Click Add Integration and select the Cisco ECE option.
- Enter a suitable Name for the integration.
- Select the required Version of the Cisco ECE connector.
- Enter Authentication Details for the integration.
- Base URL: this URL lets you connect to the Cisco Finesse Chat console. Obtain this URL from Cisco Finesse.
- User Name: username used to login to the Cisco Finesse chat console
- Password: password used to login to the Cisco Finesse chat console.
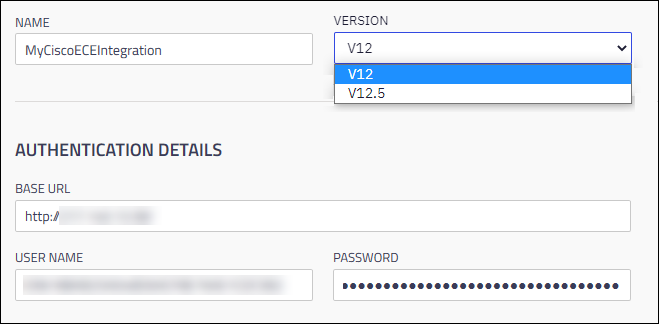
Authentication Details
- Provide details for Entry Point Configurations (an entry point is an agent or a group of agents in Cisco Finesse):
- Name – a suitable name for the entry point.
- Cisco Entry Point ID – a unique identifier of the entry point. Obtain this from Cisco Finesse.
When multiple agents keep signing in and out of the Cisco Finesse chat console, the status of the agents' changes. In such cases, the Refresh icon allows you to refresh the status of the agent and view the current status.

Entry Point Configurations
The following icons provide details about the agent:
Icon | Description |
|---|---|
Agent | Indicates whether an agent can accept new chats or is busy:
|
Depth | Indicates whether the maximum number of chats that an agent can handle concurrently has been reached:
|
Wait | Indicates whether the waiting time for the customers before an agent picks up the chat is within an acceptable range or not:
|
Status | Indicates the availability status of the agent:
|
- Configure the set of messages that appear to the customer when certain events are triggered. This is an optional step.
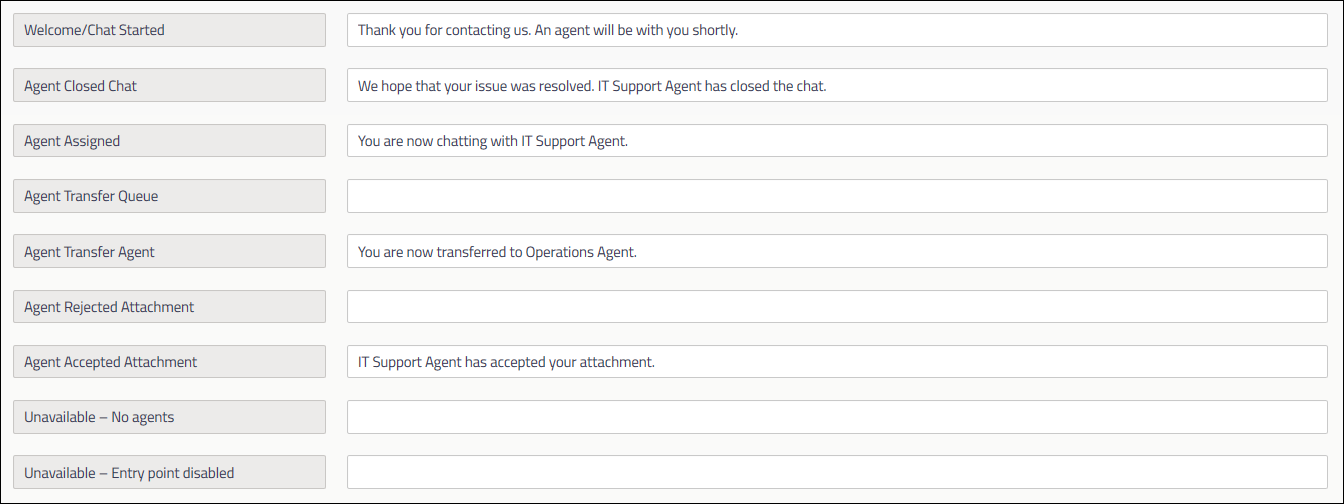
Configure Messages
You can configure the following messages:
- Welcome/Chat Started - a welcome message that appears when a customer starts the chat
- Agent Closed Chat - a message that appears when the agent closes/ends the chat
- Agent Assigned - a message that appears when an agent is assigned to the chat
- Agent Transfer Queue - a message that appears when an agent transfers the chat back to the queue
- Agent Transfer Agent - a message that appears when an agent transfers the chat to another agent
- Agent Rejected Attachment - a message that appears when the agent rejects an attachment sent by the customer
- Agent Accepted Attachment - a message that appears when the agent accepts an attachment sent by the customer
- Unavailable – No agents - a message that appears when no agents are available
- Unavailable – Entry point disabled - a message that appears when an entry point is disabled.
- Click Add Entry Point and repeat the above steps to add other entry points to the integration. This is an optional step.
You can add entry points in scenarios where multiple entry points are associated with a single Cisco ECE integration in Webex Connect. - Use Custom Attributes to map channel attributes with integration attributes. For example, to map Facebook username to the Messenger username, enter
$(fb.username)in the Name field and$(messenger.username)in the Value field. Click Add Custom Attribute to map the required attributes. This is an optional step.
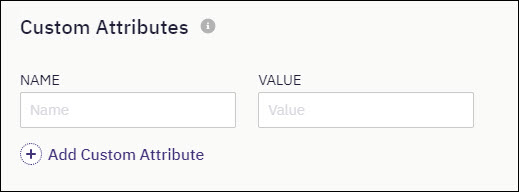
Custom Attributes
- Click Save to test and save the integration.
This step verifies if Webex Connect can connect to Cisco Finesse chat console and retrieve an access token successfully. An error message appears for any connection issues.
Use the Cisco ECE Integration
Once you’ve integrated Cisco ECE with Webex Connect, you can test the end-to-end experience from receiving a customer message through any of the supported channels to facilitating a two-way chat communication between an agent and the customer by following the below steps:
- Integrate Cisco ECE with Webex Connect.
- Configure the channels that you want to use with Cisco ECE.
- Create a new service in Webex Connect to use this integration.
- Map the Cisco ECE Integration as a CCSP endpoint within the service. Define logic to route the customer messages to CCSP in one of the following ways:
- Create a rule to forward the customer messages to Cisco ECE.
- Create a flow that uses the CCSP (Create Chat and Validate Chat) nodes. Publish the flow and then launch it.
When a customer sends a message through the configured communication channel, the message reaches the agents on Cisco ECE. When an agent responds, Cisco ECE notifies Webex Connect of any outbound messages that need to be sent to the customers. Based on the conversation object, Webex Connect automatically detects the original channel and pushes messages to the customer on that channel.
Use Cisco ECE Integration for Customer Support over Messenger
In this sample tutorial, you can see how to integrate Messenger to Cisco ECE through Webex Connect chat engine to allow direct communication between an agent and a customer.
- Create a Cisco ECE integration with the name MyCiscoECEIntegration. For more information, see the Integrate Cisco ECE with Webex Connect section.
- Create a Messenger asset.
a. Go to Assets > Apps > Configure New App and select Messenger.
b. Enter the name as MyCiscoECEFBMessenger.
c. Click Add Messenger Page and select the Cisco ECE Integration or any other relevant page from your Facebook account. This is the page that you created previously created in your Facebook account.
Add Messenger Page
You can add only the pages that you have created.

Add Messenger Page
For more information, see Creating a Messenger App.
- Create a service to route incoming customer inquiries from Facebook messenger account to Cisco ECE.
a. Create a new service with the name MyCiscoECEService.
b. Go to the Rules tab and click Add New Rule.
c. Select Messenger as the channel, Incoming Message as the event, and MyCiscoECEFBMessenger as the Facebook Messenger. Click Next.
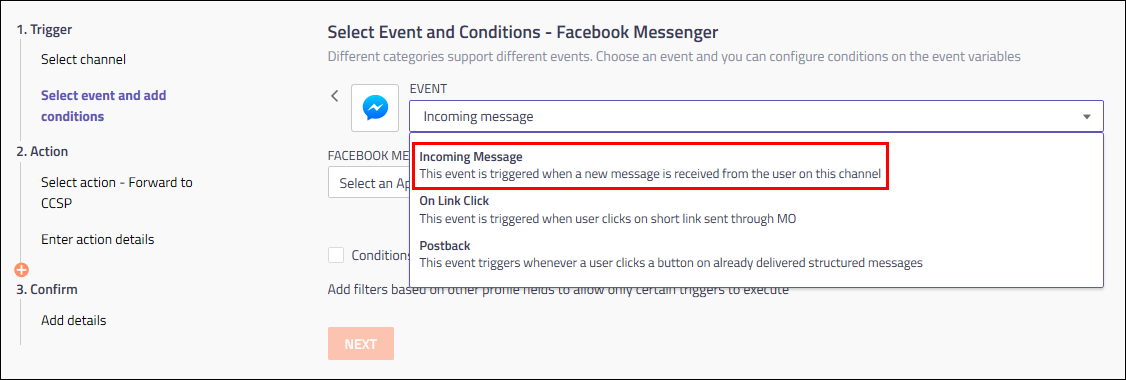
Select Event
d. Select Forward to CCSP as the action, MyCiscoECEIntegration as the integration, and the entry point, which you have configured while creating the integration, as the parameter. You can specify additional parameters if required.
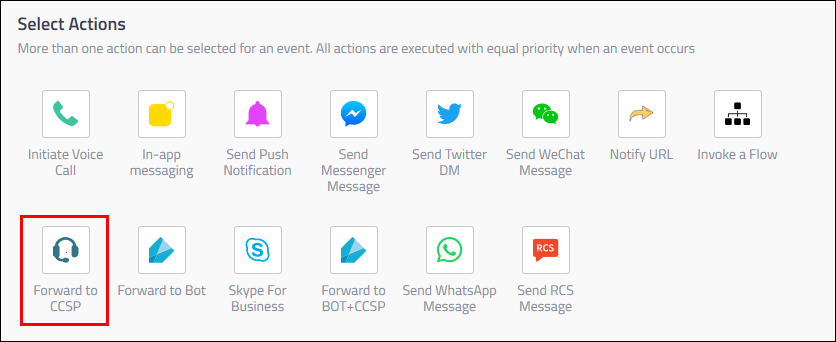
Select Action
e. Configure rule details like Name, Start Date, End Date, Status, and then Save the rule as MyECEMessengerRule.
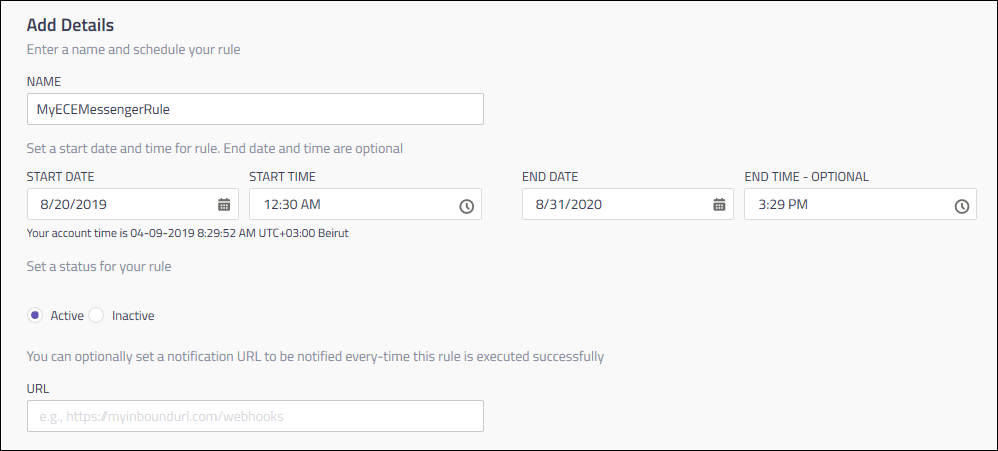
Rule Details
This rule forwards all the incoming messages on Messenger to Cisco ECE directly.
Use Cisco ECE Integration for Customer Support over SMS
In this sample tutorial, you can see how to send and receive messages to Cisco ECE chat console on the SMS channel through the Webex Connect chat engine.
- Select MyCiscoECEService on the Services Dashboard.
- Go to the Rules tab and click Add New Rule.
- Select SMS as the channel, Mobile Originated - MO as the event.
- Select the number on which you want to receive the SMS from the customer.
- Enter the keyword that you want to associate with the number and click Verify to check the availability of the keyword.
- Select Forward to CCSP as the action, MyCiscoECEIntegration as the integration, and the entry point that you have configured while creating the integration as the parameter. You can specify additional parameters if required.
- Add details for the rule like Name, Start Date, End Date, Status, and then Save the rule as MyECESMSRule.
This rule sends all the mobile originating message through the SMS channel (to the configured number with the defined keyword) to the Cisco ECE chat console. Webex Connect sends all the messages from Cisco ECE to the customer in the form of SMSes.
Use Cases
This section illustrates how communication journeys look like when the agents are available/unavailable.
##Agent Available
In this use case, you can see the customer journey from chat initiation to chat completion.
- A customer sends a message on the Cisco ECE Integration Facebook page through Messenger.
- The message reaches the Cisco ECE chat console through Webex Connect and a pre-configured welcome message appears in the Messenger window. For example,
Thank you for contacting us. We are here to help you resolve your issue. Please be patient until an agent attends you. - When an agent picks up the chat on Cisco ECE console, a pre-configured agent-assigned message appears. For example,
You are now chatting with CiscoAgent1. - If the agent transfers the chat to another agent or queue, a pre-configured message appears. For example,
You have been transferred to the Network Issues queue. - When the customer sends an attachment to the agent and if the agent accepts it, a pre-configured message like
The agent has accepted your attachment.appears to the customer. When the agent clicks the attachment, it is downloaded. If the agent rejects the attachment, a message indicating that appears on the customer screen if configured. - If the agent pushes a page to the customer using Page Push in the chat console, again a pre-configured message appears on the customer screen.
Finally, when the agent completes the chat, a message like The agent has marked your chat closed. appears if configured.
Agent Unavailable
In this use case, you can see what happens when there are no agents available to pick the customer’s chat.
- A customer sends a message on the Cisco ECE Integration Facebook page through Messenger.
- The message reaches the Cisco ECE chat console through Webex Connect and a pre-configured welcome message appears in the Messenger window.
- If there are no agents available/ready to pick up the chat, a pre-configured message like
Sorry! There are no agents available right now to be with you. Please come back later.appears to the customer.
You can embed the logic into the workflow and define how to handle customer messages in such scenarios. For example, you can discard the message after a pre-defined time interval or close the chat.
Note: This integration is available only in the cloud version of Webex Connect.
Updated 9 months ago
