Task bots
Task bots augment the no-code bot-building capabilities of Webex Bot Builder by complementing Q&A bots. Q&A bots are pertinent to cases where the interactions with users are restricted to answering specific queries from a corpus or knowledge base with minimal turn-taking involved. Task bots overcome this limitation by enabling multi-turn conversations where a bot can obtain relevant data from users to perform the task at hand.
Creating a task bot
Use this procedure to create a task bot.
- Log in to the Bot platform. The dashboard screen appears.

Create a task bot
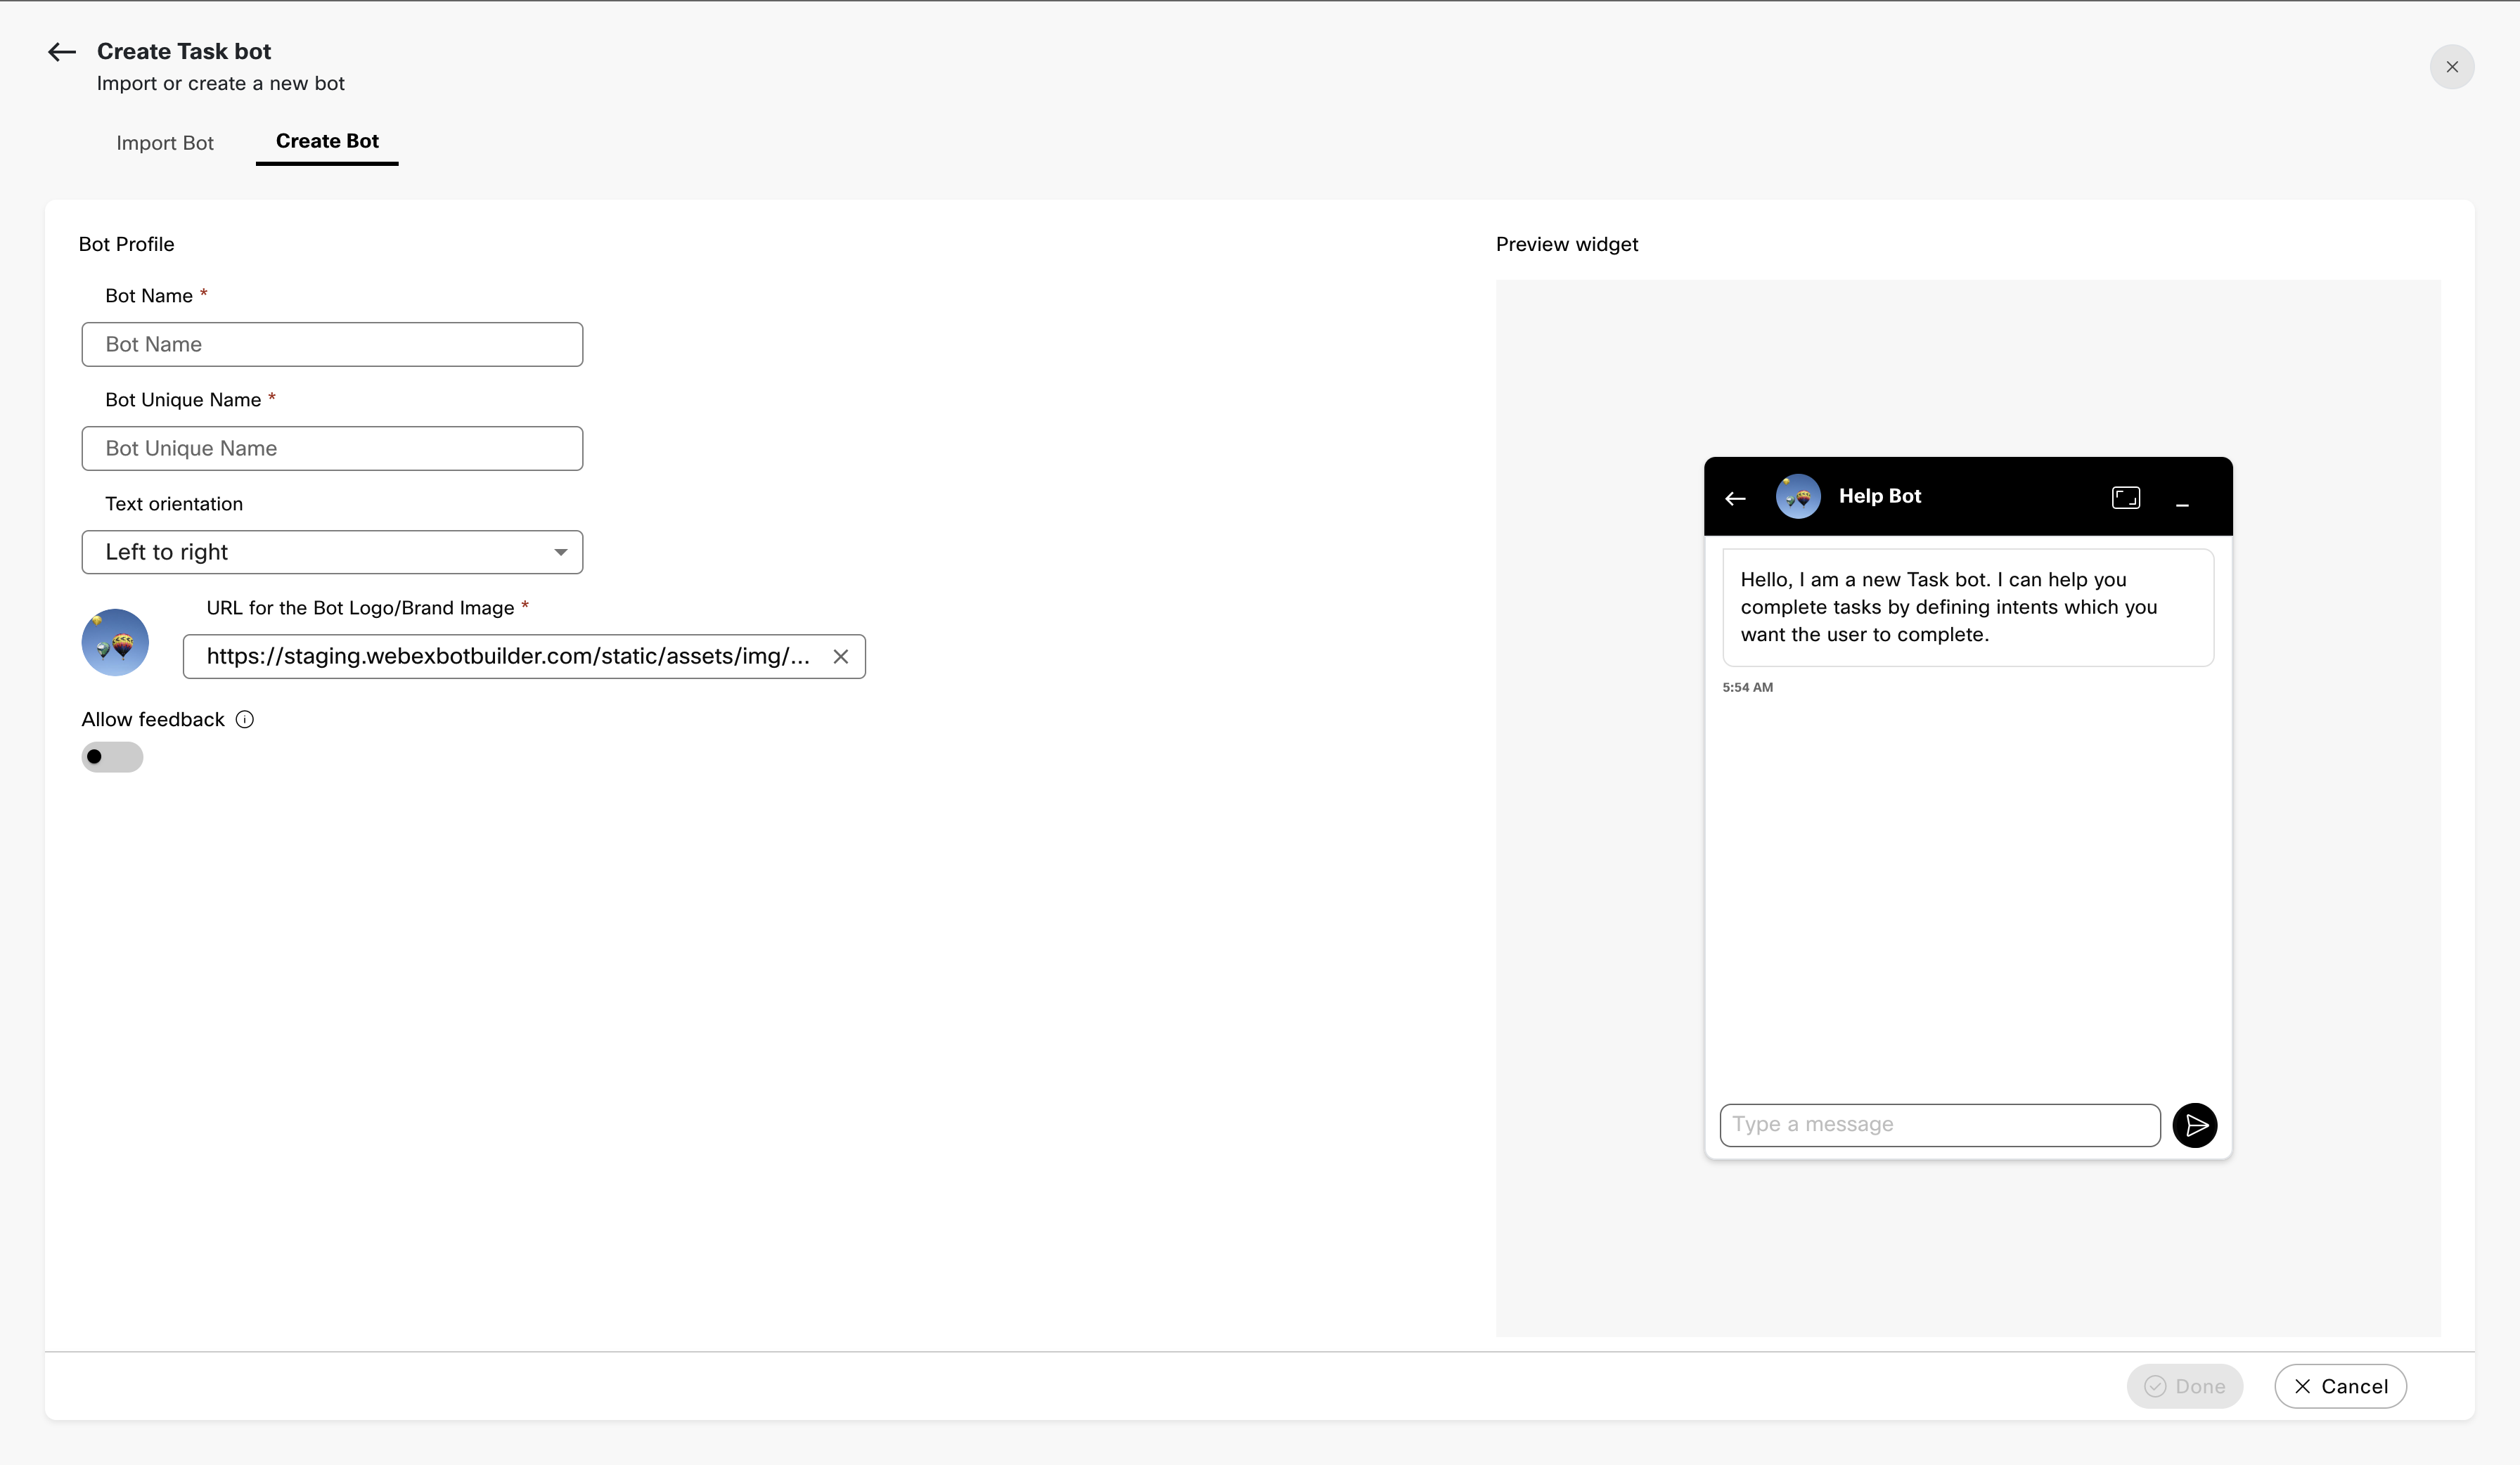
- Click +New Task Bot and Create Bot the Bot Profile screen appears.
Note: Navigate to the Task Bots, Smart bots, Router bots and NLP Pipelines tabs to create task, smart, router and NLP Pipeline bots respectively.
2.a. Specify this information:
Bot Name
The name of the bot.
Bot Unique name
A unique name for the bot.
Text orientation
Display of text format on the platform. Possible values:
Left to right (English)
Right to left (Arabic)
URL for the Bot Logo/Brand Image
The URL from where the bot logo or image defaults.
2.b. Select the Allow Feedback toggle to request feedback from consumers for every bot message.
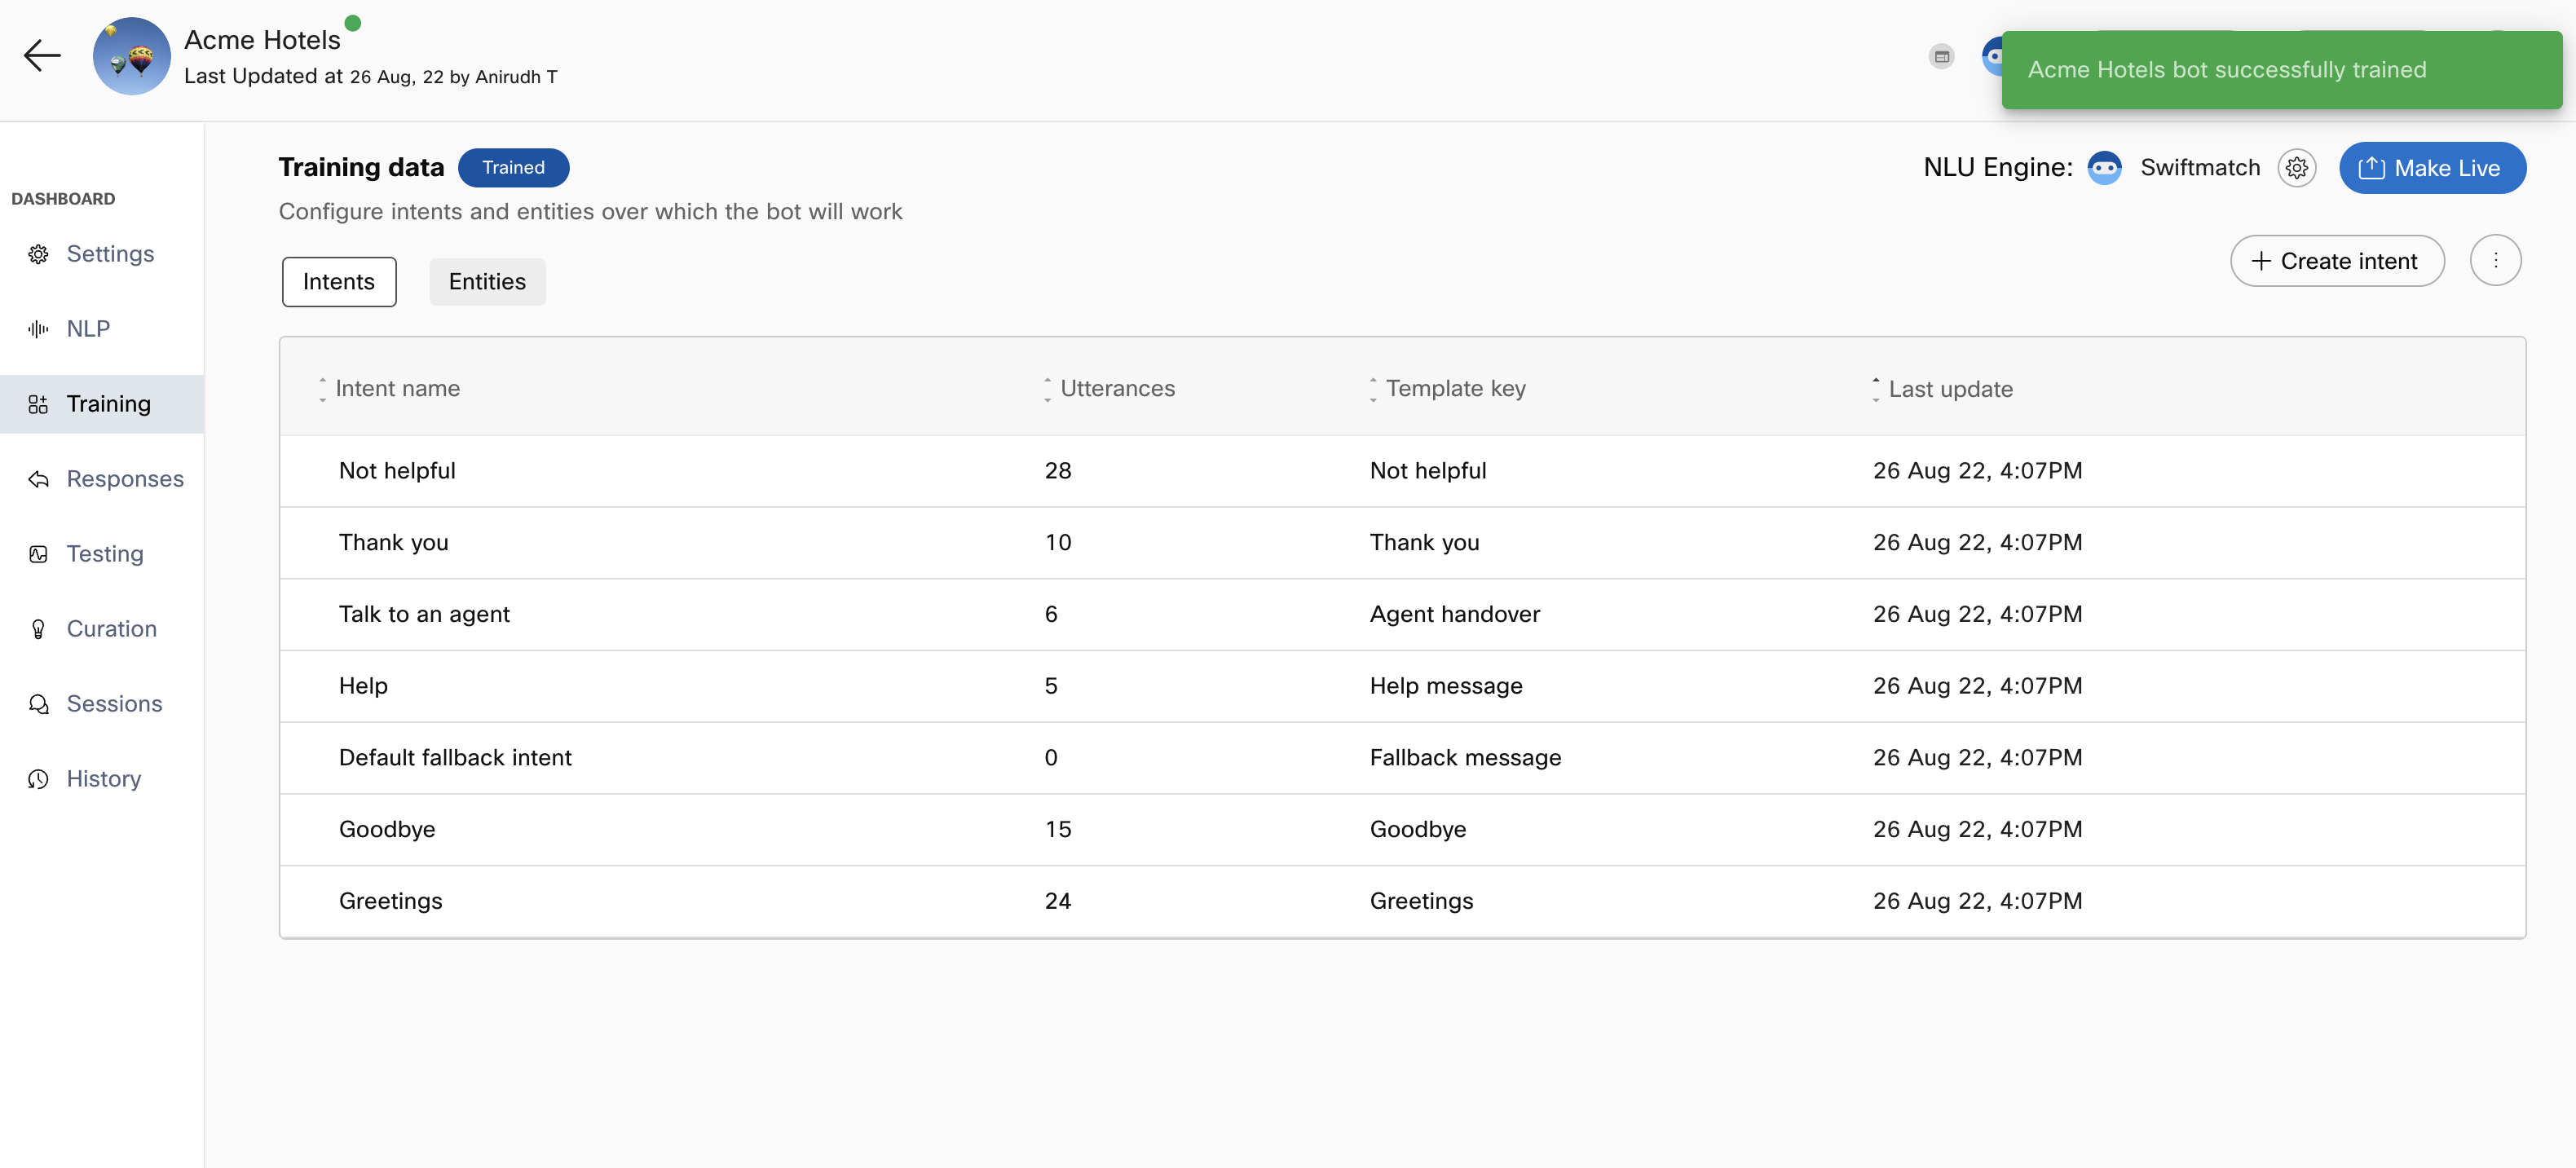
2c. Click Done. The bot is created successfully, and you are redirected to the Training data screen to create entities and add intents.
Importing a pre-built task bot
Alternatively, a user can import prebuilt bots from a selection of bots representing common use cases by going to the import bot section.
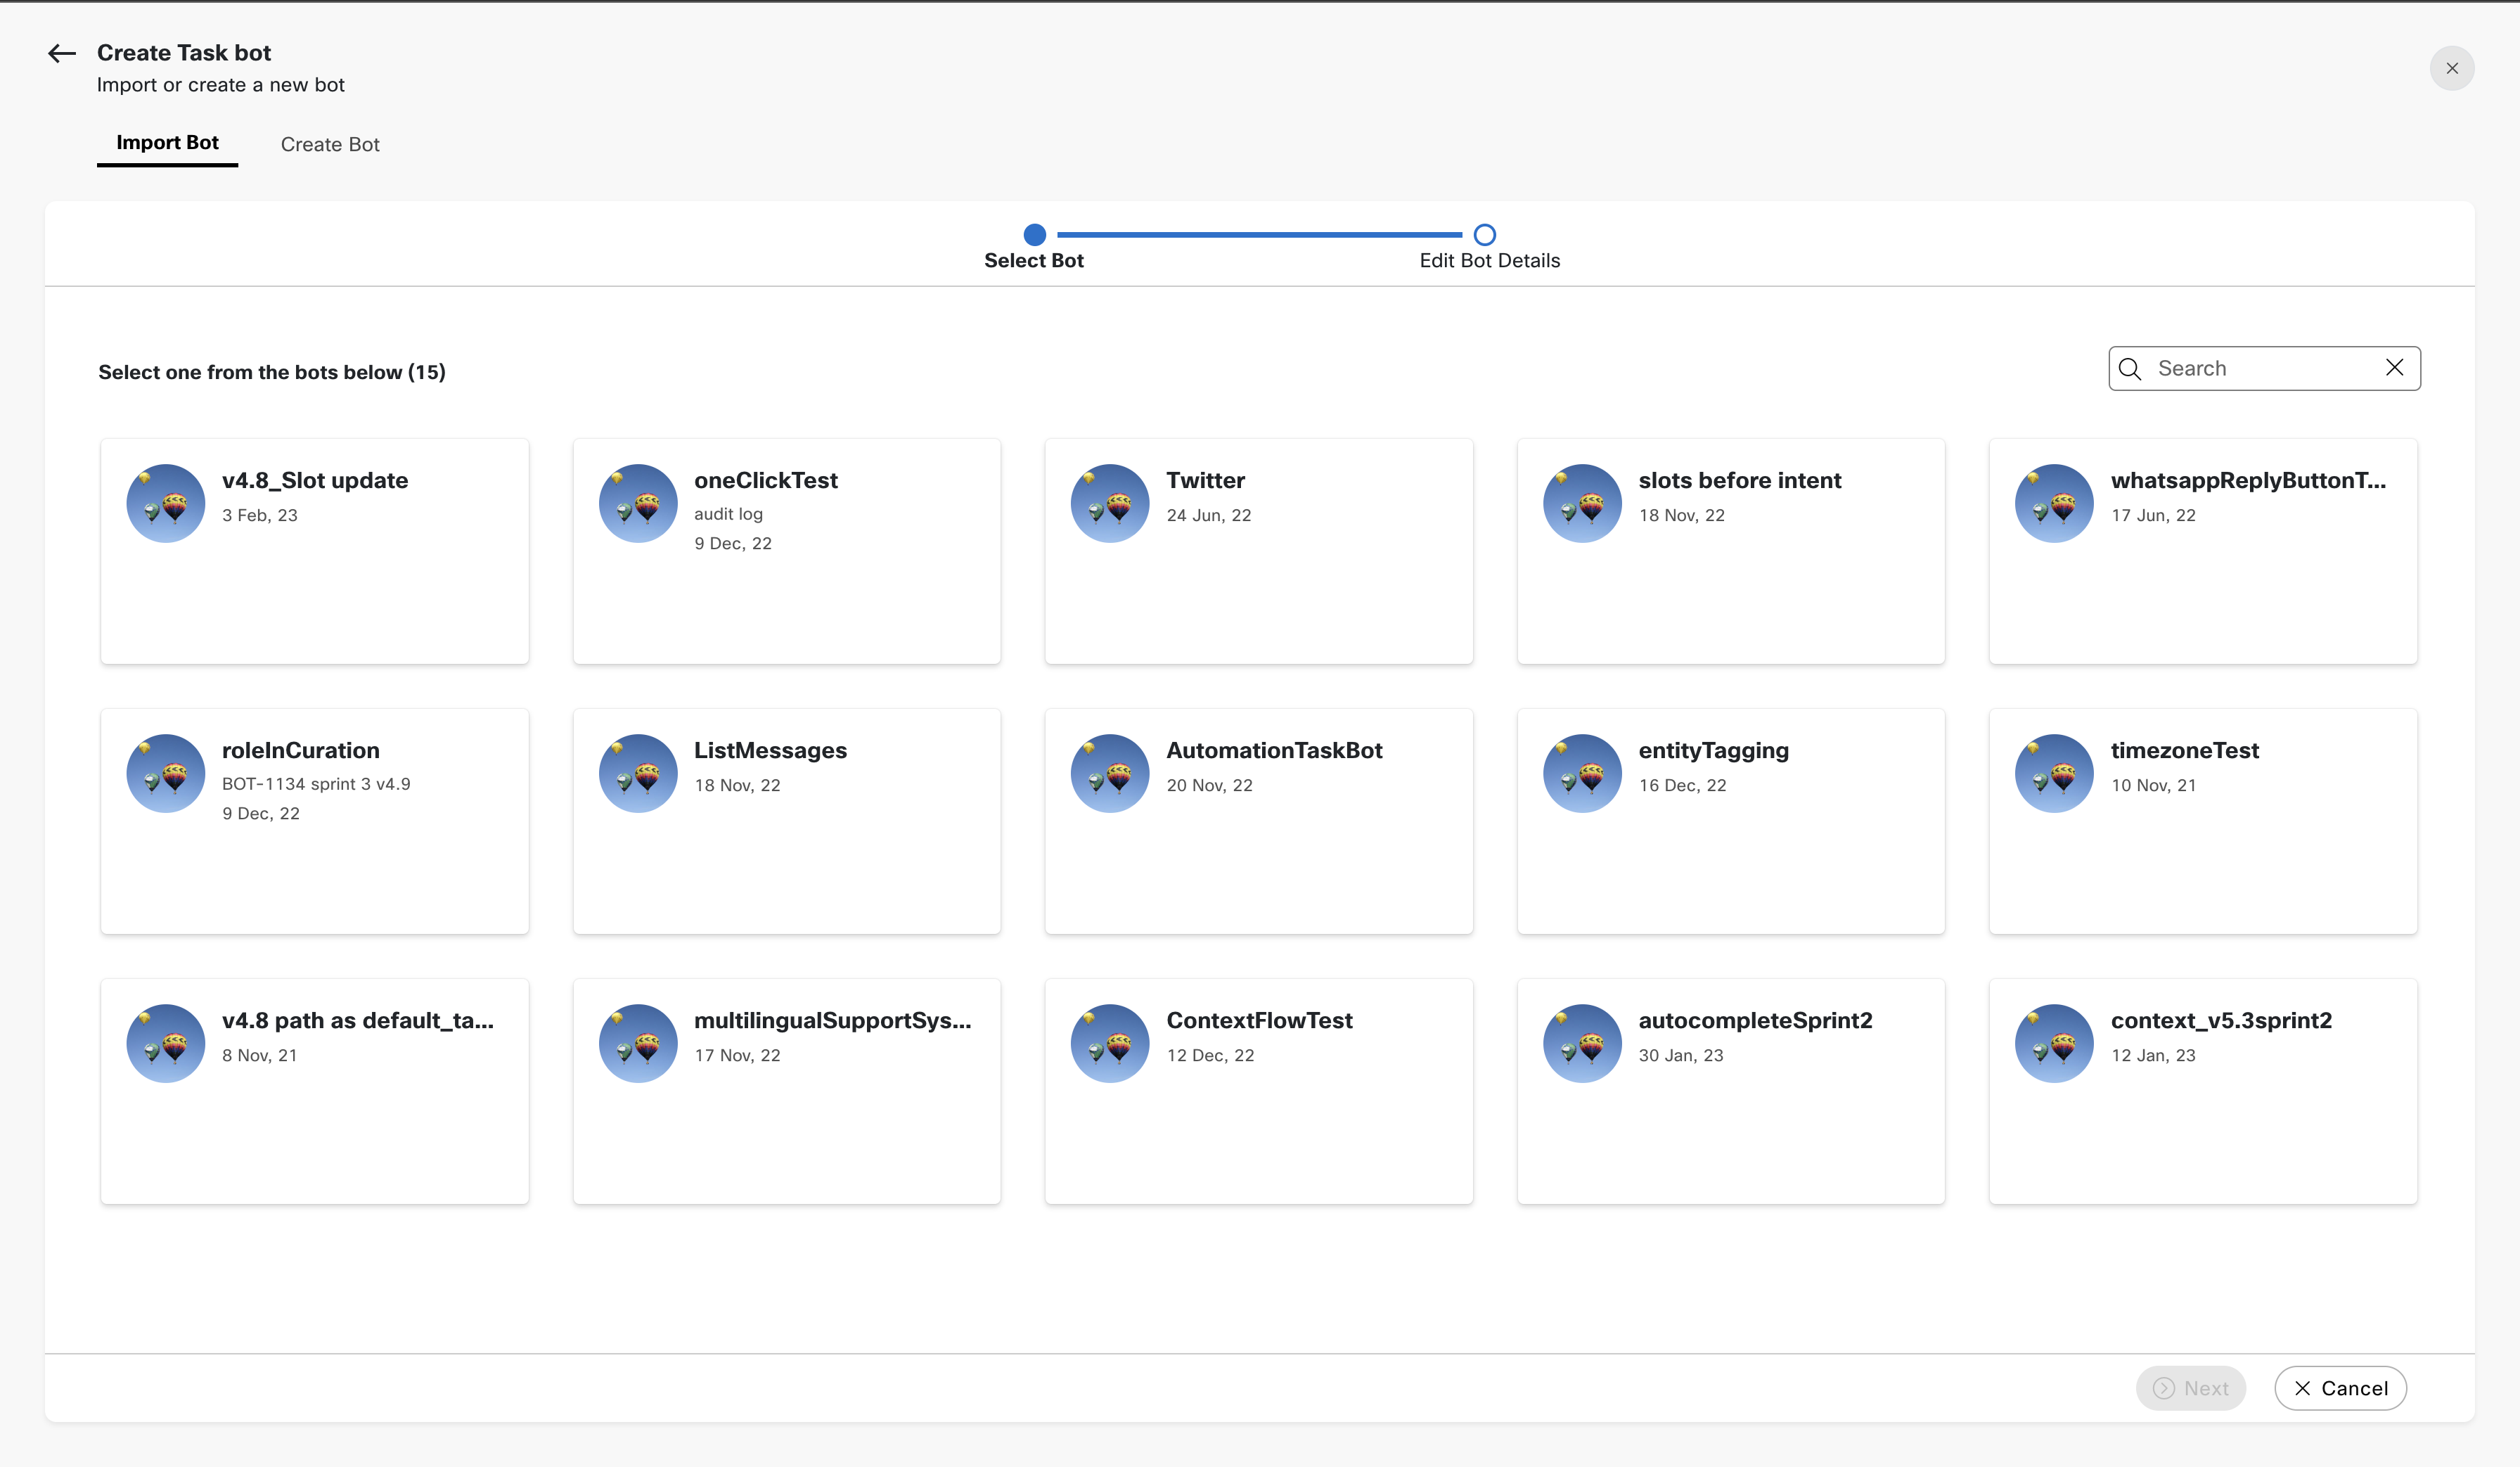
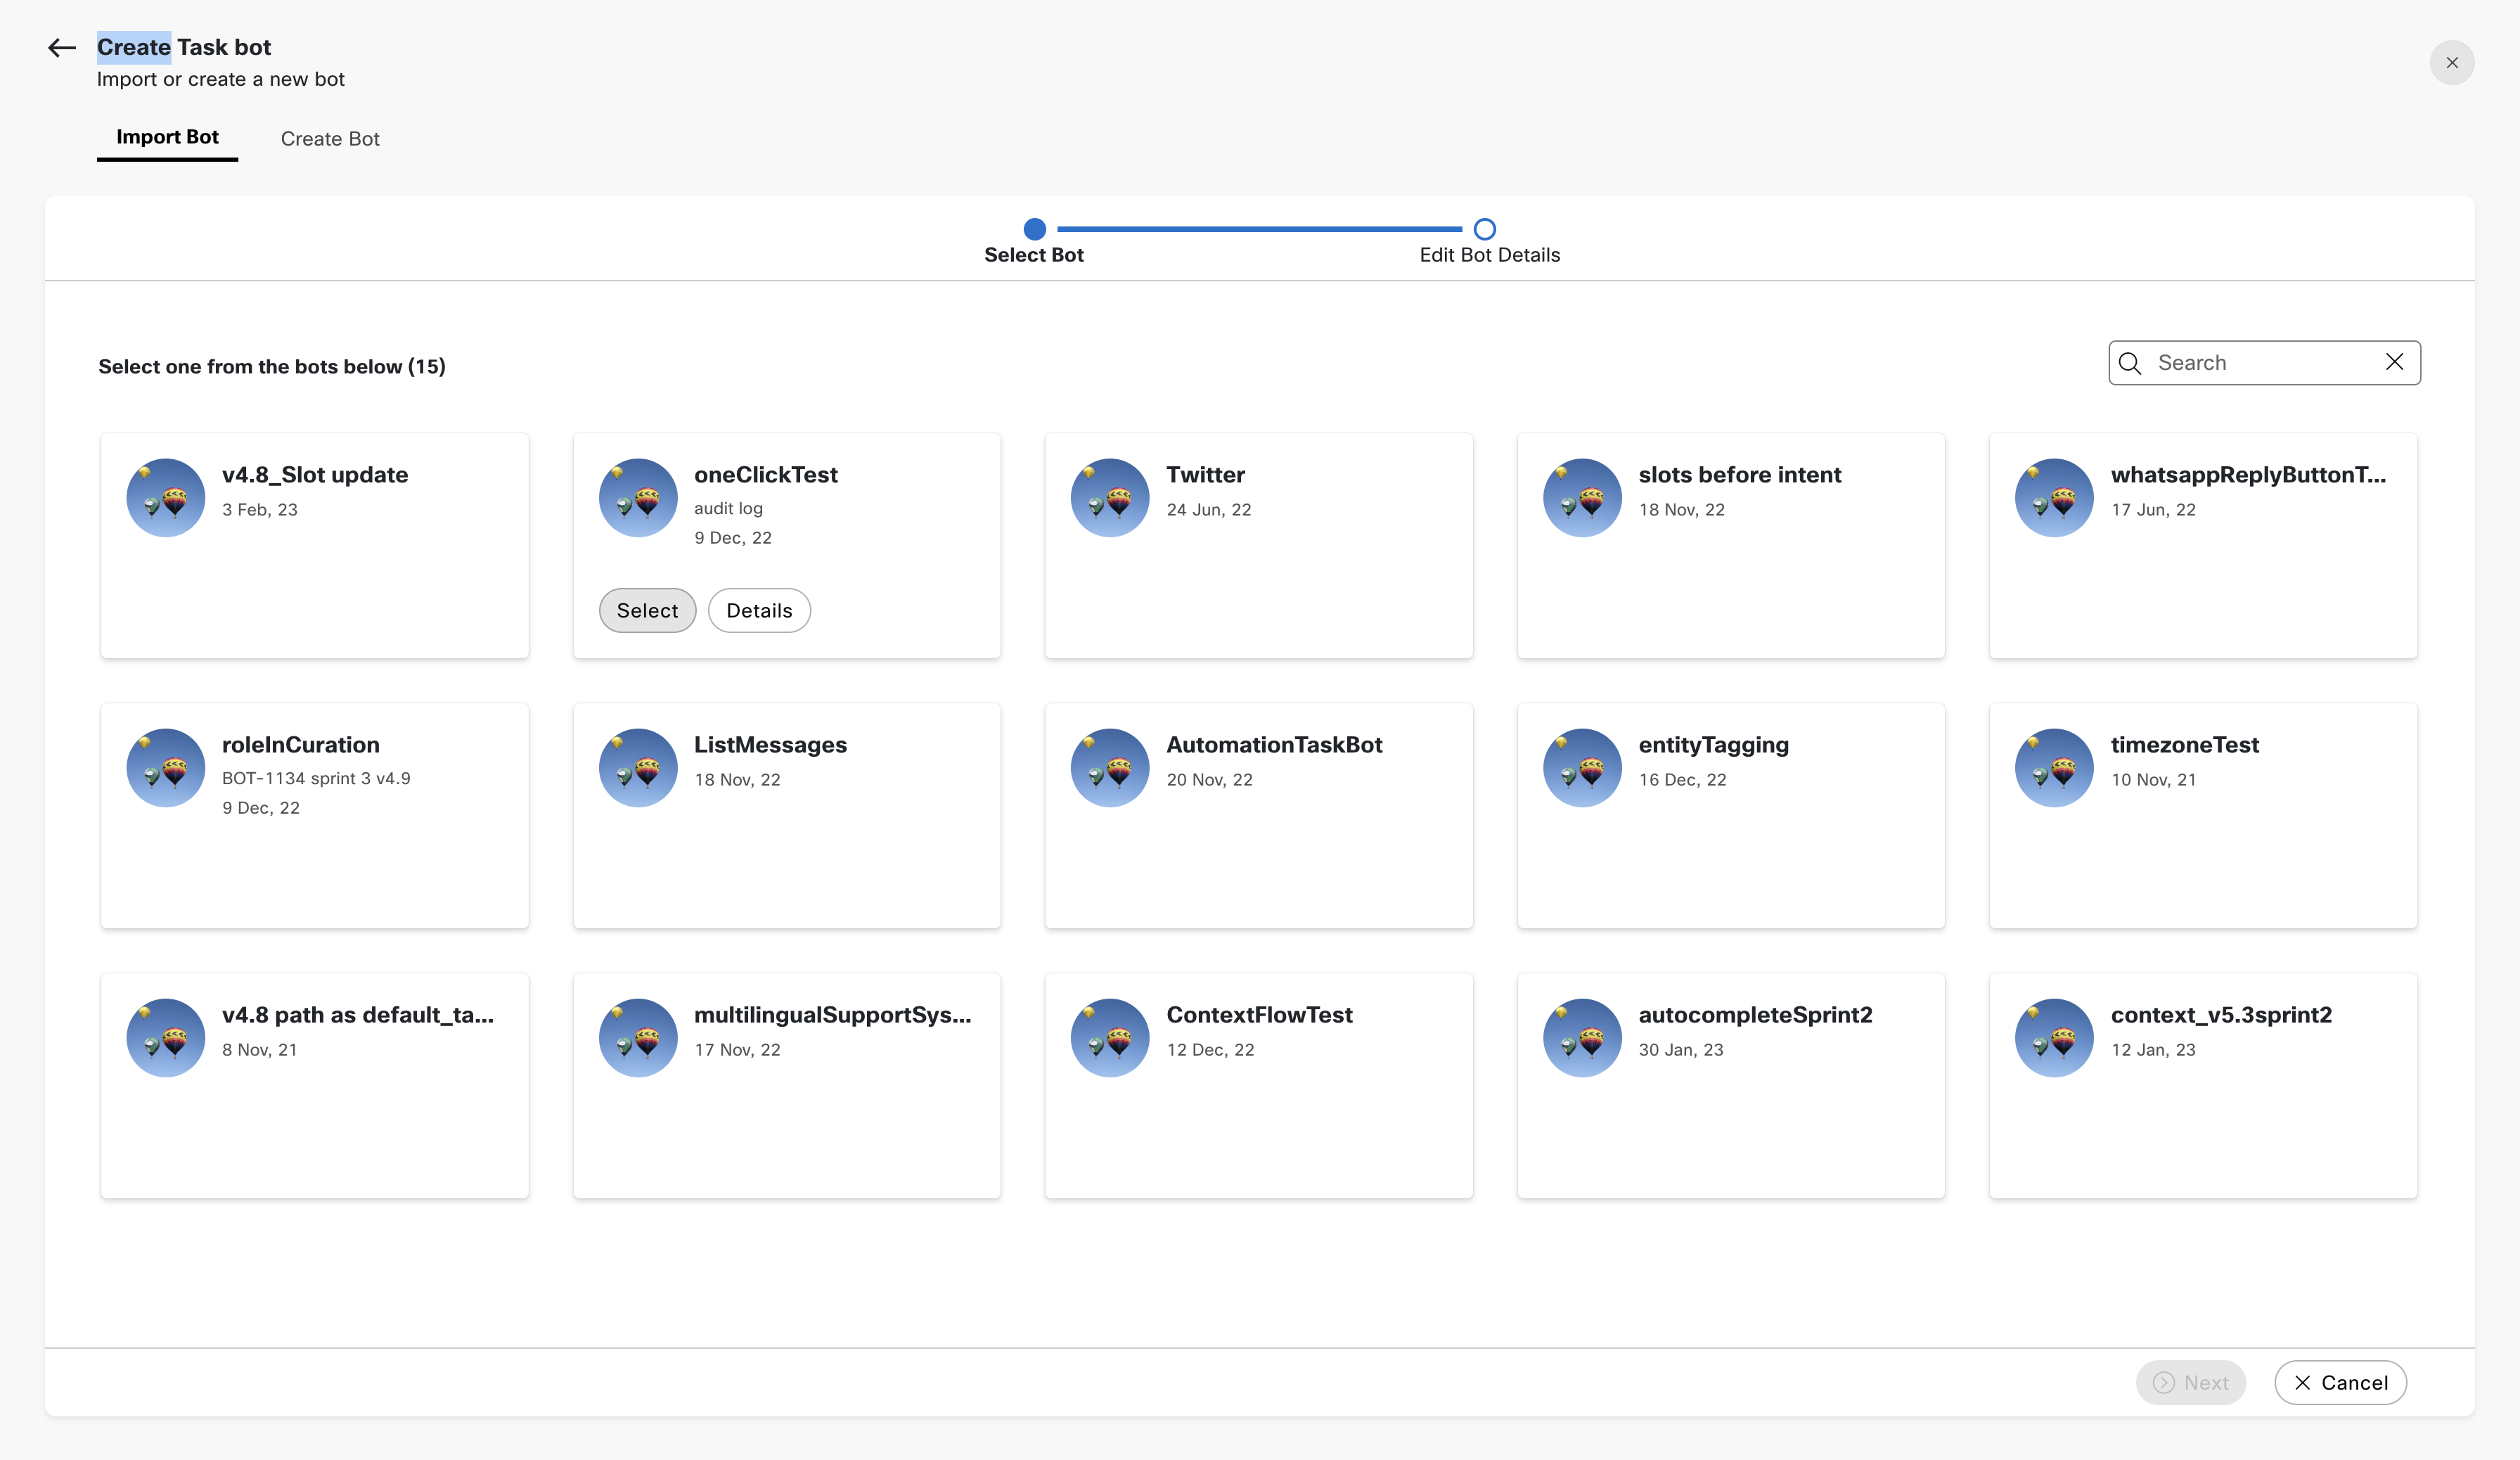
3.a. To view the details of a prebuilt bot, the user can click on the 'Details' button available, on hover, in the bot card.
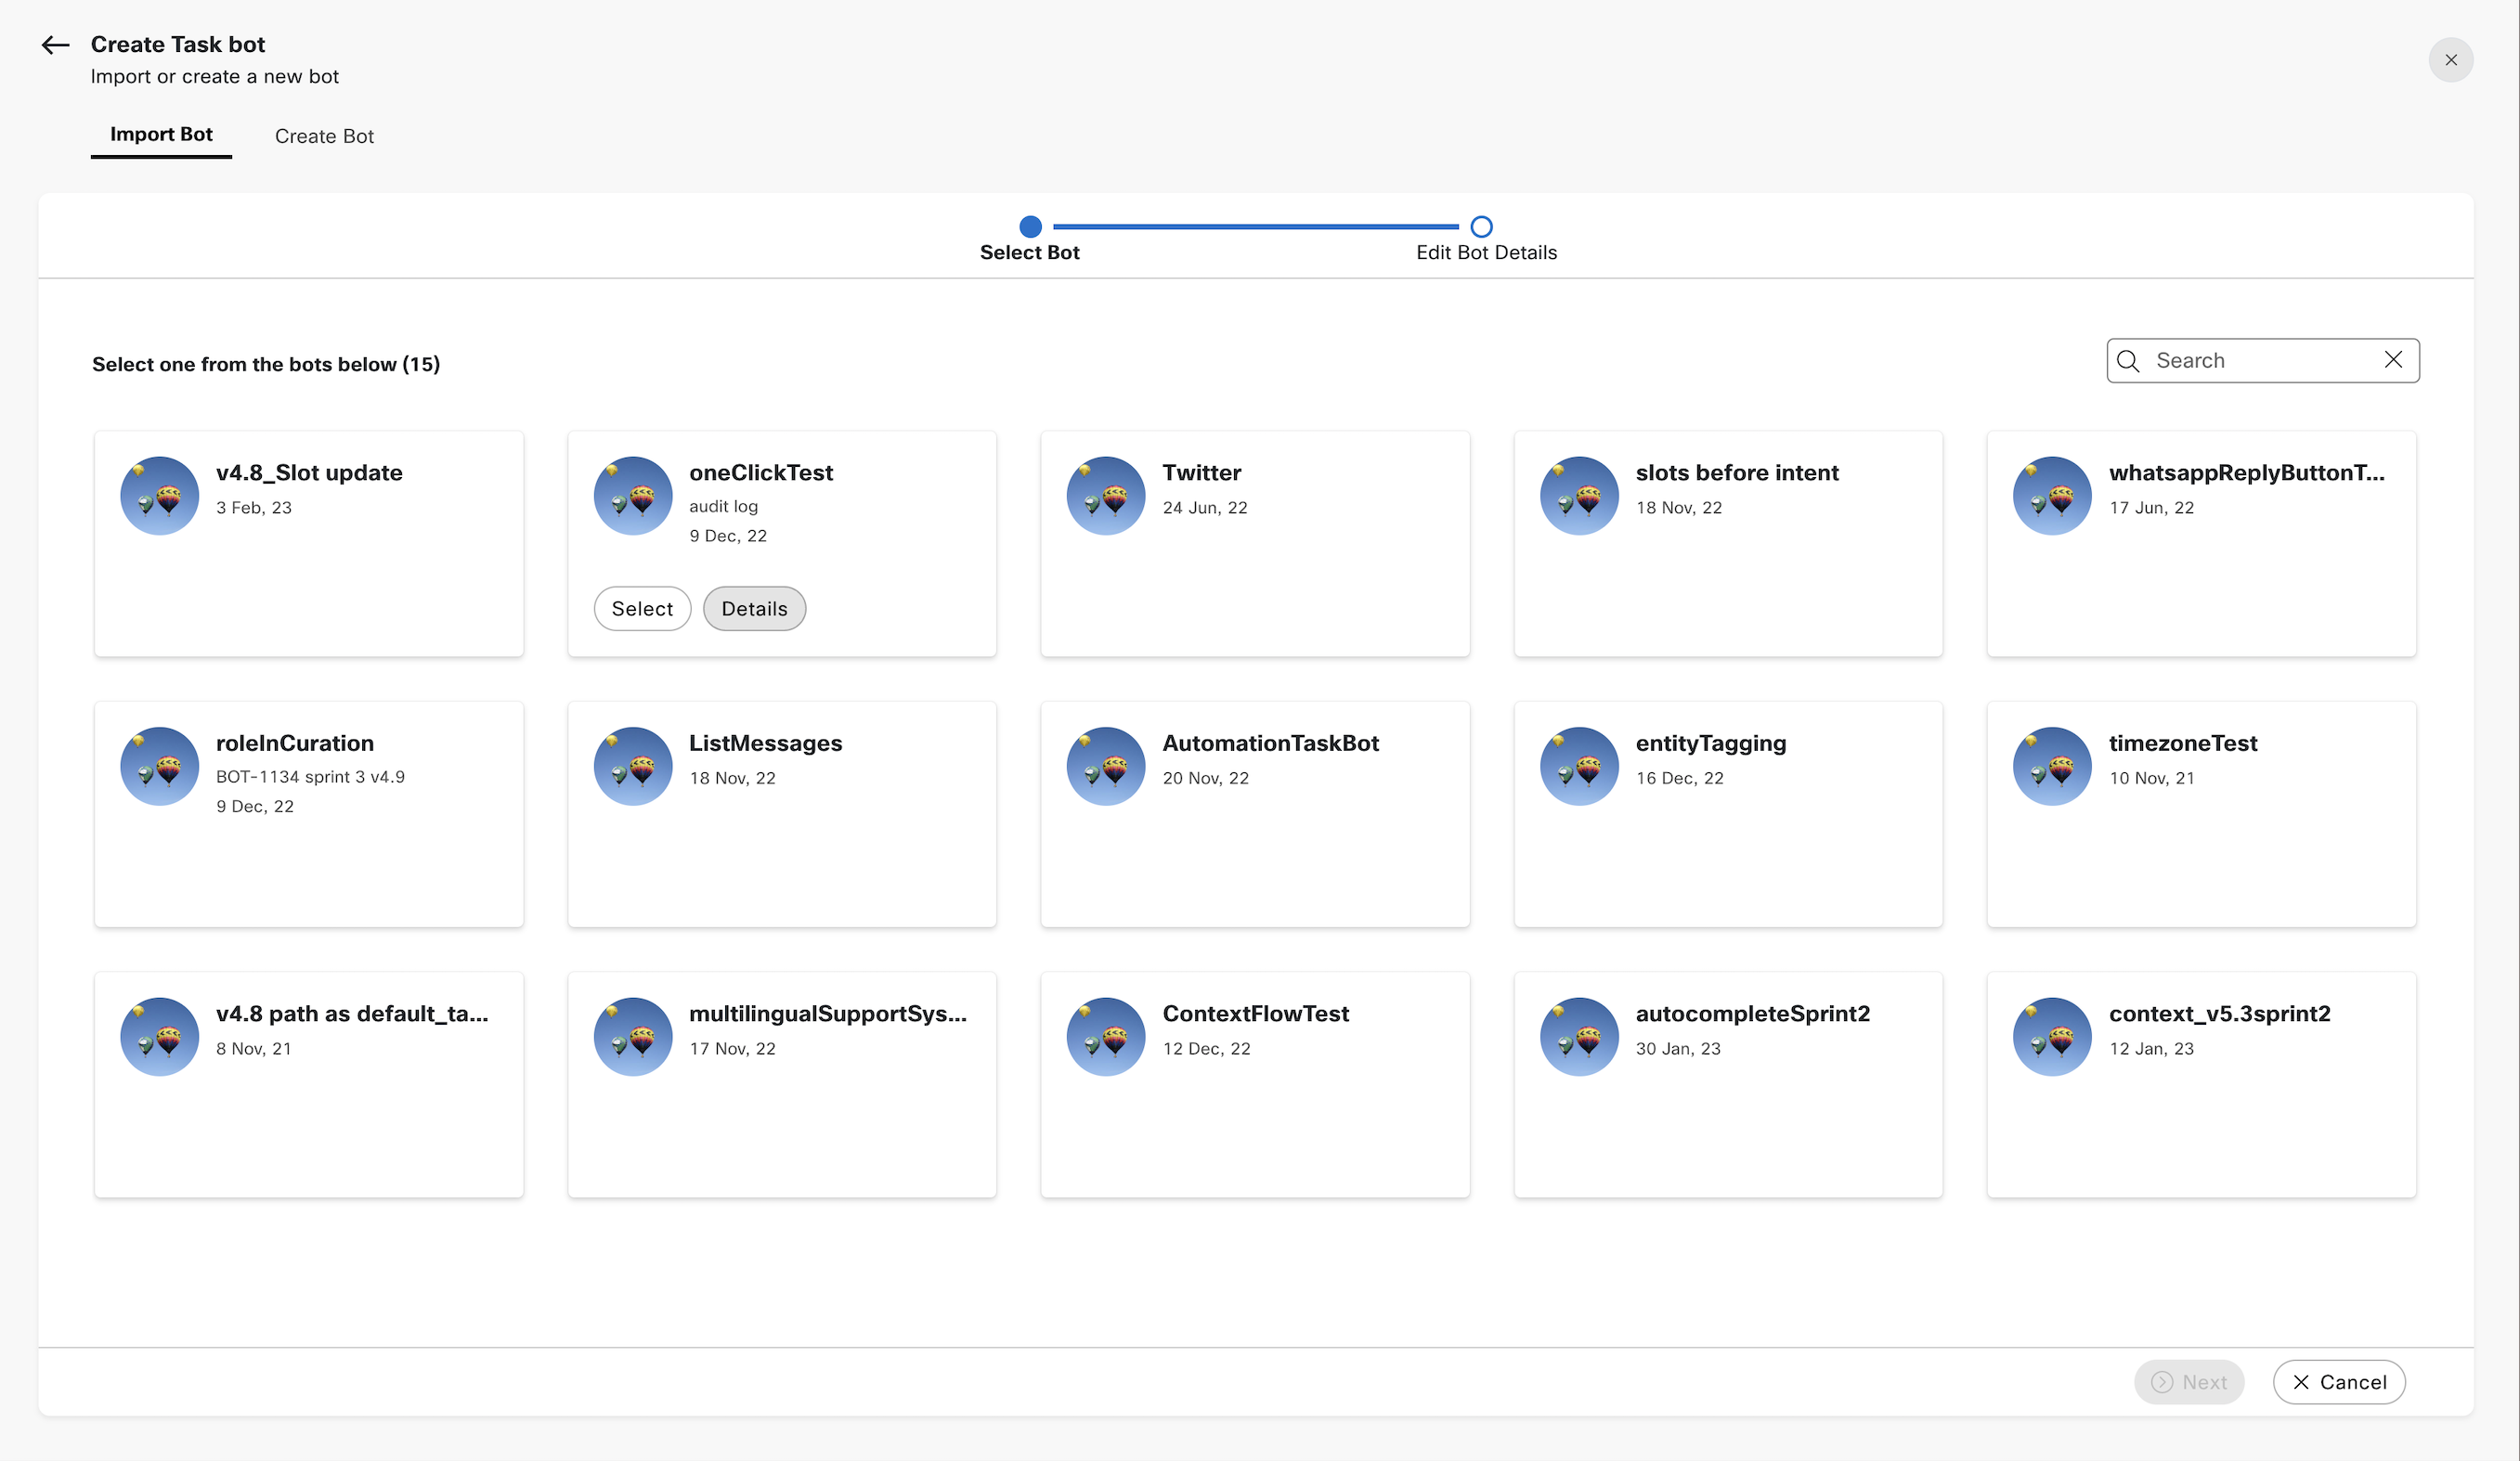
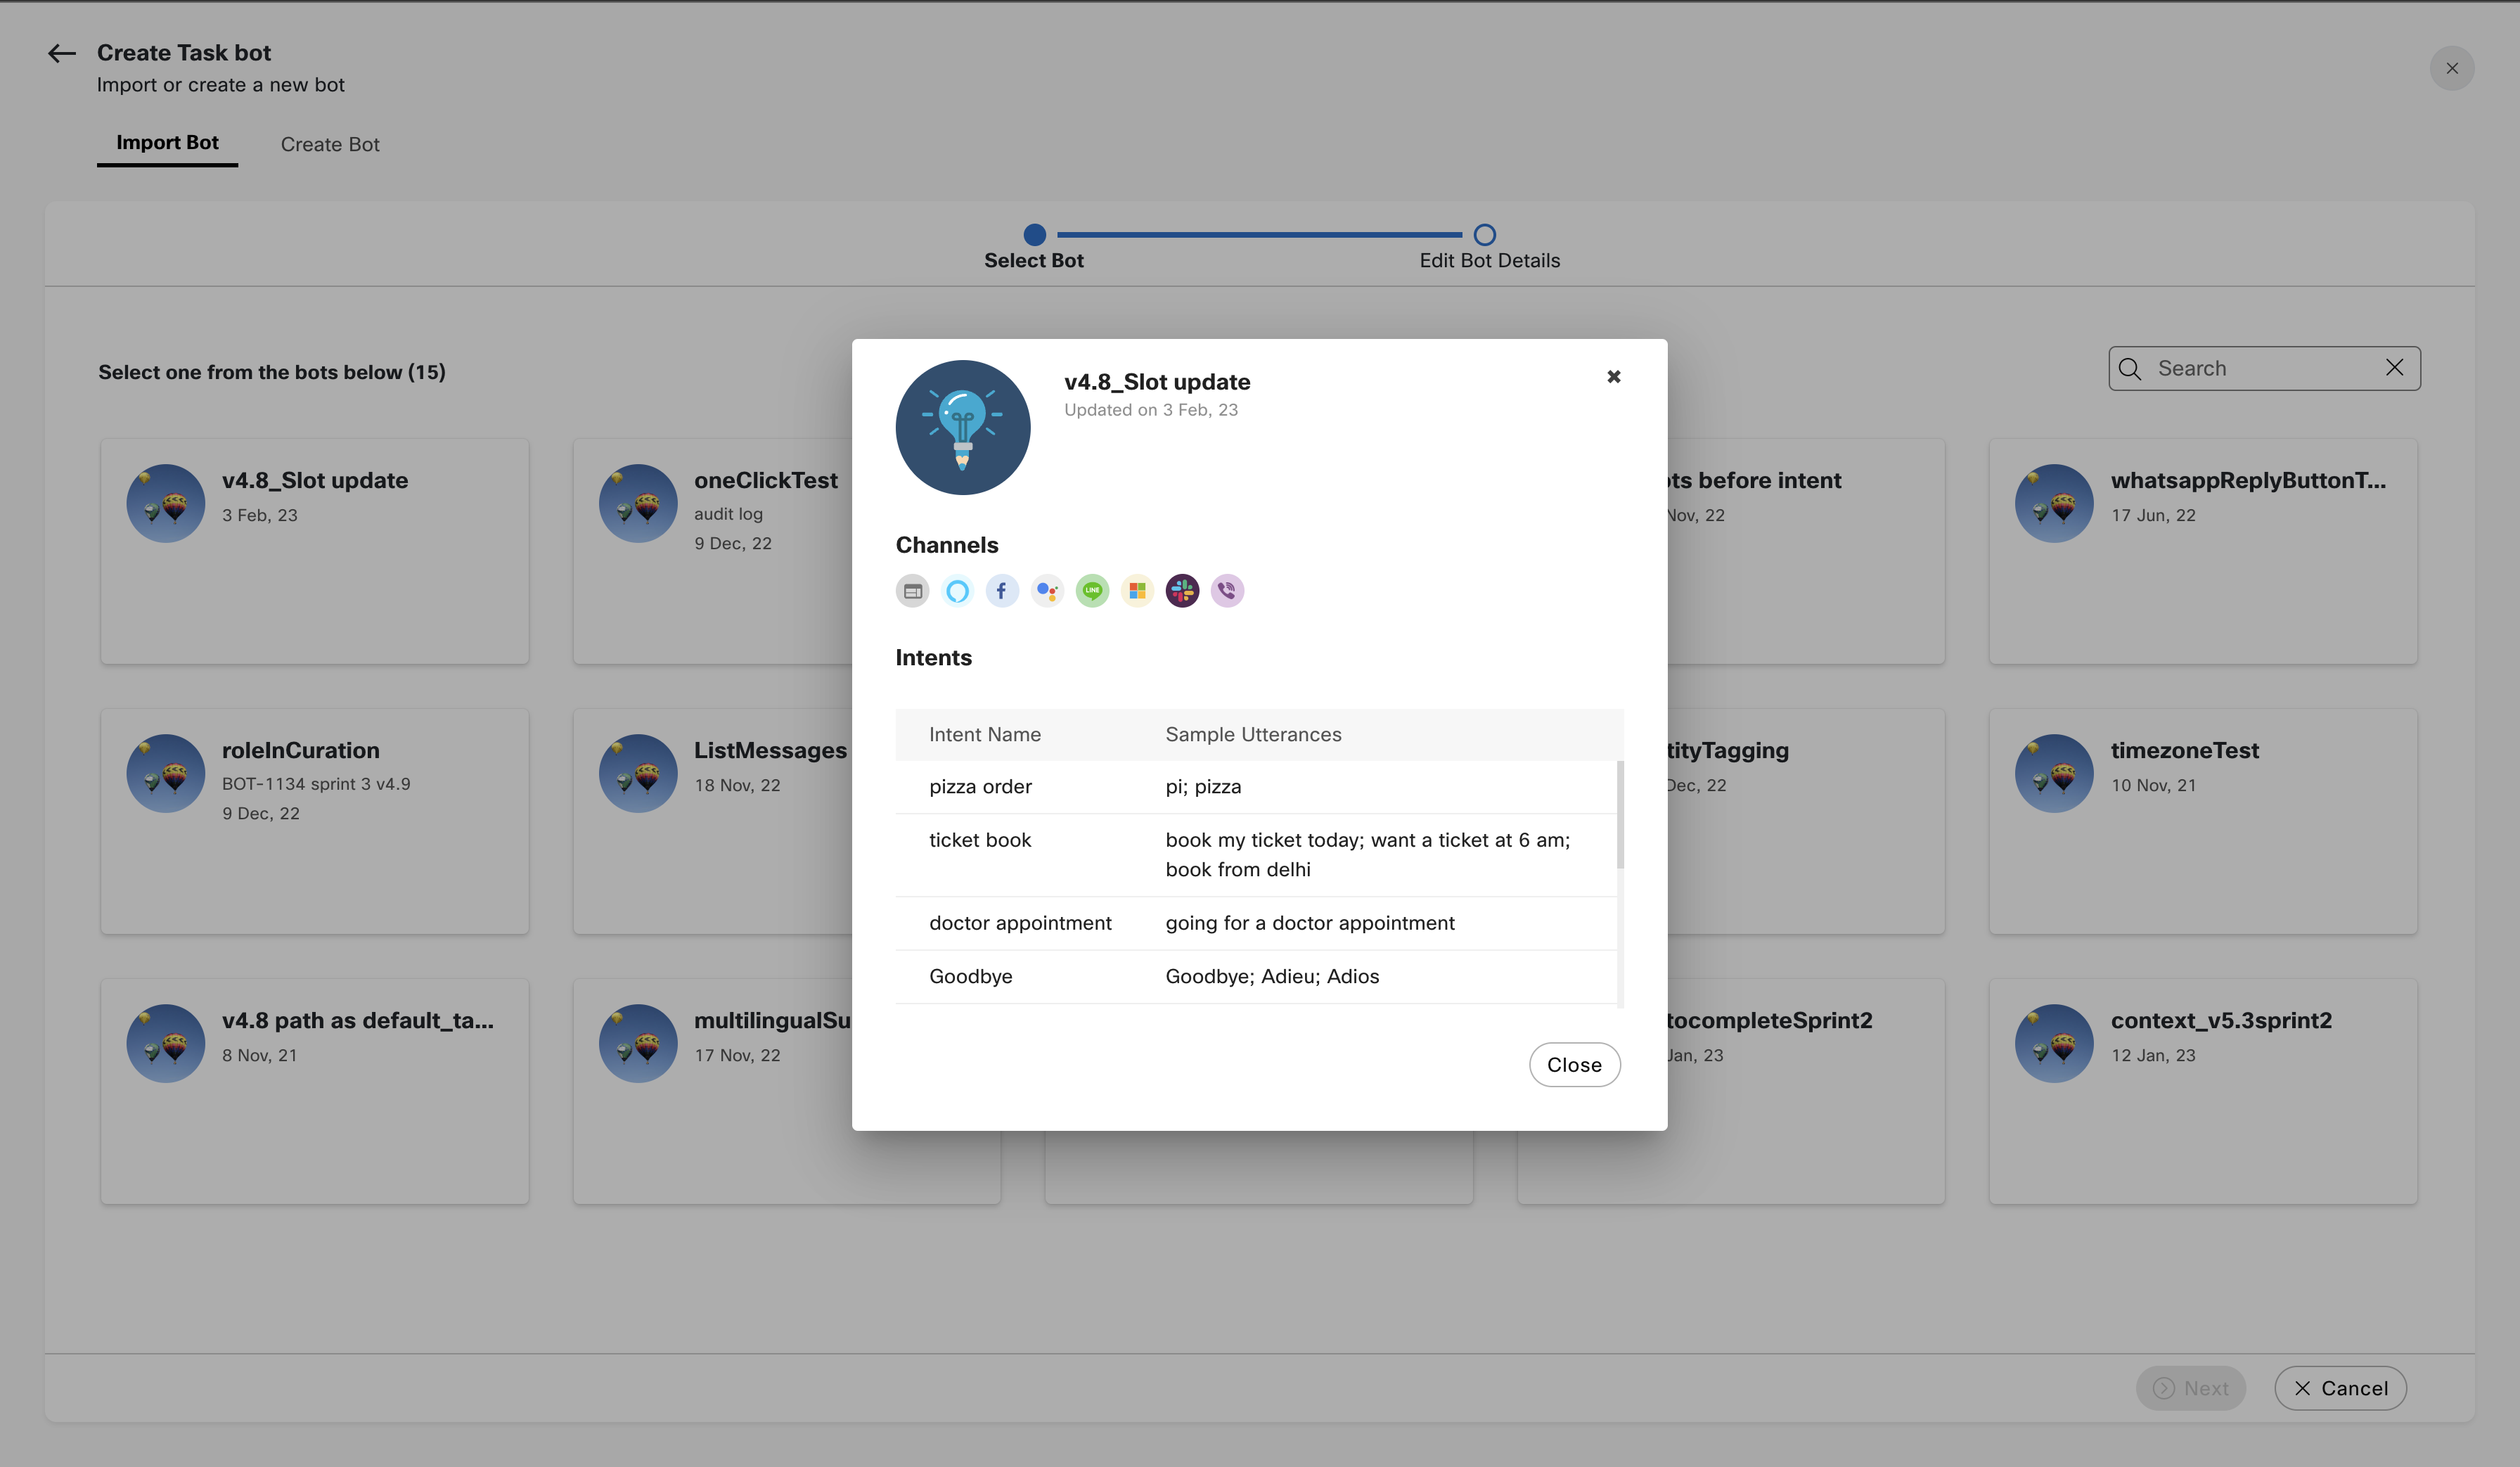
3.b. The user can then 'Select' the bot that needs to be imported and click on 'Next'
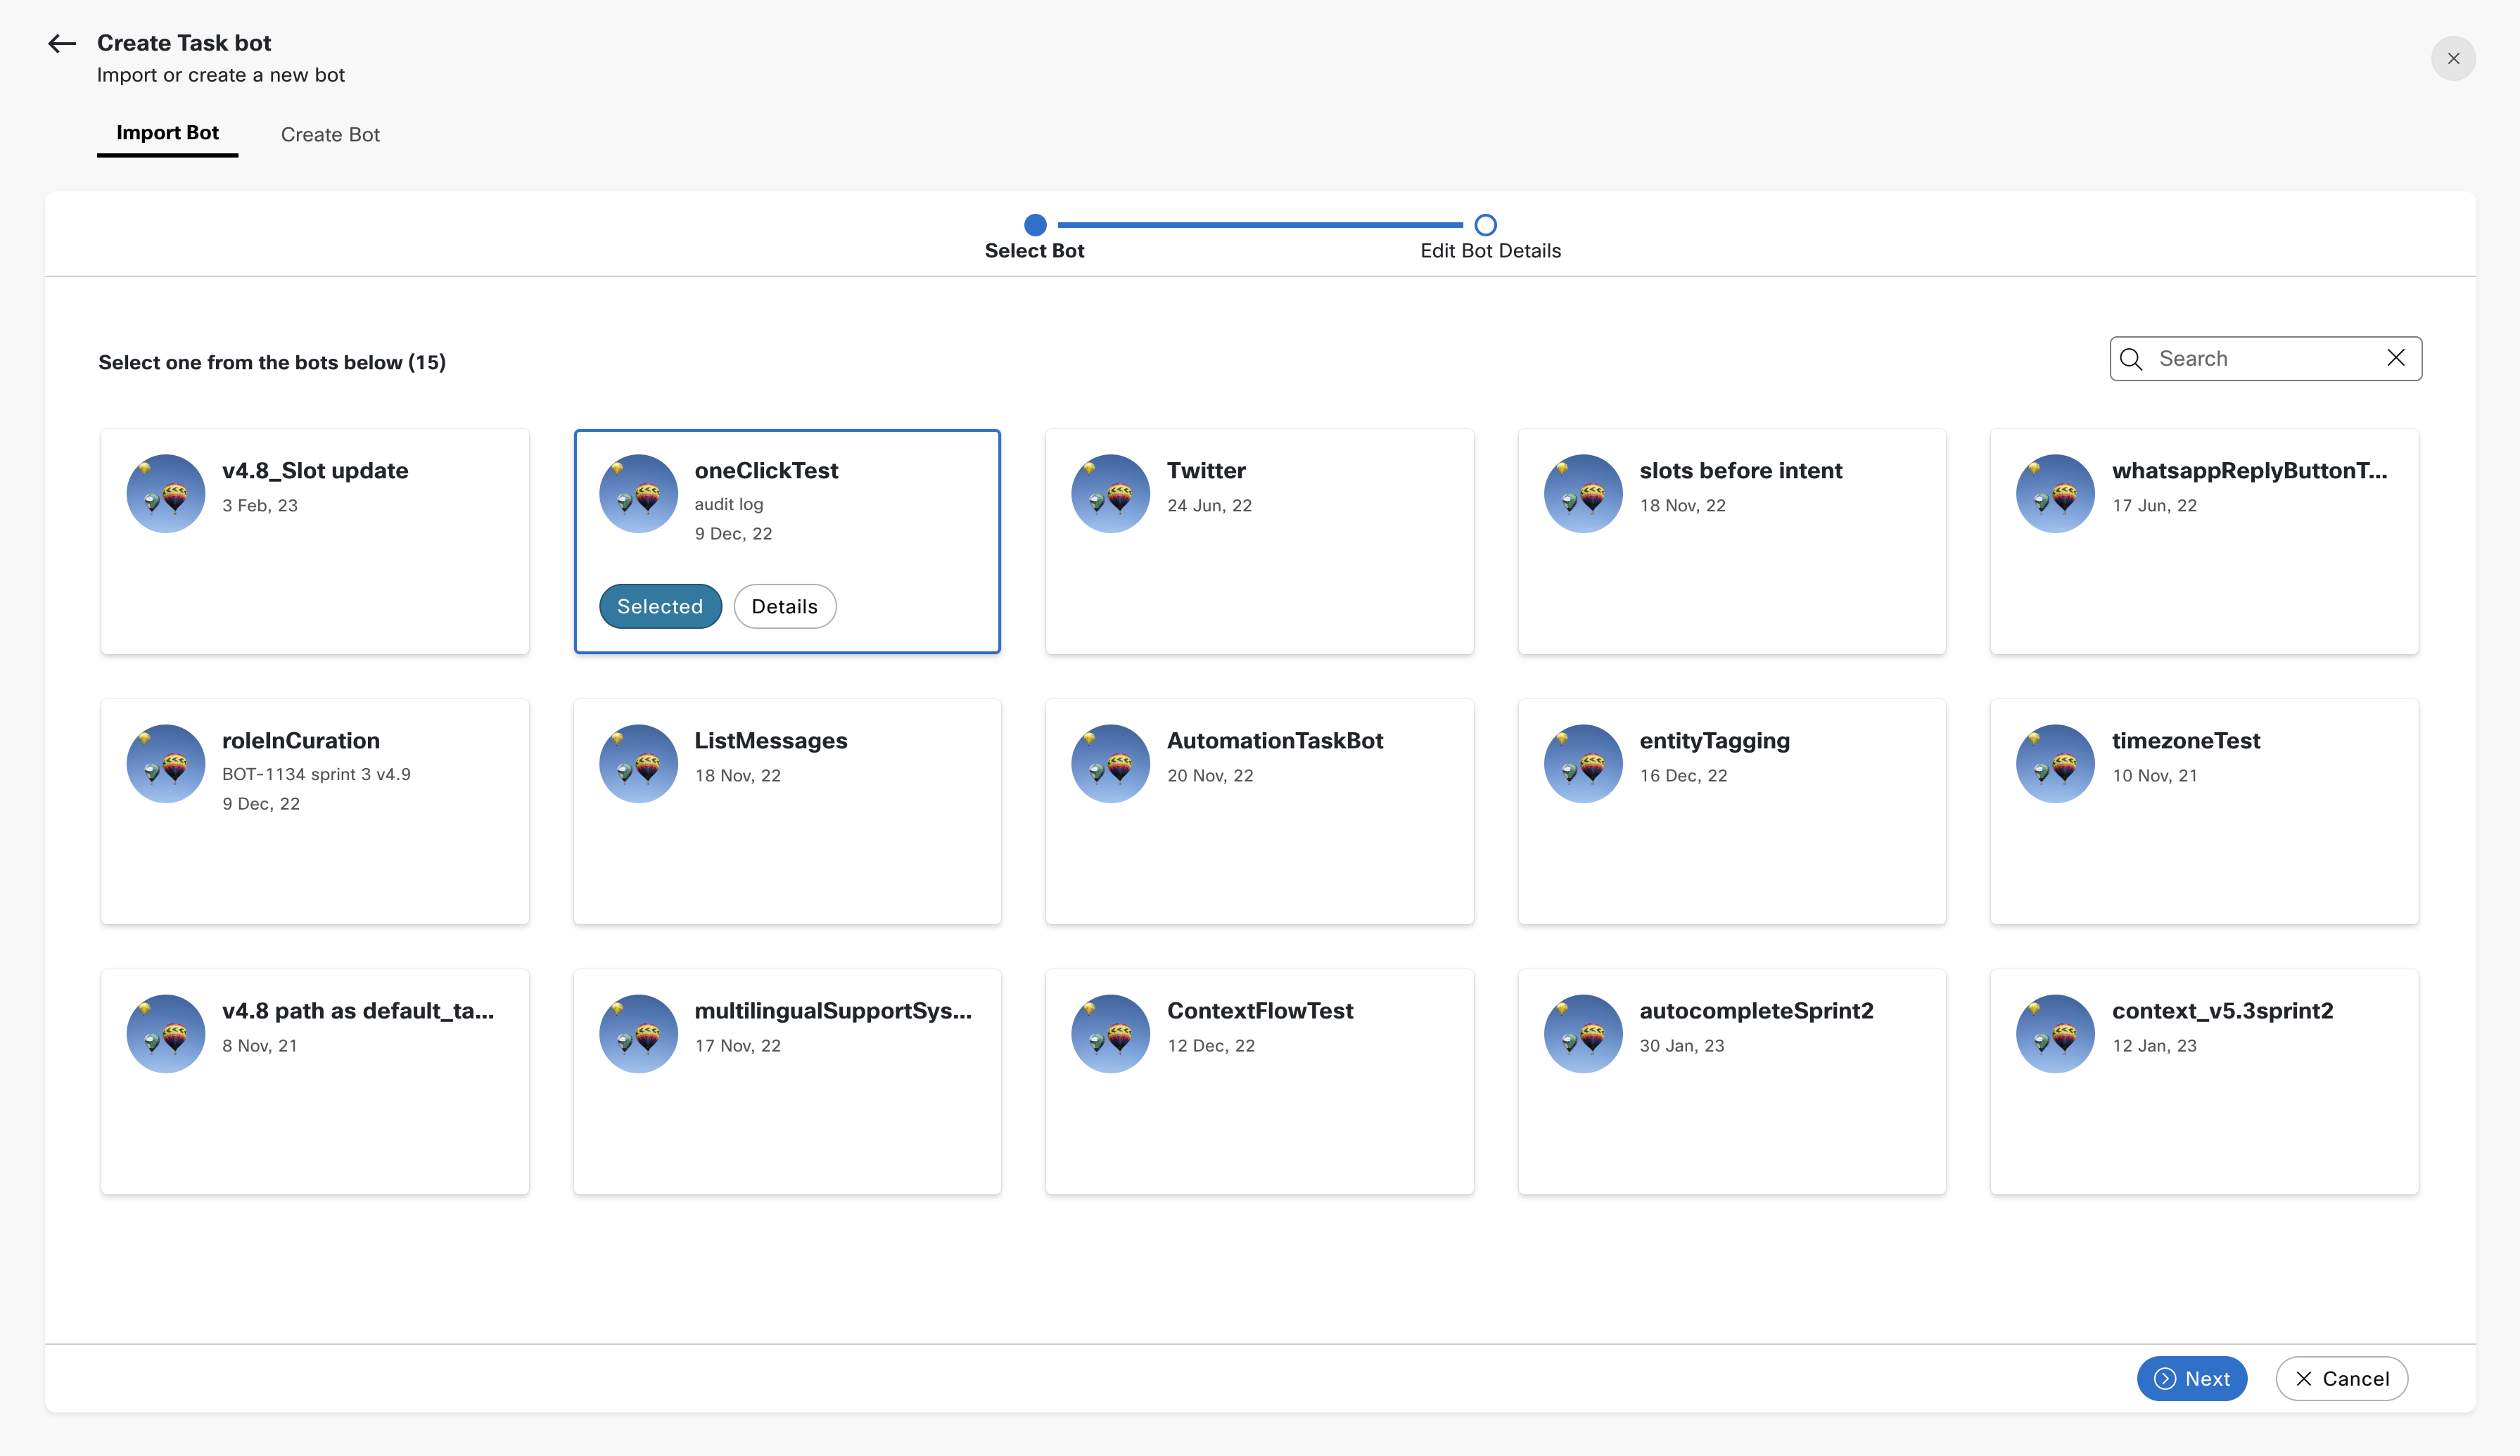
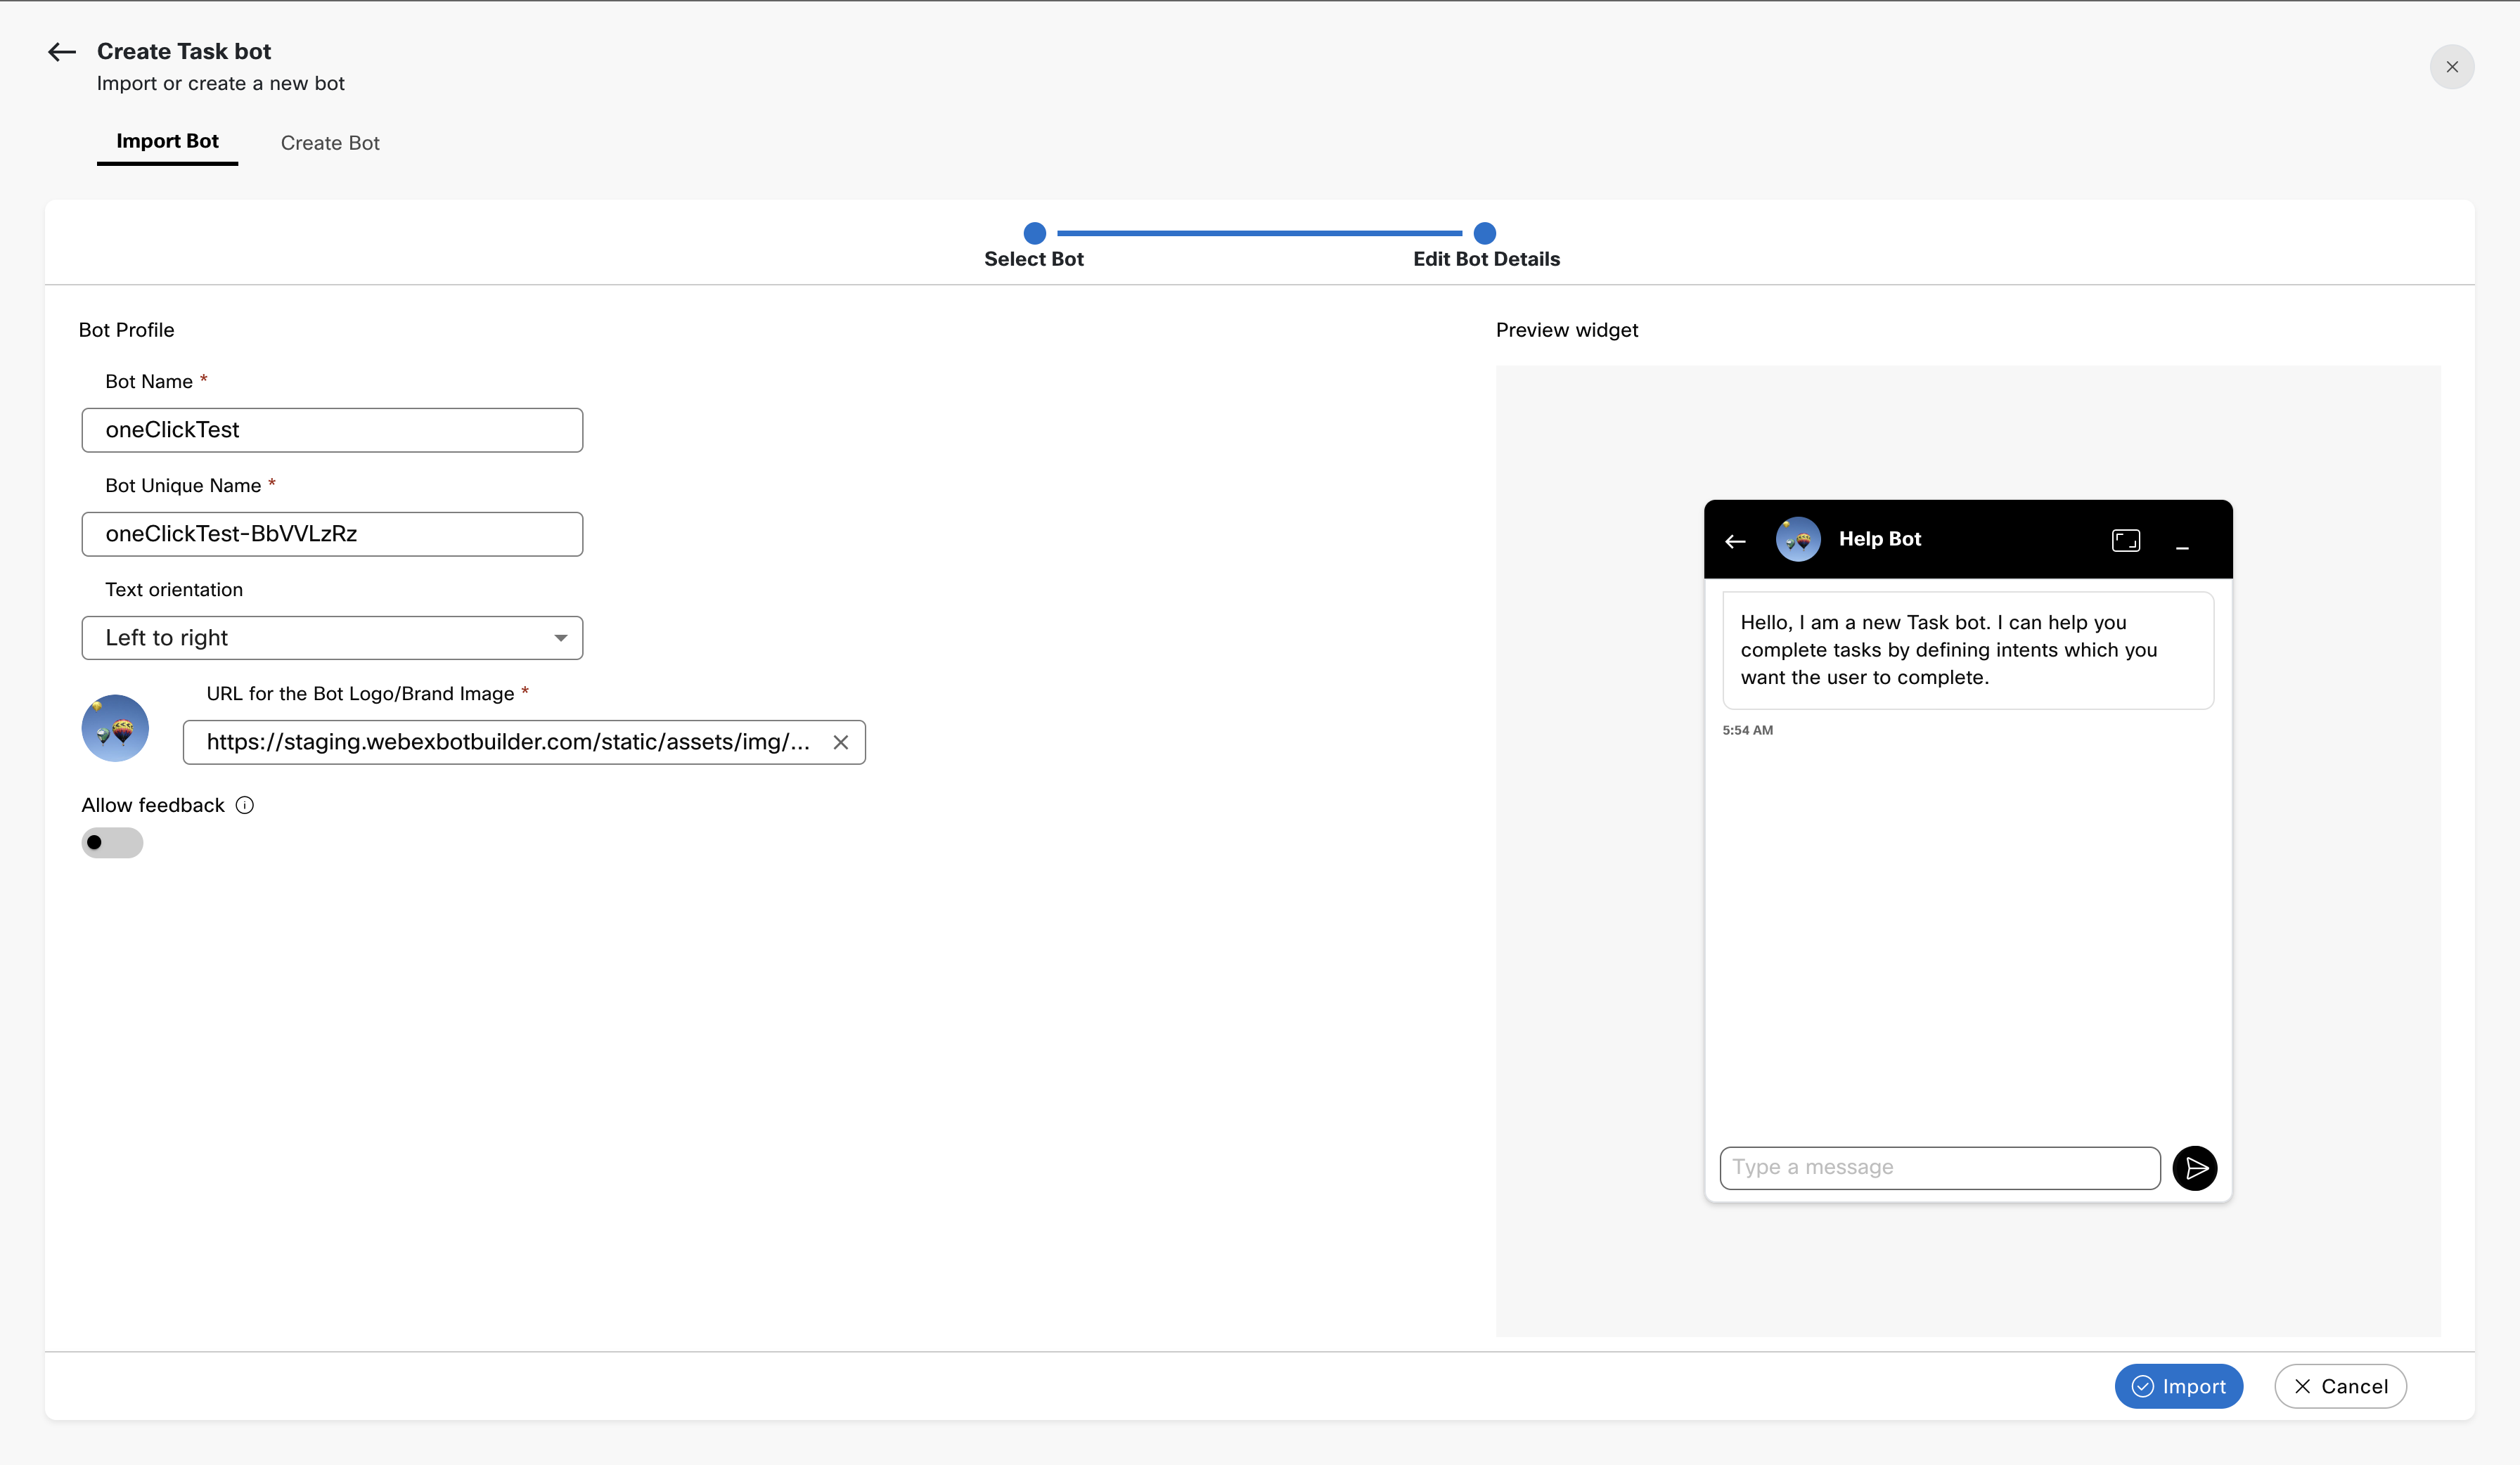
3.b. In the next step the user can edit the pre-filled bot details before importing
The building blocks of task bots are:
- Intents to represent a task or action the user wants to perform through their utterance.
- Entities to extract specific data related to intents.
- Responses to converse with the user.
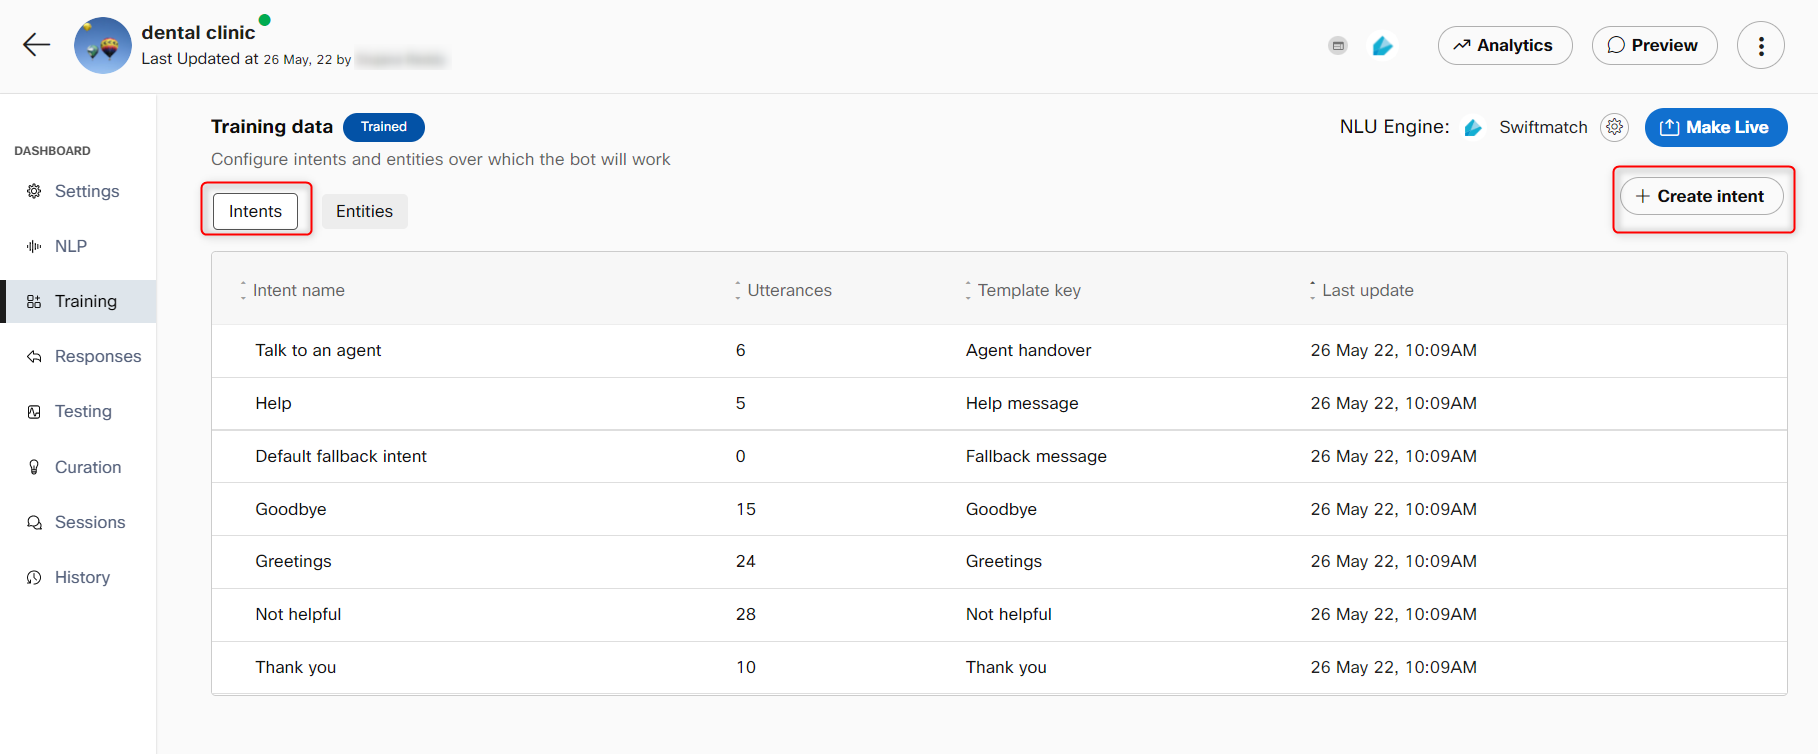
Intents and Entities are available in the Training section on the left and responses in the Responses section.
Importing and exporting a task bot
To migrate bots from one account to another, or to replicate bots within the same account, you can import or export task bot corpus in JSON from the Training section.
The kebab menu next to +Create intent button contains the options to import and export the training data. Selecting the Export to JSON option exports the training data along with the configured rich responses and responses for different channels to a JSON file whereas selecting the import from JSON option allows you to browse and import a JSON file with training data onto the Intent tab.
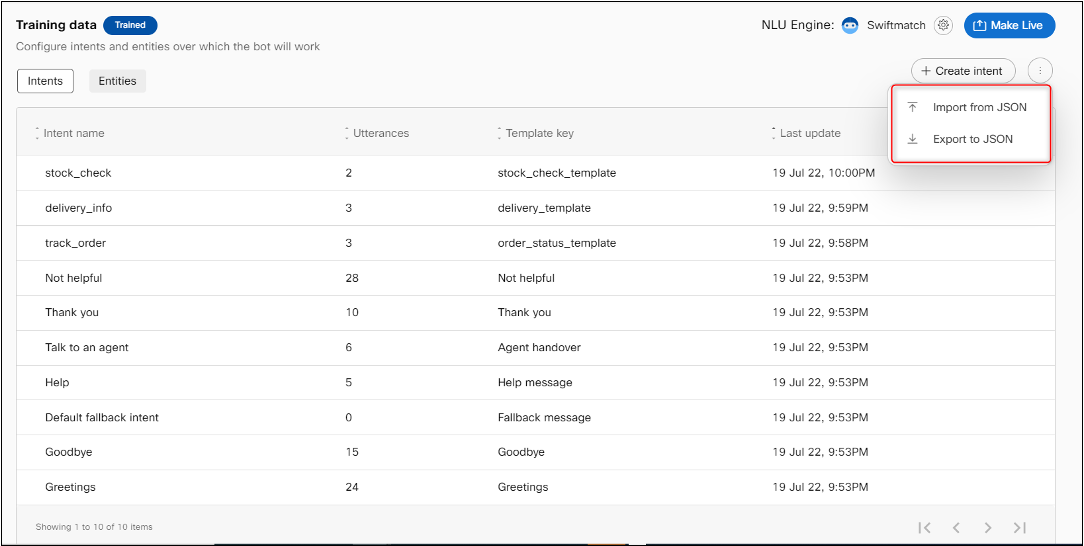
Options to import and export training data to and from a JSON file
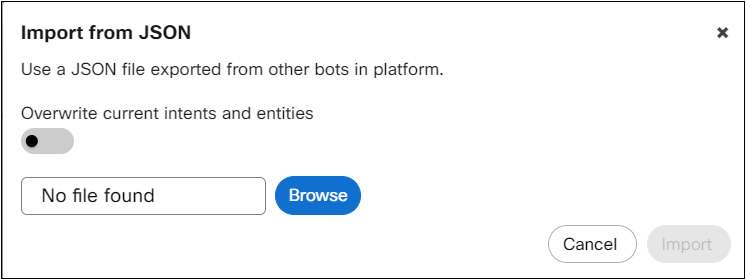
Import from JSON
This feature imports/exports not only the training data but responses as well.
Intents
An intent represents a task or action the user wants to perform in each conversation turn. Bot developers define all intents that correspond to tasks the users want to accomplish in the bot. When a consumer writes or says something, Webex Bot Builder matches their utterance to the best intent in your bot. Matching an intent is also known as intent classification.
To access and start configuring intents, navigate to the Training section of your bot.
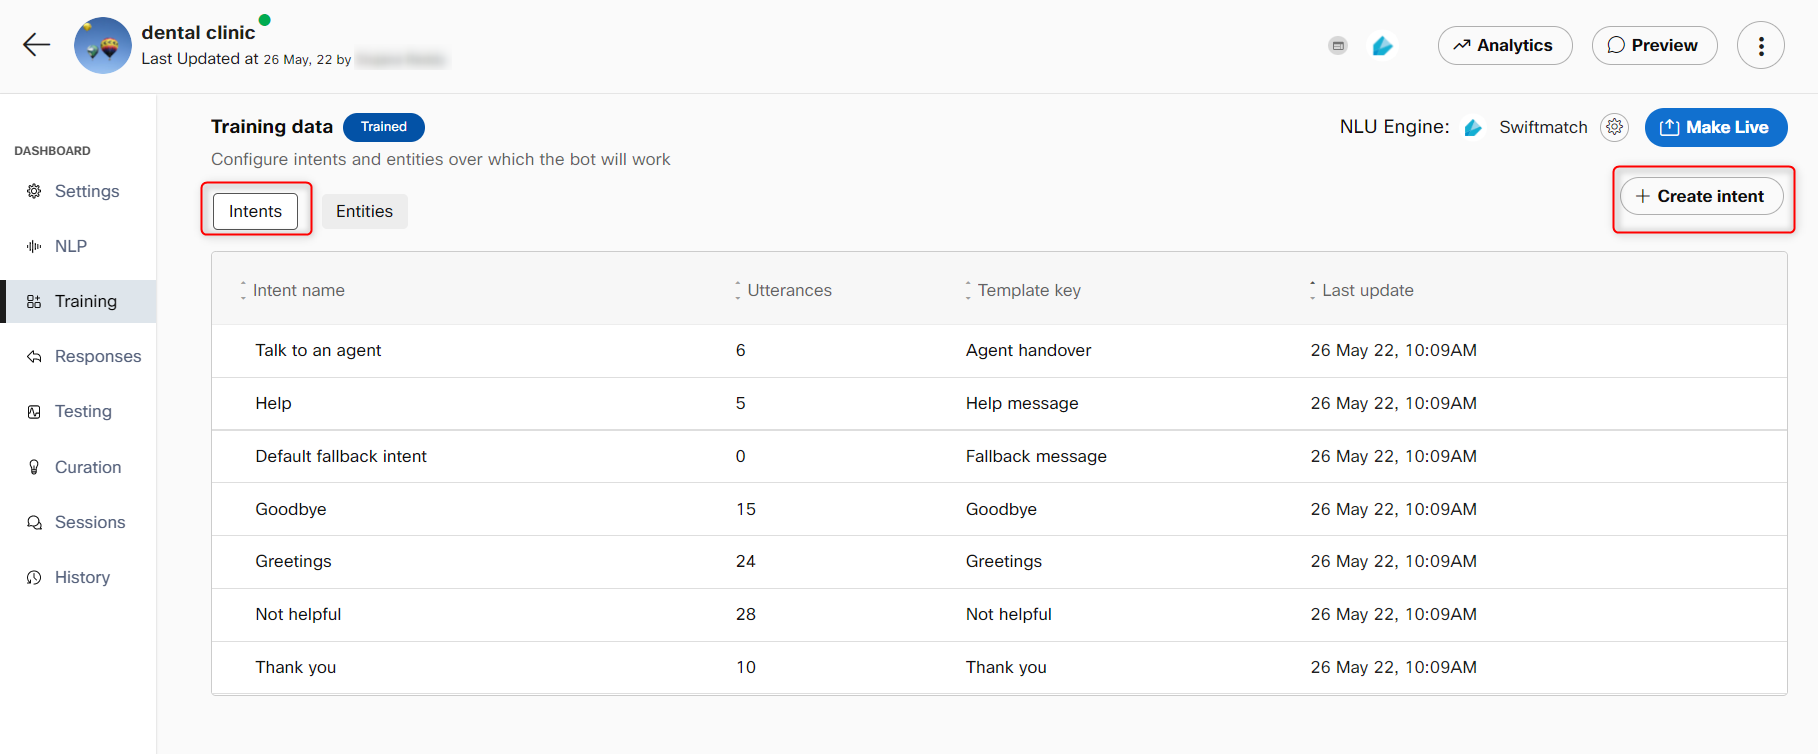
On the creation of a task bot, system 'help' and 'default fallback' intents are added automatically (these can be deleted or modified). The 'help' intent enables users to query the bot’s capabilities.
Default fallback intent
Any bot is limited by the scope of what all intents it has been configured to respond to. But once a bot is taken live, the enterprise will not have control over the kind of questions its customers ask the bot. To ensure that users are not taken into uncontrolled conversational loops, the default fallback intent can be leveraged by the bot developers to gracefully bring the conversation back into the configured scope.
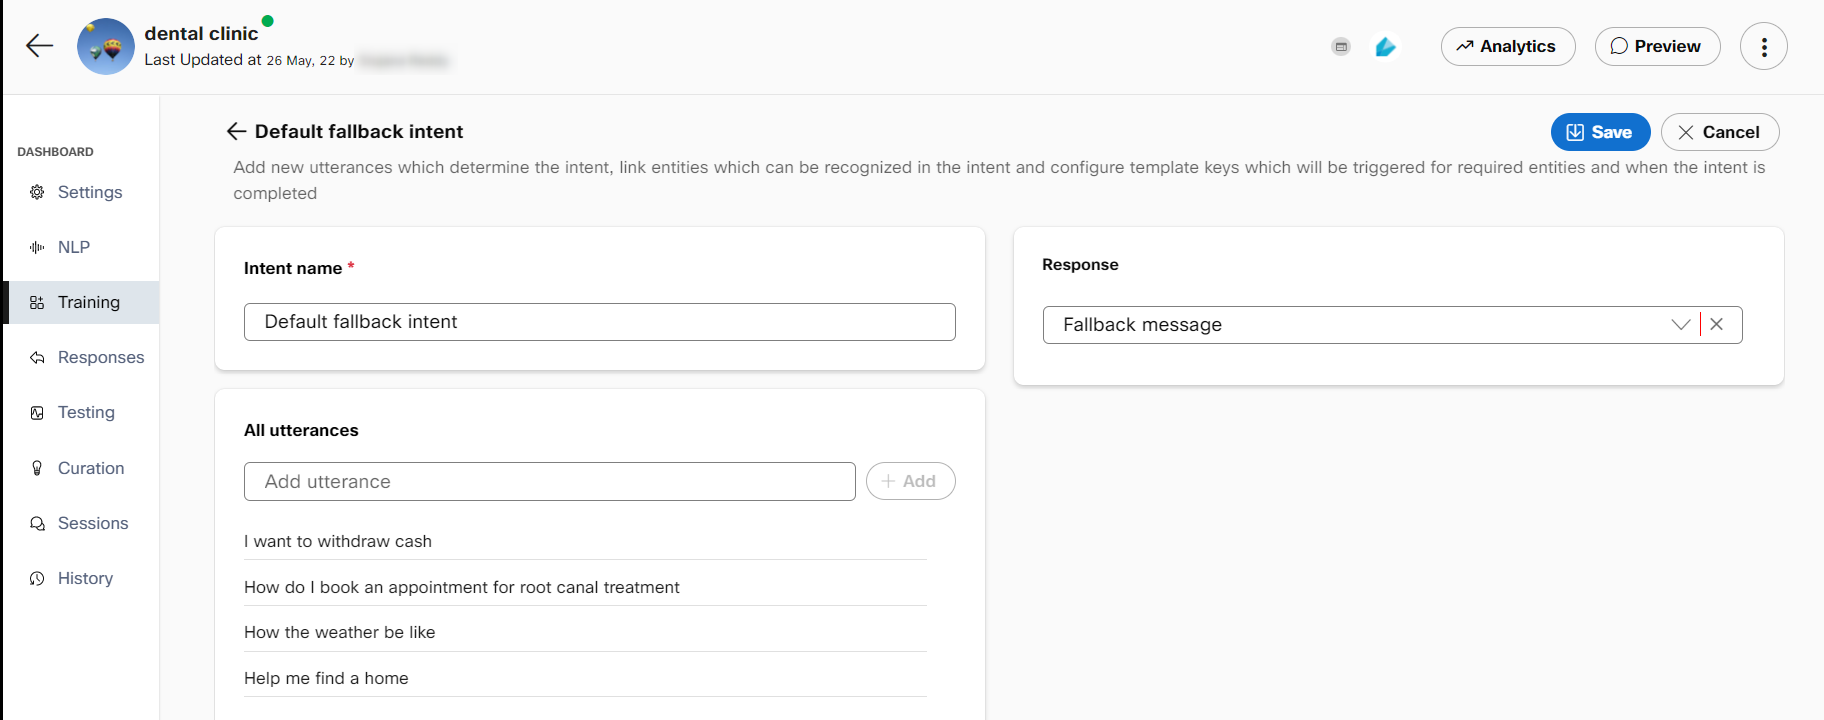
Default fallback intent in task bots
Default fallback intent configuration
Bot developers are not required to add any utterances to the fallback intent. The bot can be trained to trigger the fallback intent for known out-of-scope questions that might otherwise be misclassified into other intents
For example, in a bot configured for appointment booking, end-users might try to reschedule their appointments once they book them. If the bot does not support this functionality, ‘Reschedule my appointment’ can be added as a training phrase in fallback intent. When users try to reschedule their appointments through the bot, they will get a fallback response rather than being misclassified into the appointment booking intent.
The fallback intent cannot have any slots and must use the default fallback template key for its response. The response message itself can also be modified in the responses section.
Small talk articles
All new bots also have four small talk intents that handle user utterances for:
- Greetings
- Thank you
- The bot was not helpful
- Goodbye
These intents and responses will be available in the bot knowledge base by default on creating a new bot and can be modified or removed altogether.
Creating an intent
Use this procedure to create an intent.
Note: Before creating an intent, it is recommended that you create entities to link to the intent. The entities are required to complete the task. For information, see create entities
- Select a specific task bot in which the intent must be added. The Bot Configuration screen appears.
- Click the Training tab on the left-side vertical navigation bar.
- Click +Create intent. The Create intent screen appears where the intent’s name, training utterances, linked entities, and response template key can be configured.
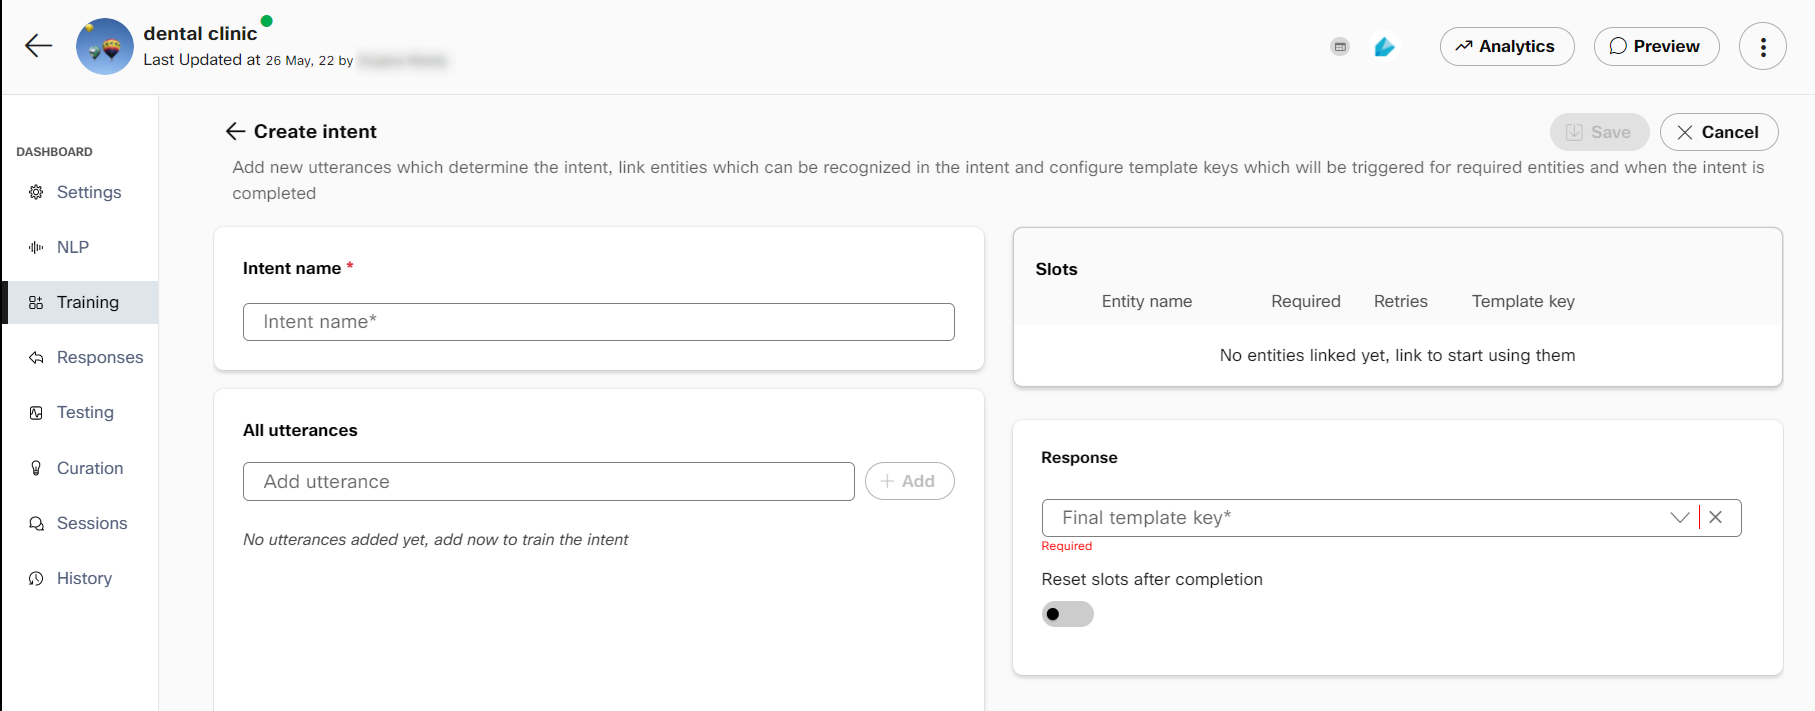
- Specify the intent name in the Intent name field and add utterances, which are example phrases that an end-user might ask to trigger this intent.
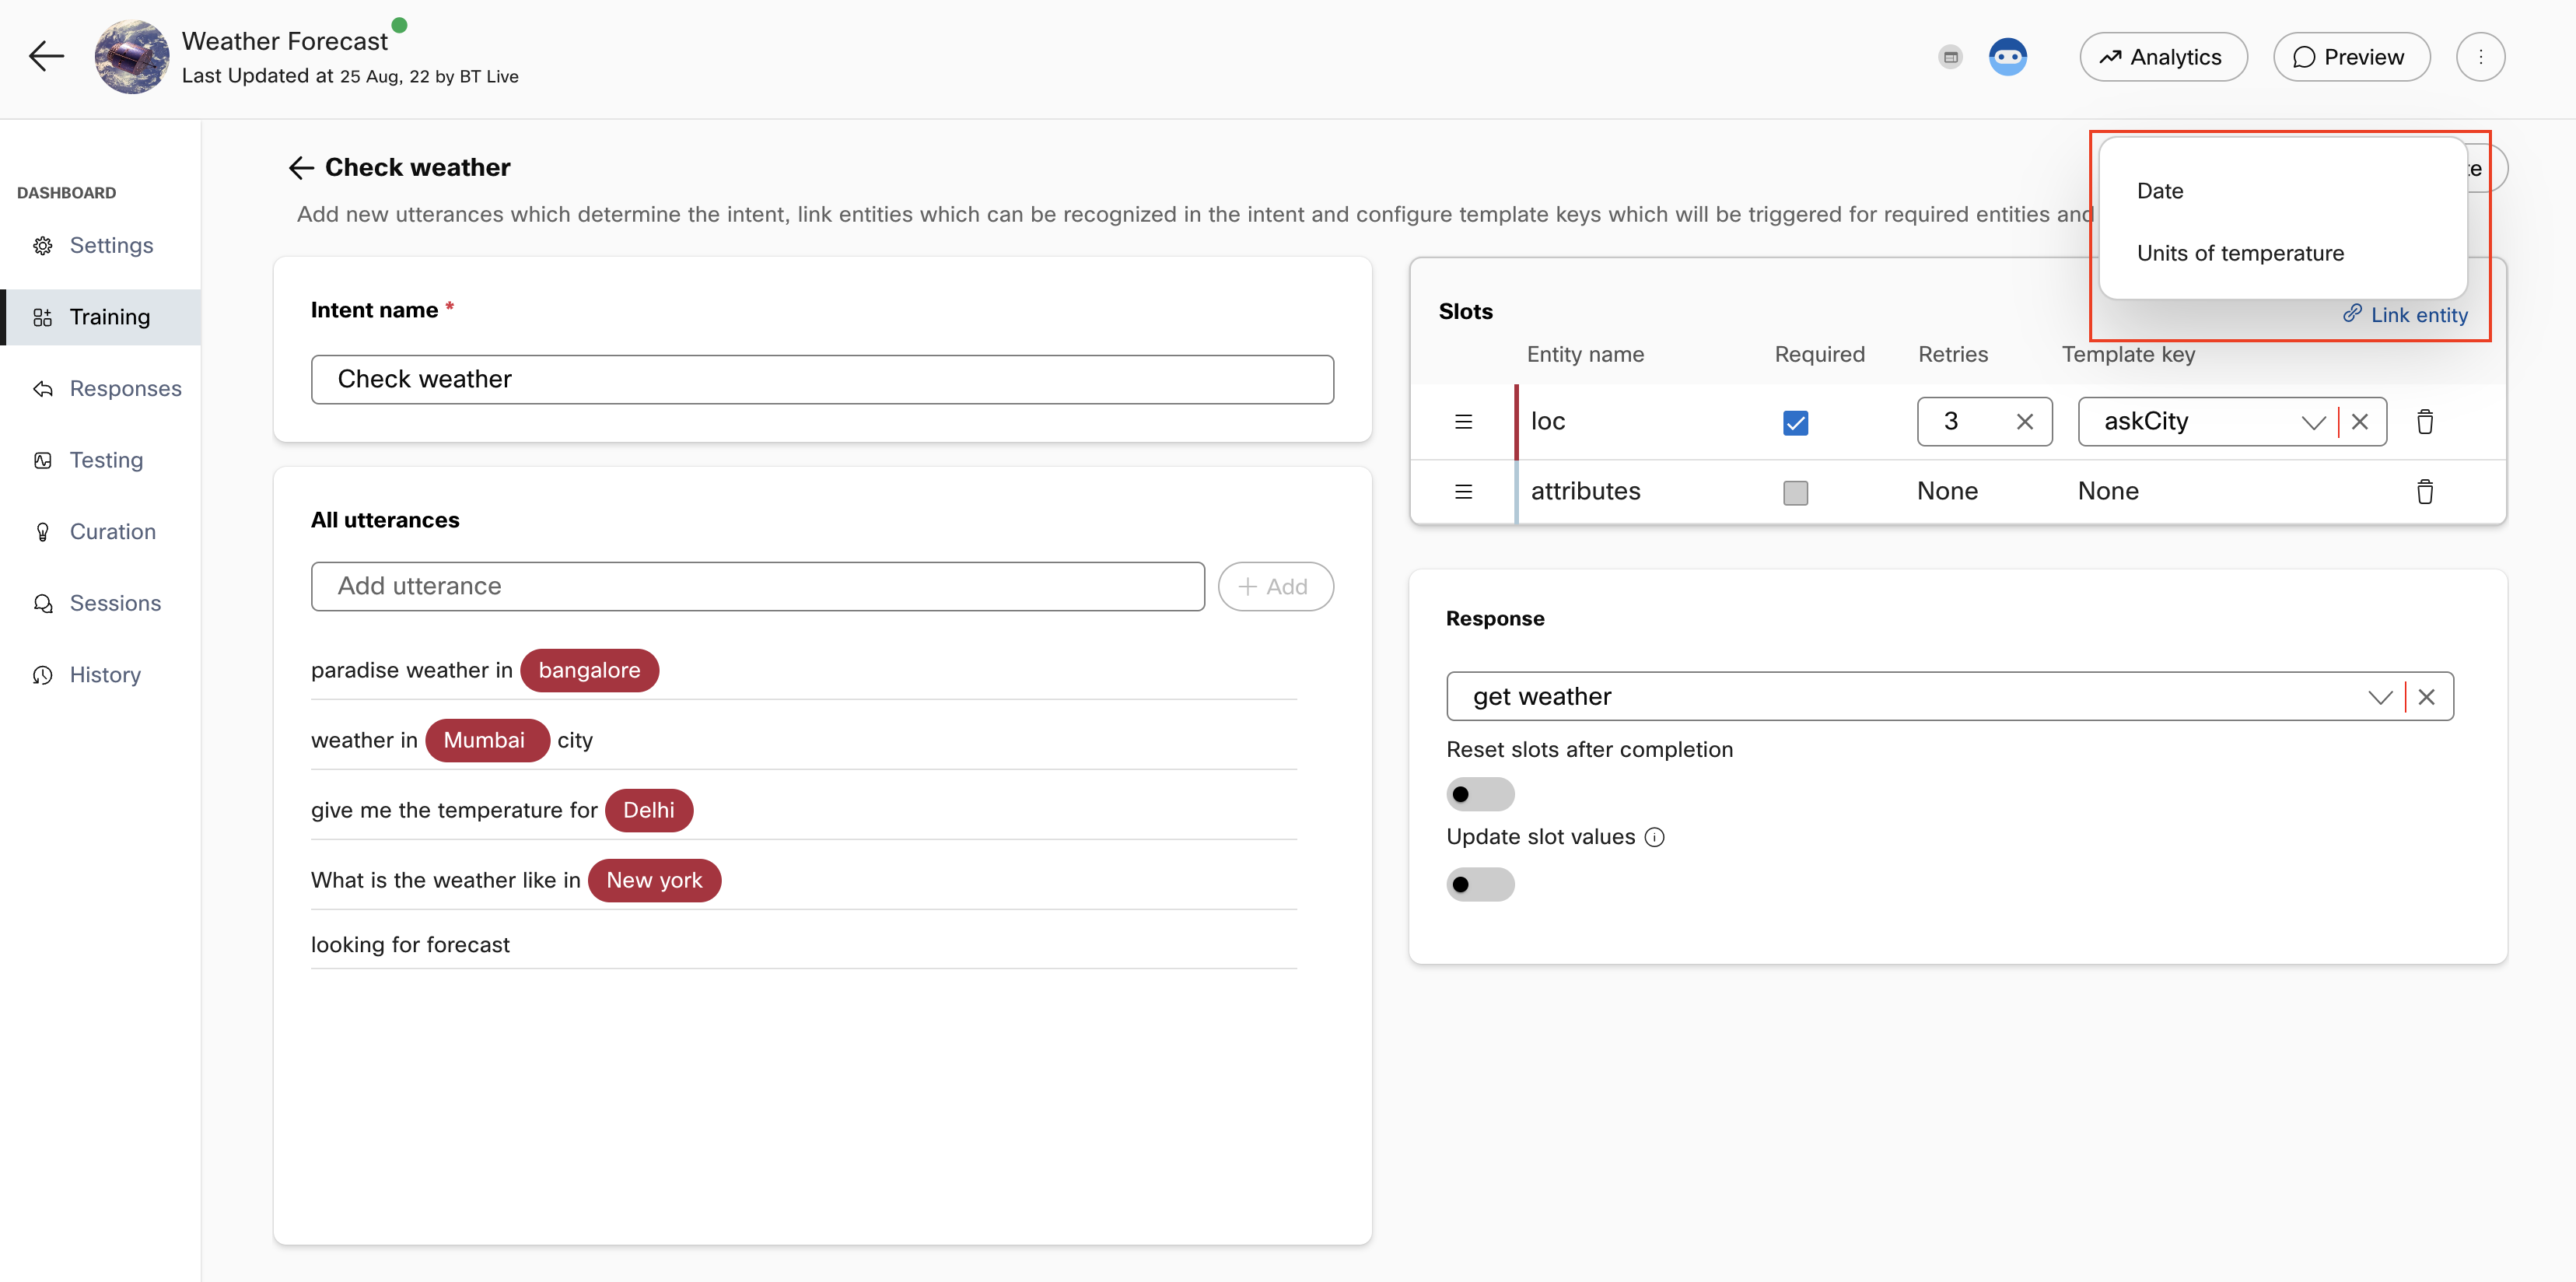
- If any entities are present in the added utterances, they will be auto-annotated in the utterances and will appear in the 'Slots' section on the right. If you wish to add more entities as slots in an intent, click +Link entity to see the list of entities that are created.
Note: Navigate to the Entities tab to create an entity. For information, see create entities
Each slot displays the entity name, whether it is required for intent completion, the number of retries the bot will attempt to get this slot value from the user, and the template key. - Select the Required check box, if the entity is mandatory to be filled by the consumer.
- Enter the number of retries allowed for this slot when it is incorrectly filled by the consumer. By default, the number is set to three.
- Select the Template key from the list. If you want to create a new response template key for the entity, click +Create new.
Note: The response content for these template keys is configured in the Responses section. Each template key is configured with a response that is sent to the user when this intent is triggered.
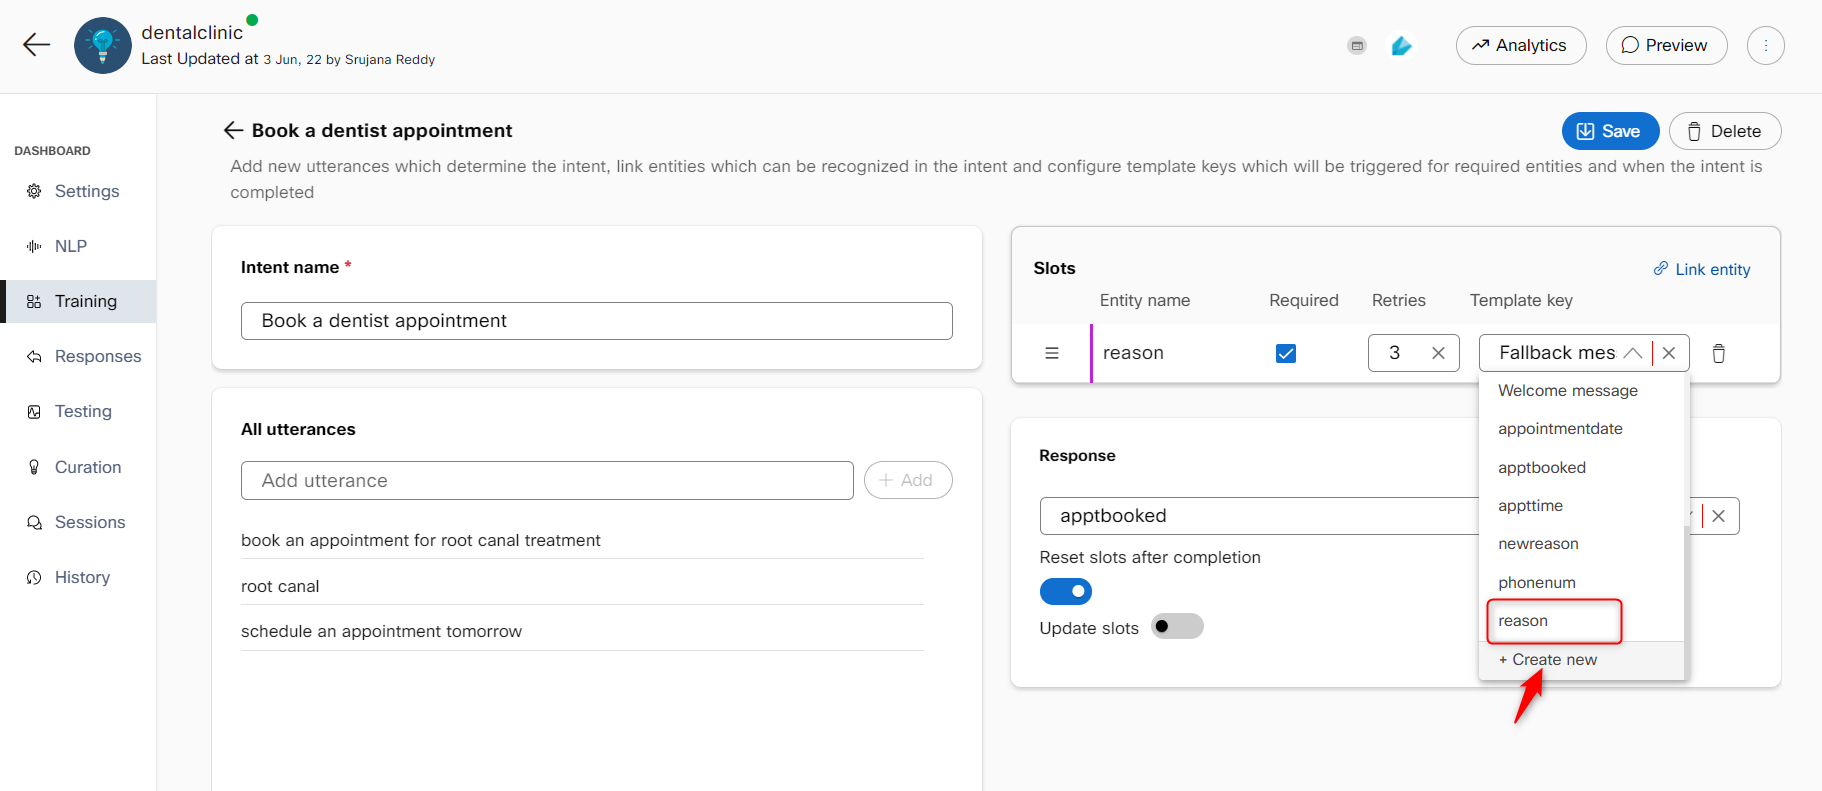
Creating a new response template key
- Enter the final response template key to be returned to users on completion of the intent in the Response section on the right.
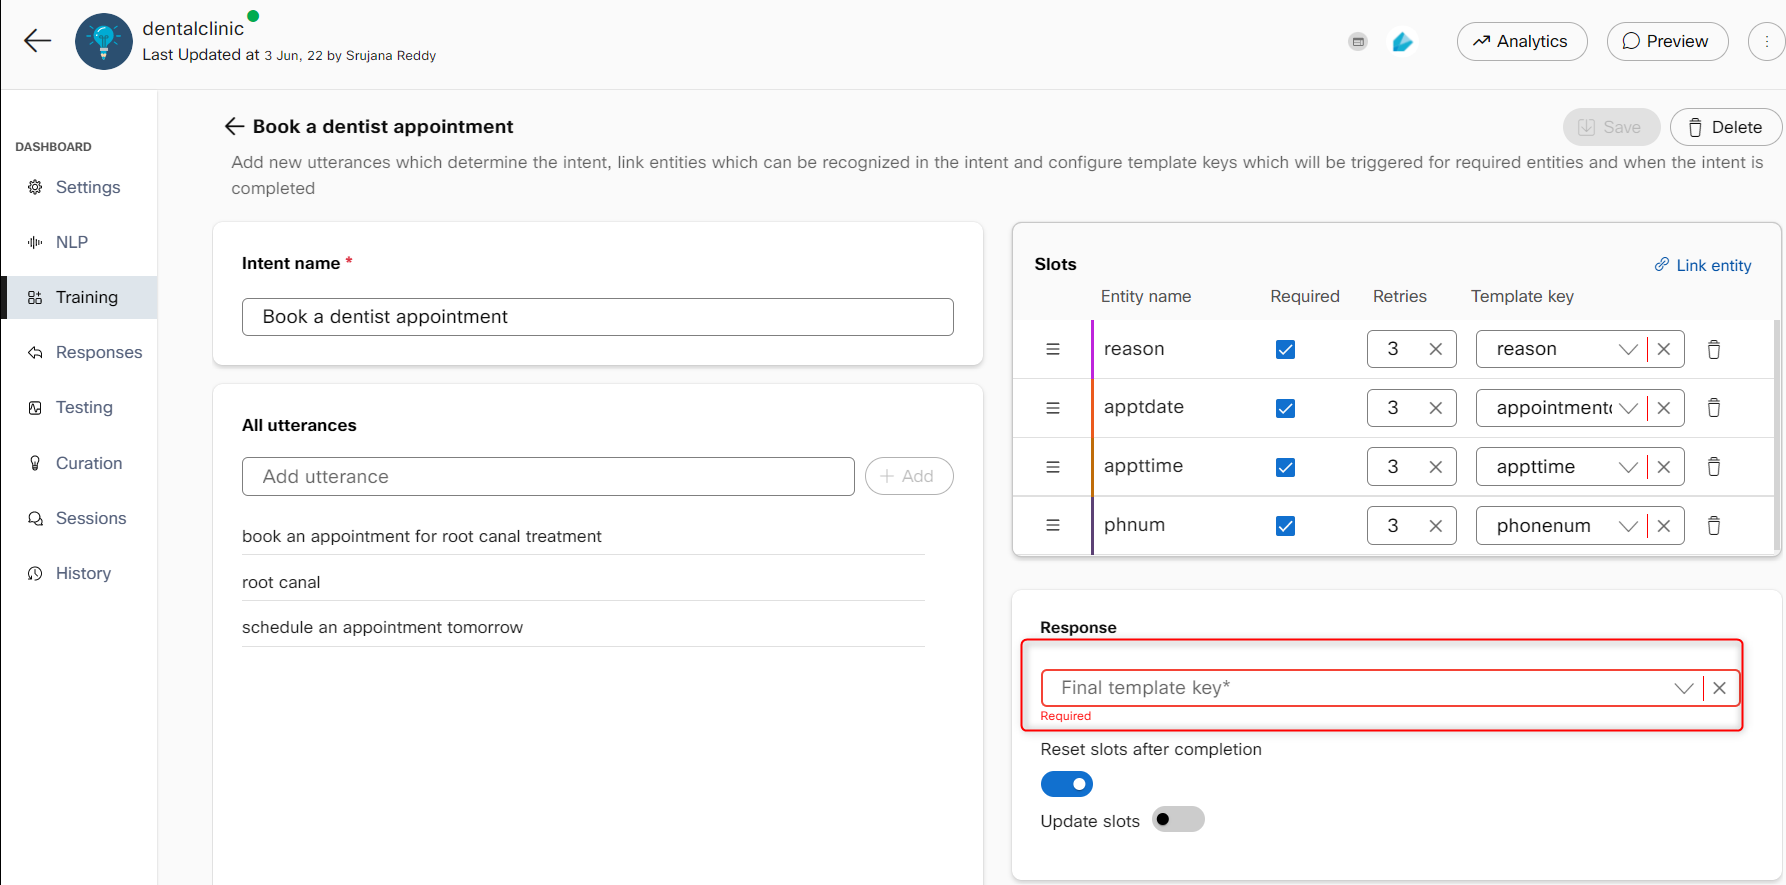
Final response template key
- Enable the Reset slots after completion toggle to reset the slot values collected in the conversation once the intent is complete.
Note: If this toggle is disabled, the slot retains the old values and displays the same response. - Enable the Update slot values to update the slot value during the conversation with the consumer. The last value filled in the slot is considered by the bot to process the data. Values for filled slots will be updated when users provide new values for the same slot type if this feature is enabled.
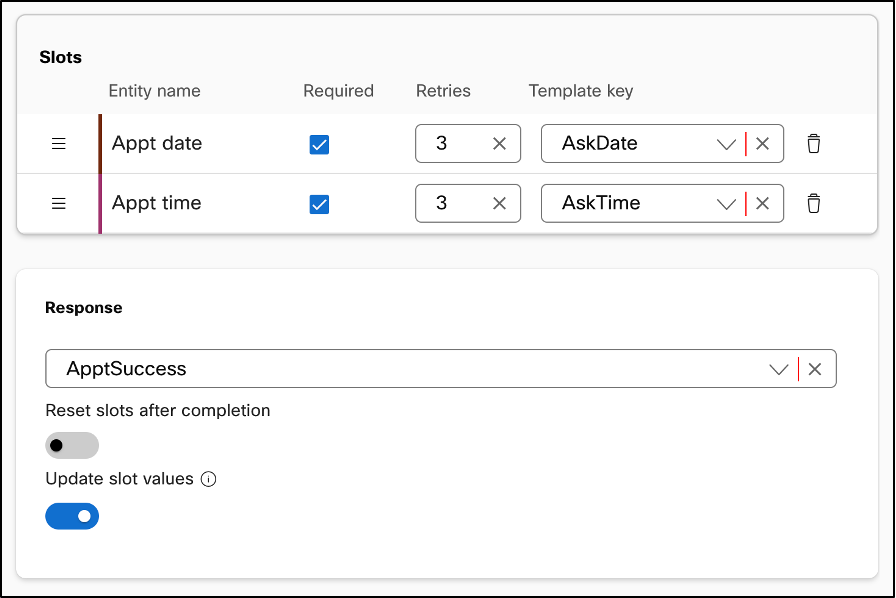
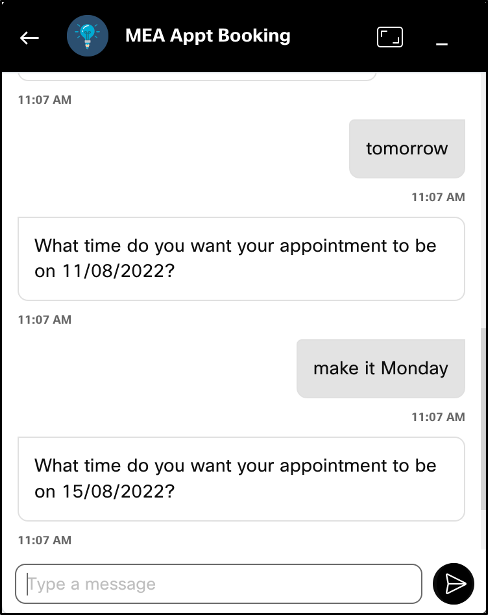
Slot value is updated when the user provides a new date and 'Update slot values' is enabled
- Click Save. The model needs to be trained again by clicking the Train button on the top right of the Training tab to reflect any changes made in intents and entities.
Note: Rasa and Mindmeld NLU engines require a minimum of two training variants for intent. If there are less than two training variants (utterances) for intent or if there are less than two annotations for each slot, the Train button is made unavailable until the issues are fixed. After all the issues are resolved, the bot developer can train the bot. The warning icon is displayed indicating the same corresponding to the intent name. This condition is not applicable for default fallback intent.
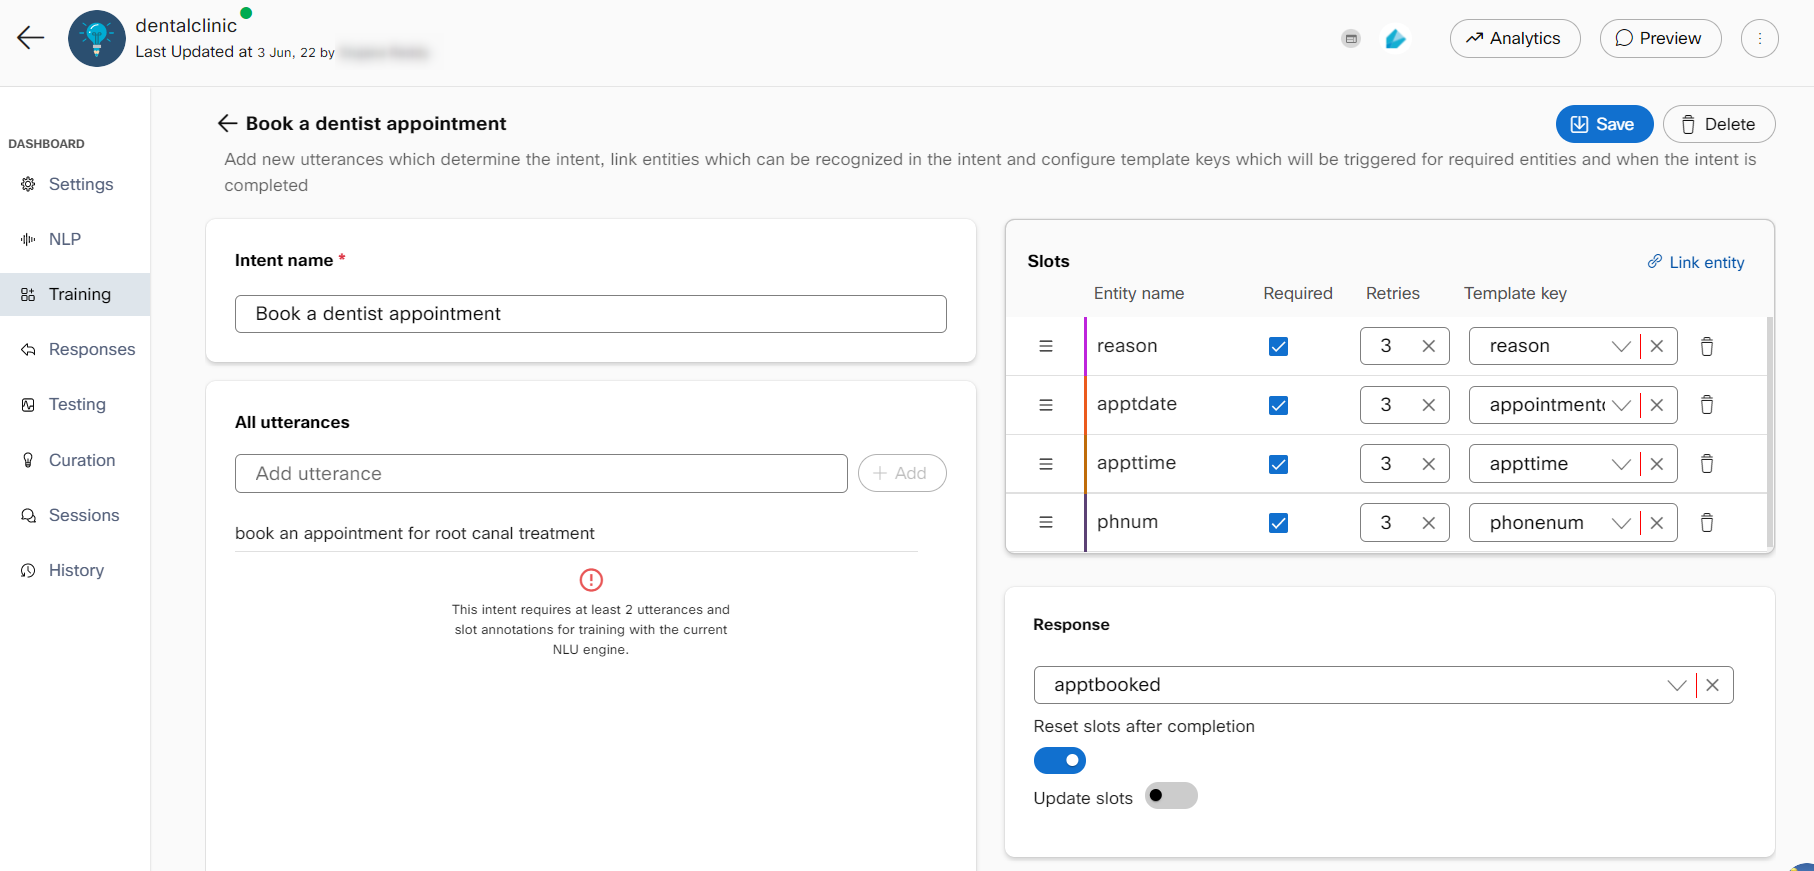
Less than two variants in an utterance
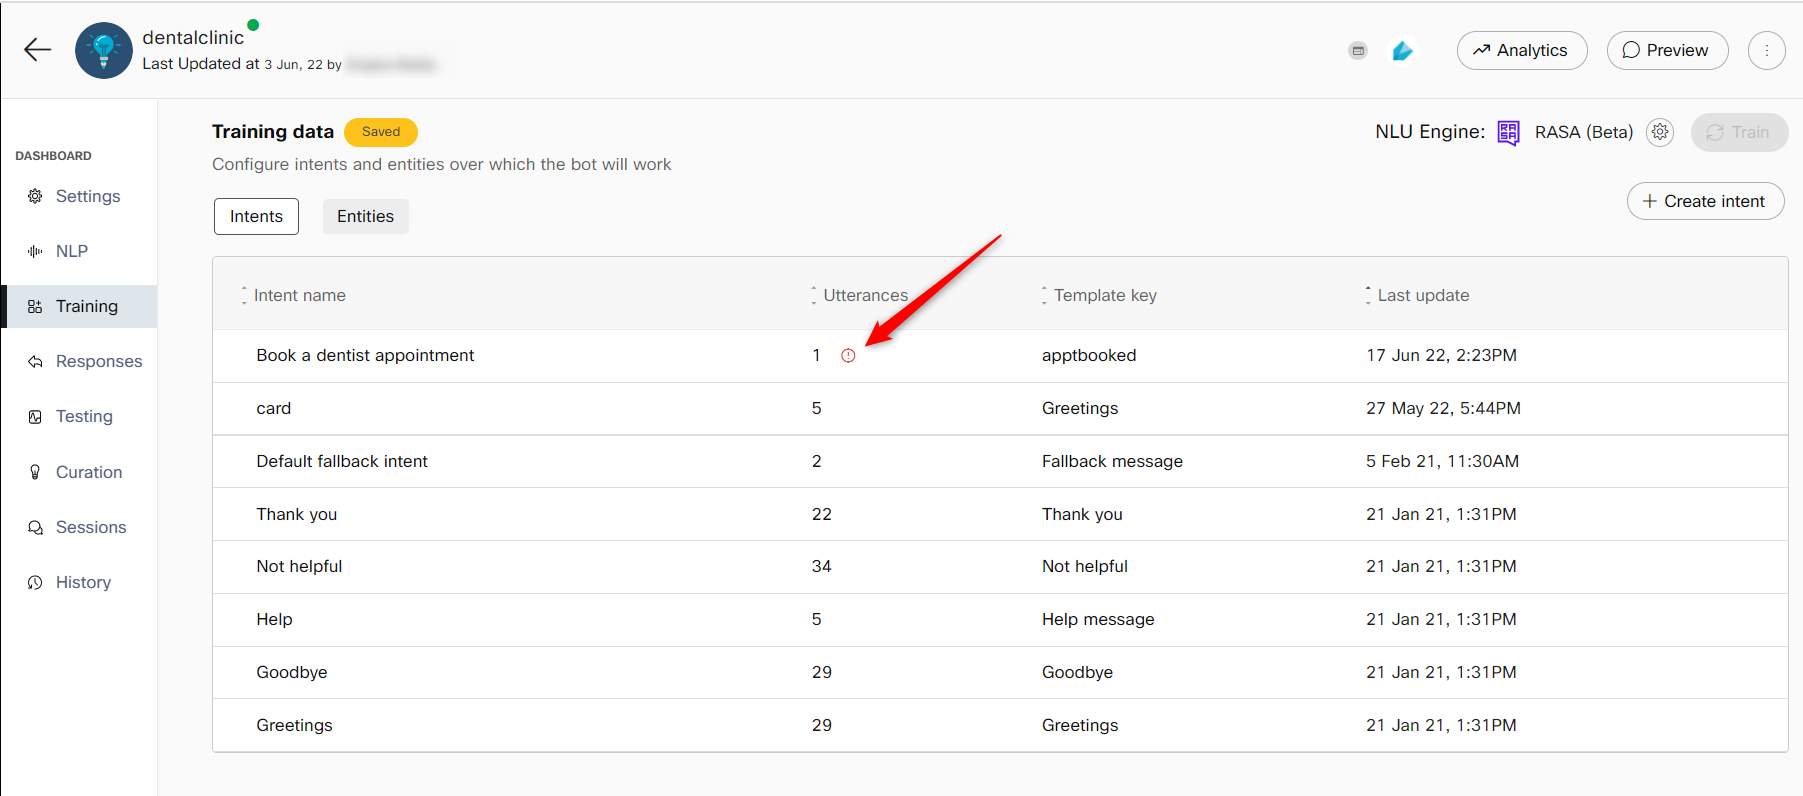
A warning icon corresponding to the intent name
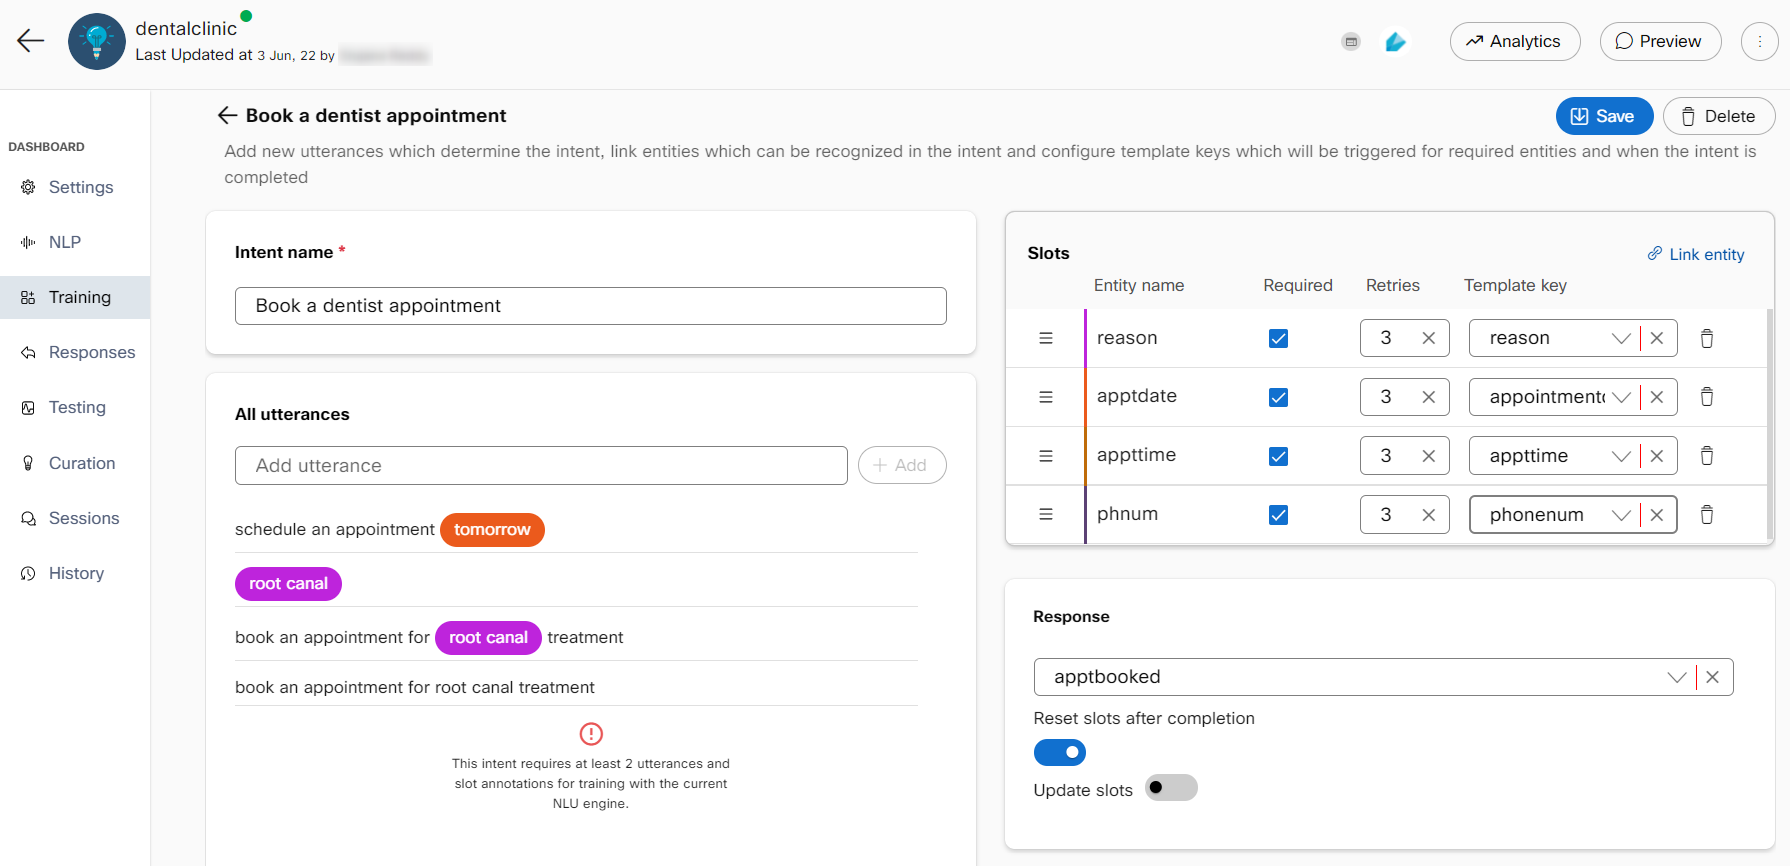
Less than two similar slot annotations
Linking entities with intents
Once an intent is created, it will need some information to fulfil the intent. Linked entities dictate how this information is obtained from user utterances. It is recommended that the entities are created and linked before adding utterances. This will auto-annotate the entities while utterances are added. There are two ways to link entities to intents:
- Link an already created entity by clicking the Link entity button on the top right.
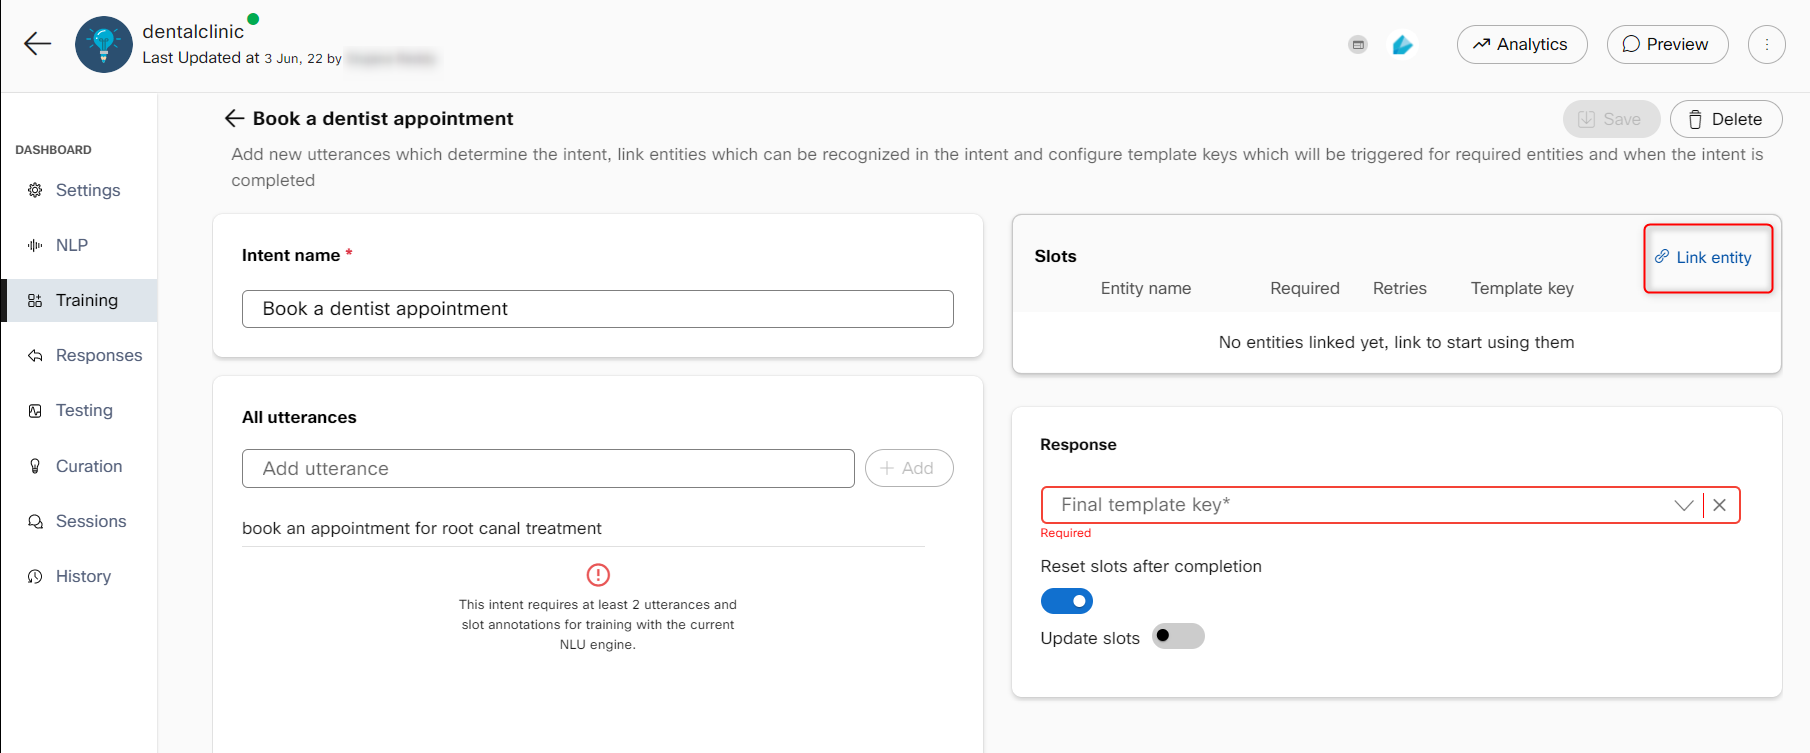
- By adding entities while adding utterances - select the part of the utterance that is a sample slot for that intent and select an already created entity or create a new entity by clicking the New entity button.
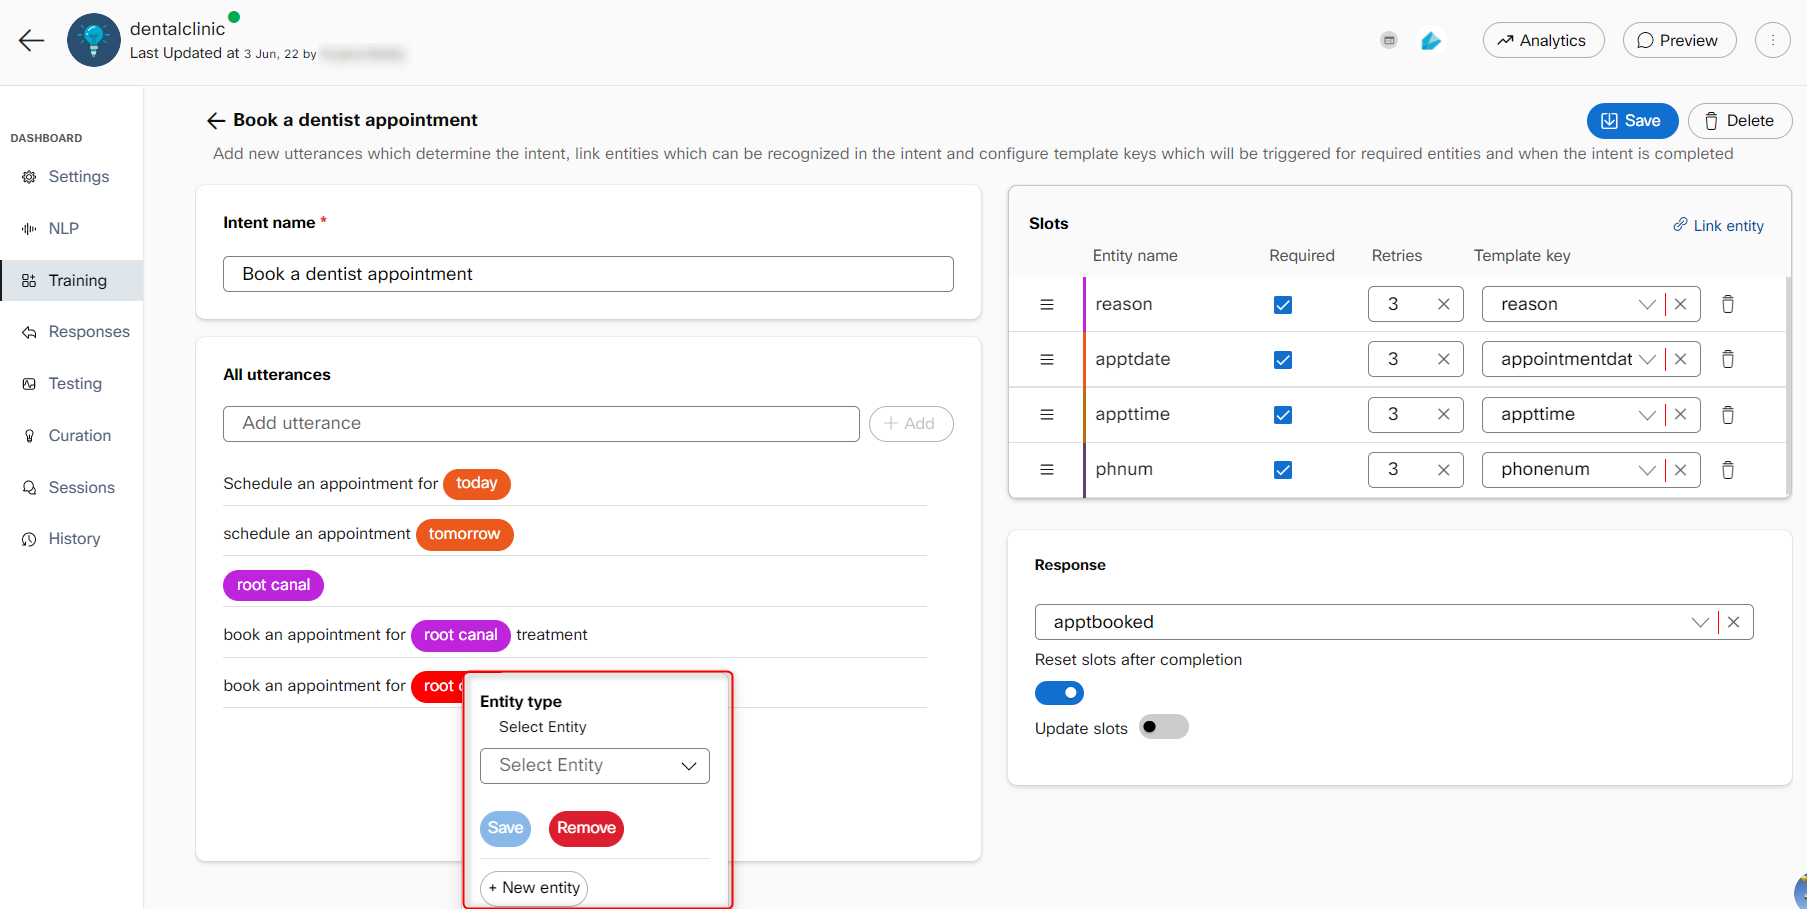
Linked entities start appearing in the slots section. An entity can be marked as required to open additional configuration to map retries and a template key. This template key is triggered when the bot receives an utterance that activates the intent without the required entity in it. This will go on until the maximum configured retries are reached for that entity. If the required entity is still not provided, the intent will not be fulfilled and a fallback response template is triggered.
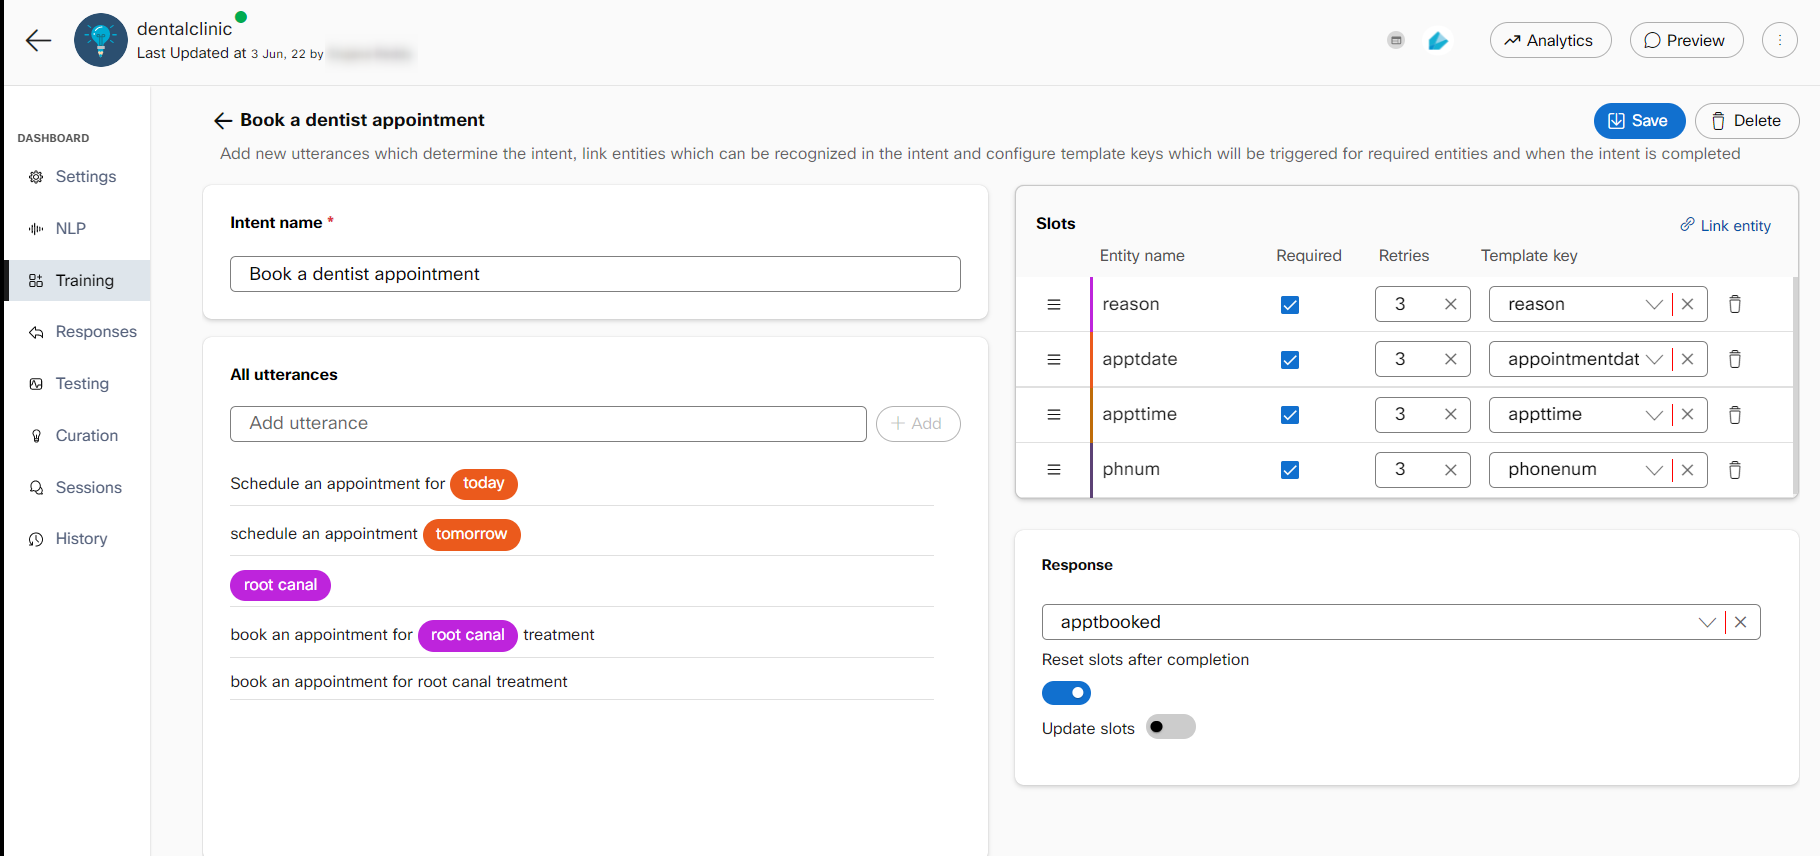
Once an intent is detected and all its required slots are filled, the bot sends back the message associated with the final template key configured in the intent. The reset slots after completion toggle, if enabled, wipes out the entities recognized in the conversation up until that point for that intent.
Contexts
Natural language conversations we have in our everyday life are made easier and more succinct by the presence of context. Things like ‘I want to buy that’ are easily communicated as long as there’s enough context to understand what ‘that’ is referring to. Contexts help you achieve this in your conversations with consumers. Expressions like these can be matched with an intent if the necessary context is provided.
To enable follow-up intents and introduce ways to structure the flow of a conversation in task bots, each intent can have entry context and exit context. This context variable will be stored for each session and the state of this variable will change based on intents that are triggered over the course of a session.
Entry and exit contexts for an intent can be configured within the intent screen in the training section for task bots.
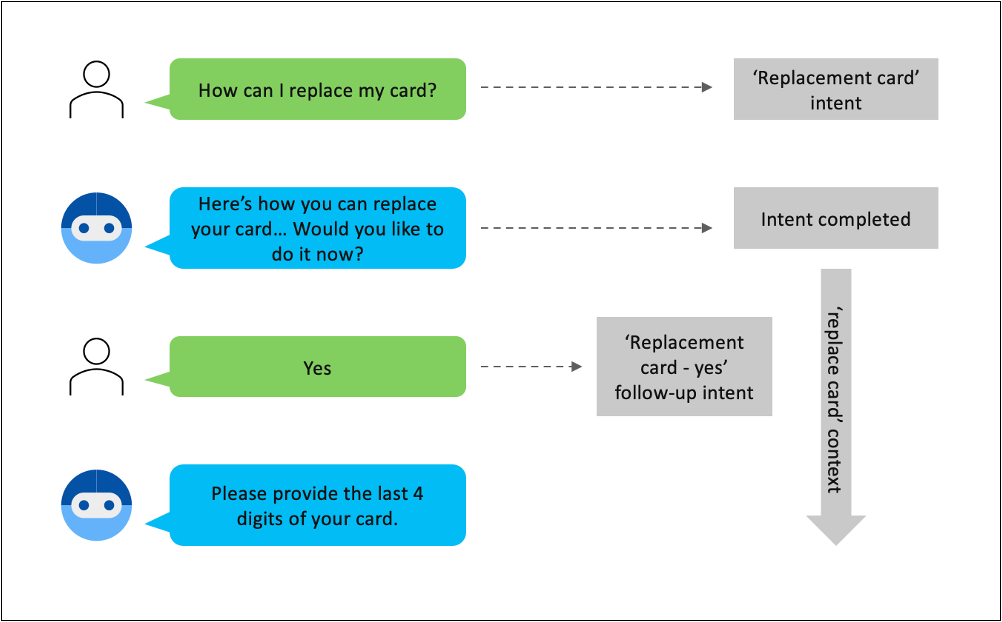
An example of a conversation utilizing contexts
In the above example:
- The consumer asks about the process to replace their card.
- The bot replies with various ways to apply for a replacement and asks the user if they’d like to do it now. The ‘Replacement card’ intent is completed and the configured exit context ‘replace card’ becomes active for 5 turns.
- The user responds with ‘Yes’, which wouldn’t be enough to identify an intent on its own. Due to the presence of ‘replace card’ intent, it’s matched with ‘Replacement card – yes’ intent configured in the bot.
- The bot starts collecting slots for the ‘replacement card – yes’ intent.
Exit contexts
Exit contexts control the active contexts for a session. An exit context contains the context value string and the duration of that context. When an intent is completed (all the slots are filled and the final response template key is triggered), the configured exit contexts for that intent become exit for their respective durations. Developers can configure a maximum of 15 exit contexts for a particular intent. An exit context can be added by pressing the enter/return key after typing the context.
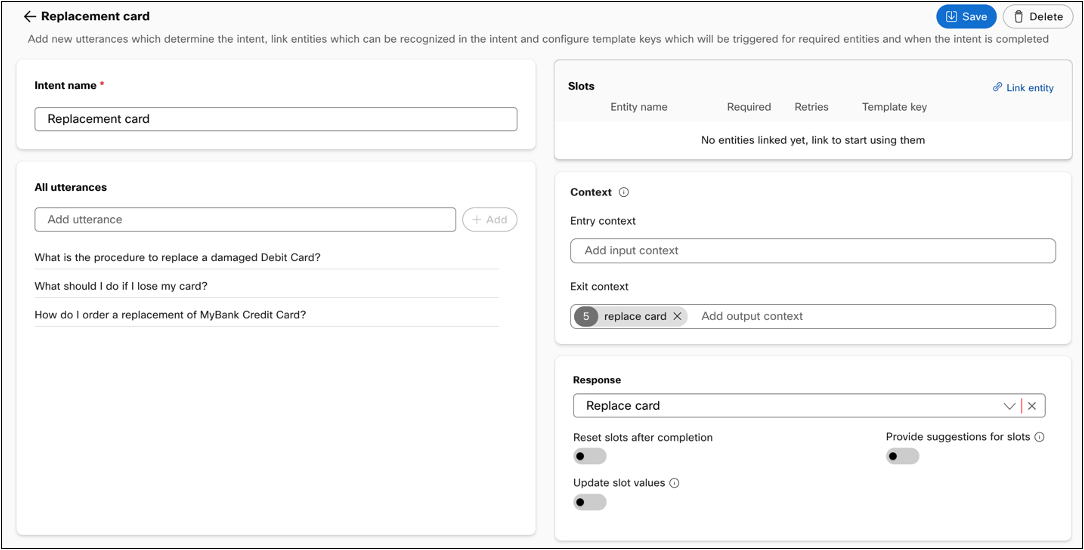
Context is available under slots in the intent configuration screen
Entry contexts
Entry contexts control whether an intent can be matched with the end-user query based on the active context of the session. When context is present in a session, the following rules are applied for intent matching:
- An intent with entry contexts will only be matched if the active context in the session already contains all the required entry context values. In other words, the entry context of an intent must be a subset of active context for it to be matched.
- For all intents satisfying the above rule, preference will be given to intents whose input context matches the active more closely if the confidence scores for multiple intents are the same. In other words, input context will be used for tie-breaking partial matches.
Developers can configure a maximum of 5 entry contexts for a particular intent.
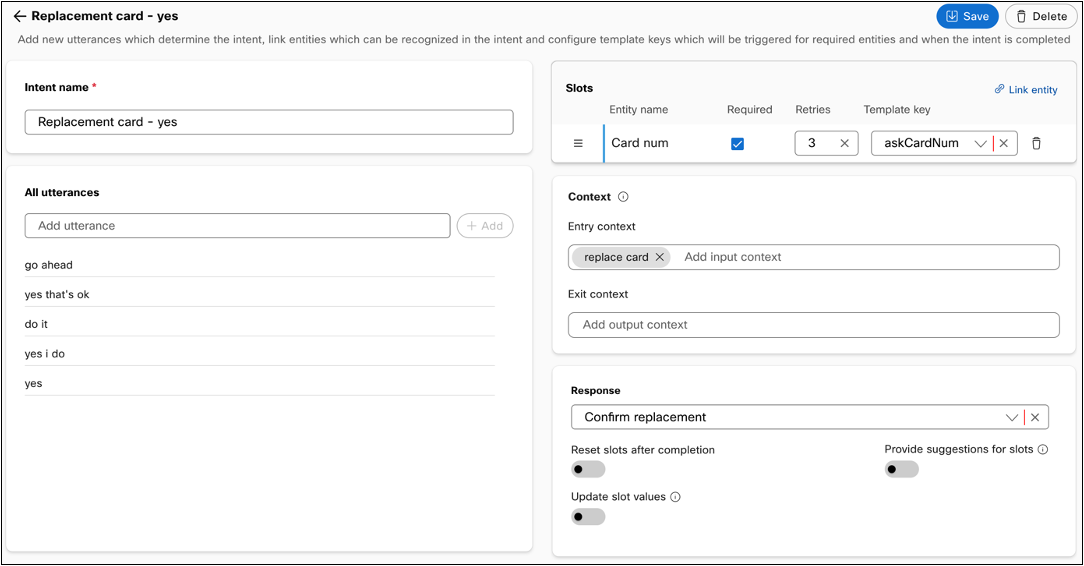
Entry contexts control intent matching
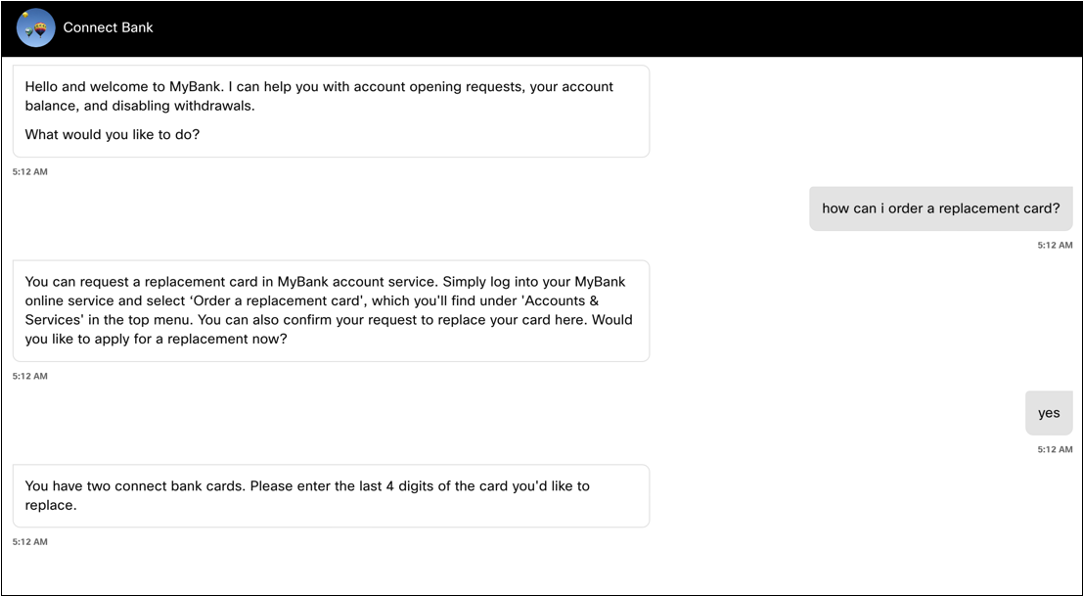
Consumer response 'yes' is matched with a follow-up intent because of context
Context duration
Each exit context has a duration to decide the number of conversational turns that context will be active for. Once the number of turns are exhausted, the context is removed from the active context. The default duration of each exit context is five conversational turns, which can be changed by clicking on the duration and providing a new value. The maximum permitted duration for an exit context is 99 turns. The duration is overridden if an intent is completed with an exit context already present in the active context. In such cases, the exit duration in active context is replaced by the duration configured in the intent that was just completed.
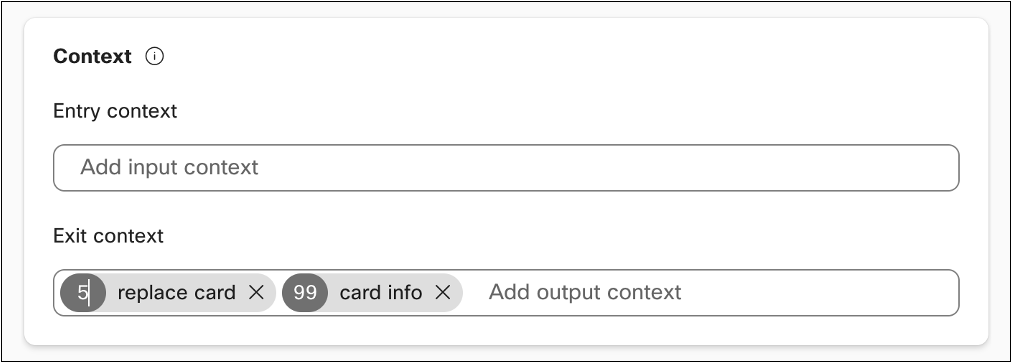
Users can edit the duration of a context by clicking the number on the exit context pill
Suggestions for slot values
Once an end-user query is received by a task bot, the entities present in the query are recognized along with the intent. The default way to identify custom entities is based on string match where the value present in the query must be an exact match of the configured entity value or one of its synonyms. There are cases where the users aren’t aware of the exact value of a slot that the bot is expecting. Such cases can lead to the intent being abandoned or the developers having to add numerous synonyms to handle all the possibilities.
With the 'Provide suggestions for slots' feature, task bots can detect custom entities that are misspelt, provided partially, or similar to other entities. These values are presented to end-users as suggestions at the time of slot filling and as alternatives that they can query for at the time of intent completion. Developers can utilize this feature for specific intents in their bot by enabling the ‘Provide suggestions for slots’ feature in their intents.
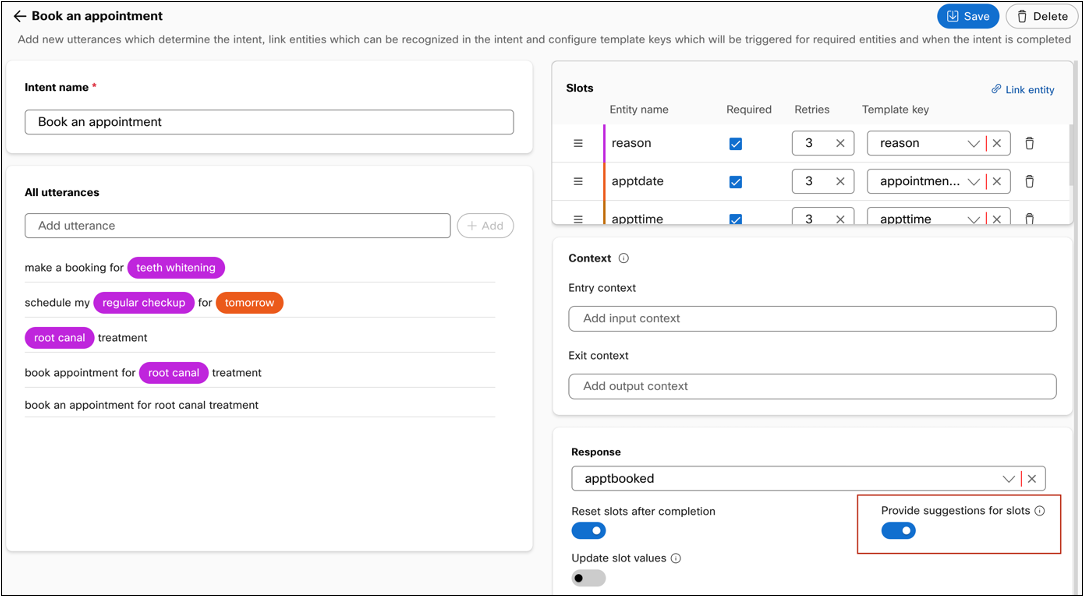
‘Provide suggestions for slots’ setting available within an intent
Within an intent, the feature can be used for specific slots by enabling or disabling ‘Auto-suggest slot values’ feature for entities.
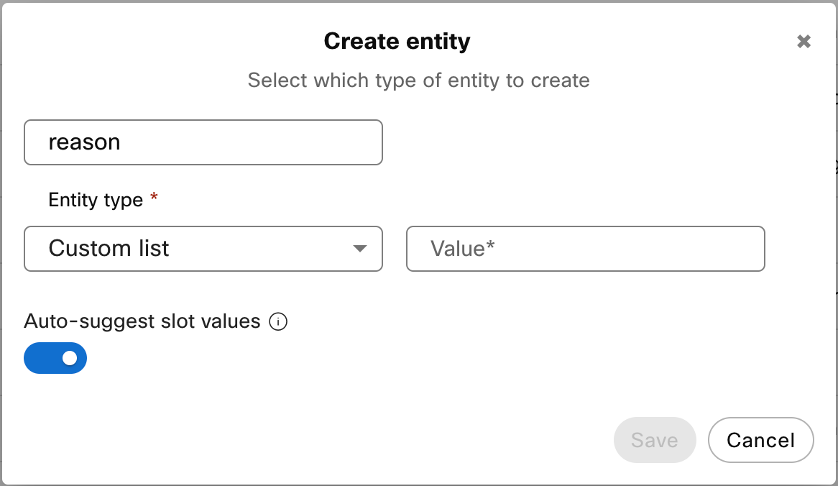
Auto-suggest slot feature at the time of custom entity creation

Auto-suggest slot values feature in the edit entity screen for custom entities
Two new response templates are added to task bots by default to share the suggestions with consumers at appropriate steps.
- Entity suggestion: For suggesting required entities to users at the time of slot filling. This response is sent along with the template key configured for a particular required slot.
- Response suggestion: For suggesting alternate slot values a consumer might be interested in based on what they’ve provided in the intent.
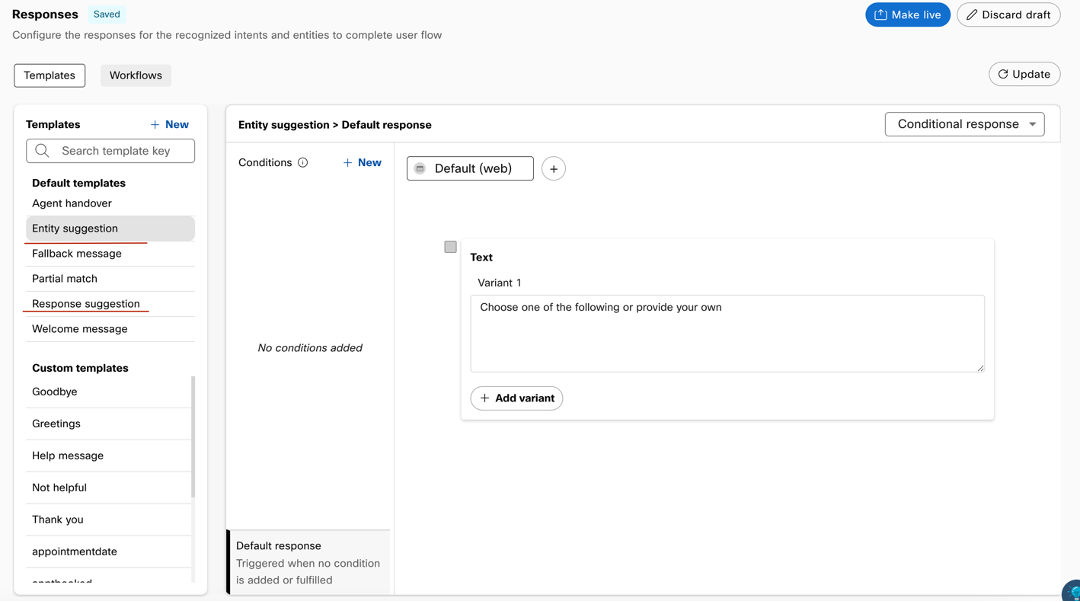
Two new default template keys - Entity suggestion and Response suggestion
The suggestions are provided differently depending on how intents and entities are configured.
Required slots during the intent flow
Based on the user input and the values configured in the custom entity linked as a slot in the intent, values for a particular slot are suggested at appropriate steps in the intent completion flow. Once suggestions are generated for a user query, we use them at the appropriate slot filling step, irrespective of the query (over the course of the conversation) these suggestions were generated from.
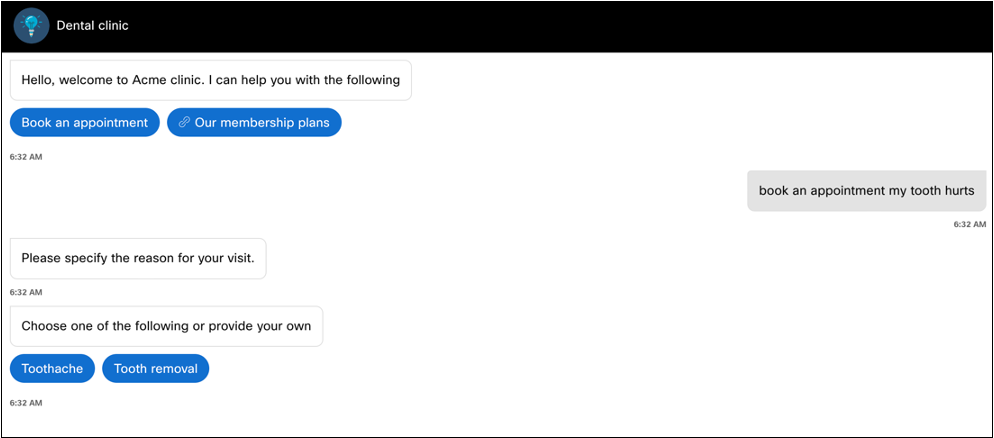
An example of suggestions for mandatory slots
In the above example:
- The user wishes to book an appointment and provides a reason for the same.
- ‘Book an appointment’ intent is matched. The first slot for this intent in ‘reason’ where we expect the purpose of the appointment from the user.
- The reason in initial user query doesn’t match with any values configured in the custom entity ‘reason’.
- However, it partially matches a few values and those are returned as suggestions by the platform.
- Along with the template key configured to prompt the user for a reason, the suggestions generated in the conversation so far are presented as quick replies.
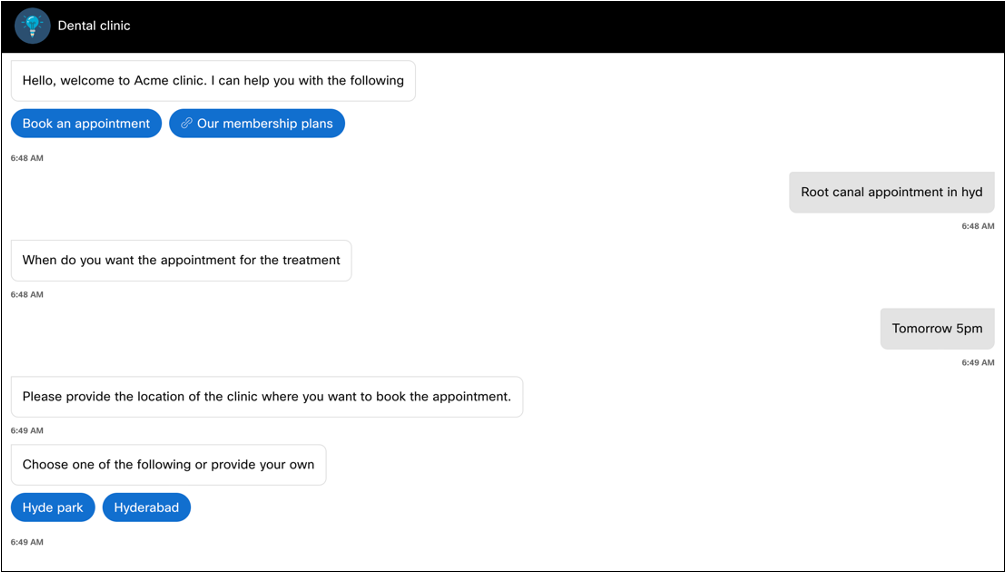
Using generated suggestions at appropriate slot filling steps
In the above example, the consumer provides a location in their first query that doesn’t match any locations configured in the custom entity. The location slot in the intent is configured after reason, date, and time. The suggestions generated for the location based on first user query are presented to the user along with the prompt for location.
Alternate suggestions for mandatory slots
For cases where multiple entity values are similar or if one entity value is a substring of another value, alternate slot value suggestions are provided to the user once the intent is completed.
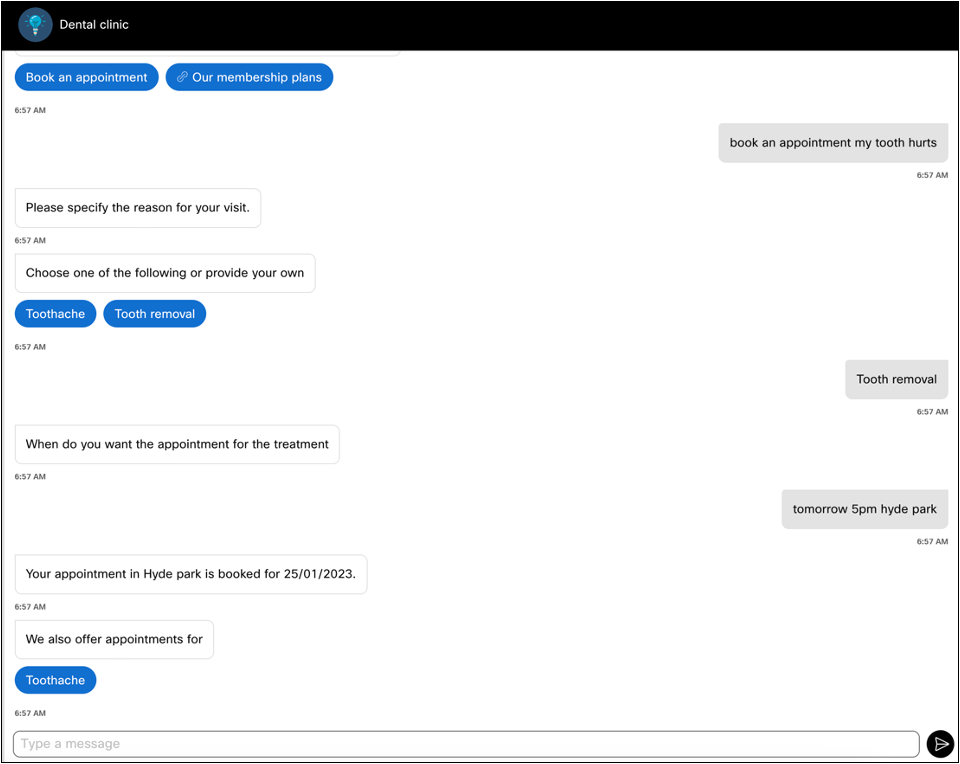
In the above example:
- User selects ‘tooth removal’ as the reason for their appointment and completes the intent by providing date, time, and location.
- Once the intent is completed, the bot responds with the final template key along with the ‘Response suggestion’ template key, which suggests slot values similar to ones they’ve provided during the conversation.
Suggestions for optional slots
The end-users aren’t prompted for any optional slots that are present in an intent. Any slots that are good-to-haves and required for completing an intent are marked as optional. Any suggestions for optional slots are sent along with the final response as a quick reply. This quick reply button is generated by substituting the suggested value for the part of user query that resulted in the suggestion.
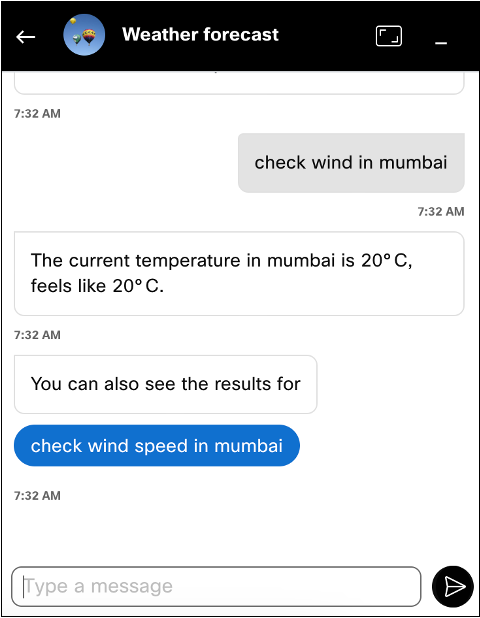
Suggestions for optional slots
In the above example:
• Location is a required slot and weather attribute (wind speed, humidity, etc.) is an optional slot.
• User query is matched to ‘check weather’ intent and the location slot is filled.
• The attribute slot isn’t filled from the user query, but we get a suggestion for it.
• This is sent back to the user by replacing the part that resulted in the suggestion (‘wind’ in this case) with the suggested value (‘wind speed’).
Entities
Entities are data you want to extract from user utterances, such as product names, dates, quantities or any significant group of words. An utterance can include many entities or none at all. Each entity has a type associated with it. Webex Bot Builder has 13 pre-built entity types that can match many common types of data. You can also create your own configurable entities to match custom data. To create an entity, click the Create entity button on the top right.
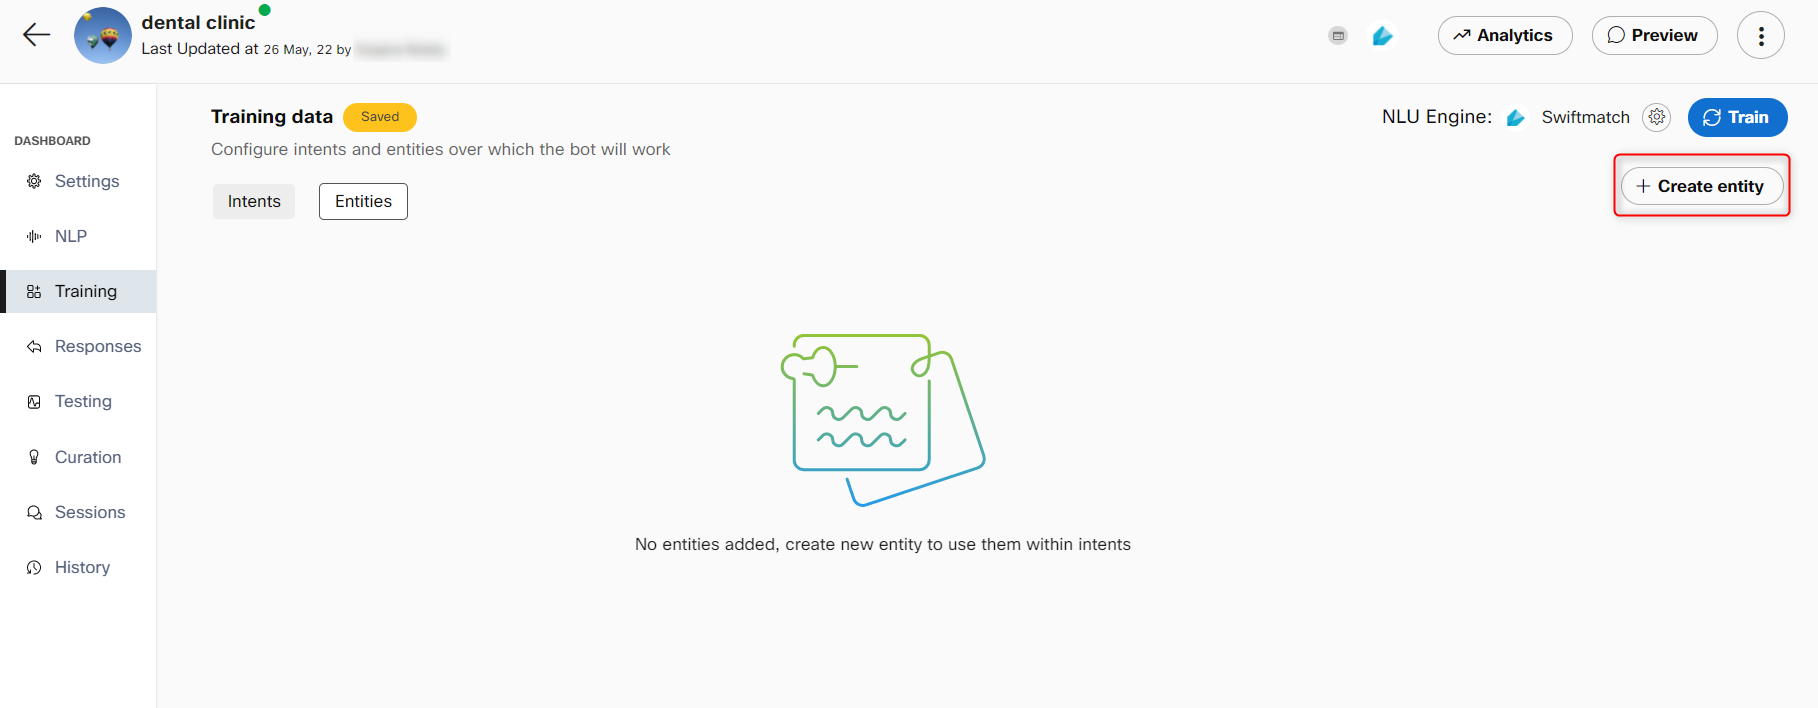
The two configurable entity types are:
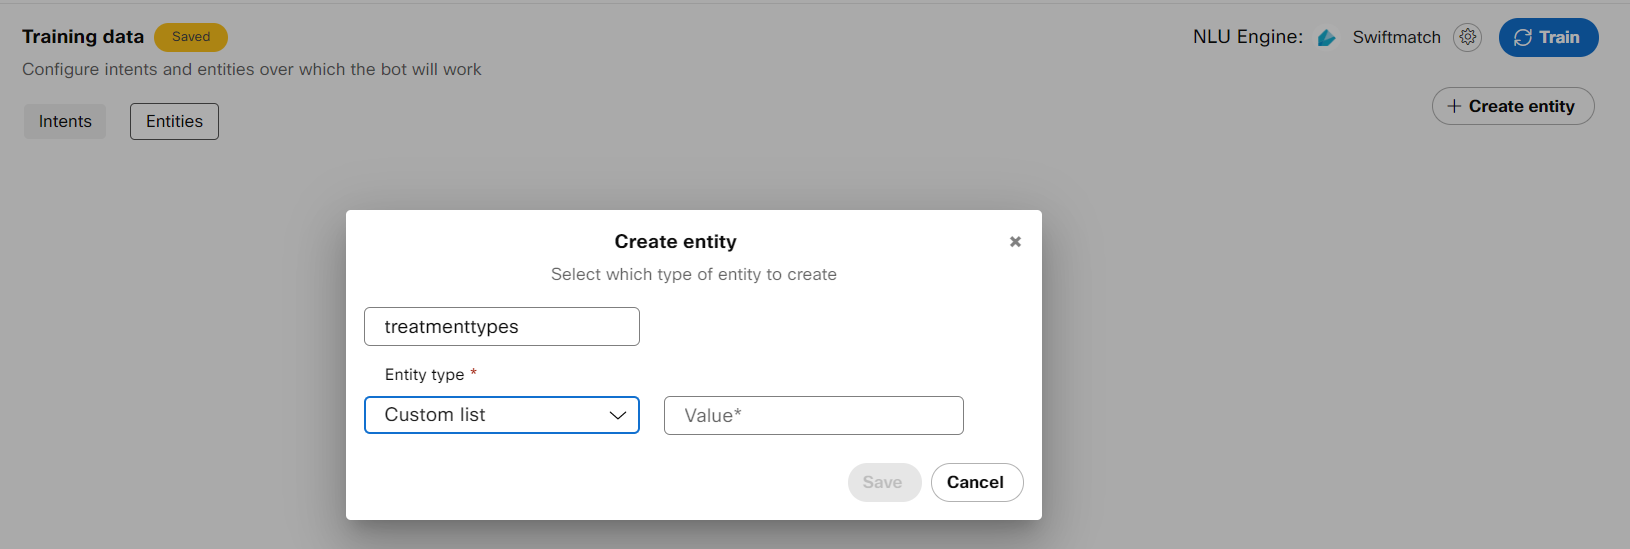
Custom: Custom entities can be used for things not covered by system entities. They can contain a list of strings that are expected from the users. You can add multiple synonyms against each one. For example, a custom Pizza size entity:
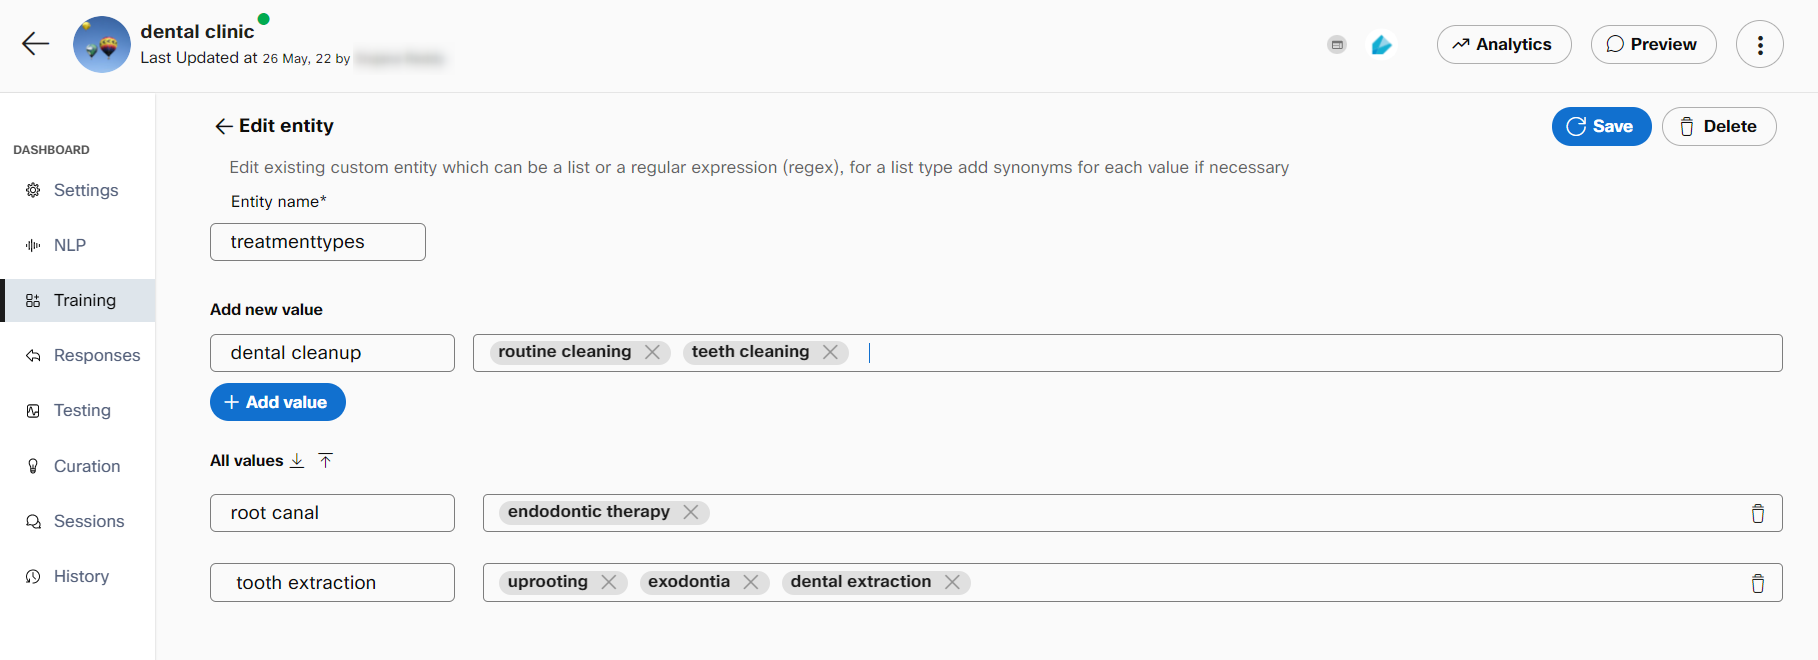
Regex: Regular expressions used to identify specific patterns and slot them as entities. For example, a phone number regex (ex:123-123-8789):
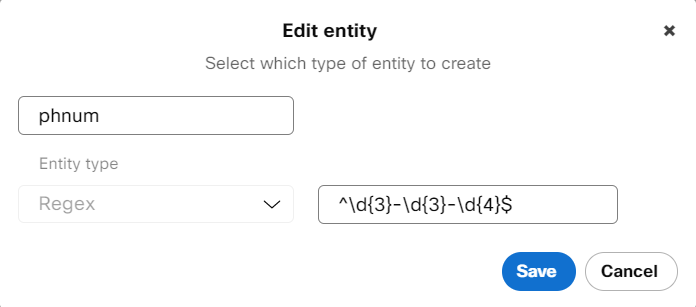
13 system supported entities are:
| Entity name | Description | Example input | Example output |
|---|---|---|---|
| Date | Parses dates in natural language to a standard date format | “july next year” | 01/07/2020 |
| Time | Parses time in natural language to a standard time format | 5 in the evening | 17:00 |
| Money | Parses currency and amount | I want 20$ | 20$ |
| Ordinal | Detects ordinal number | Fourth of ten people | 4th |
| Cardinal | Detects cardinal number | Fourth of ten people | 10 |
| Geolocation | Detects geographic locations (cities, countries etc.) | I went swimming in the Thames in London UK | London, UK |
| Non-geo location | Detects non-geographic locations (rivers, mountains etc.) | I went swimming in the Thames in London UK | Thames |
| Organization | Detects popular organisation names | Bill Gates of Microsoft | Microsoft |
| Person | Detects common names | Bill Gates of Microsoft | Bill Gates |
| Language | Identifies language names | I speak mandarin and English | Mandarin, English |
| Percent | Identifies percentages | I’m fifty percent sure | Fifty percent |
| Quantity | Identifies measurements, as of weight or distance | We’re 5km away from Paris | 5km |
| Duration | Identifies time periods | 1 week of vacation | 1 week |
Created entities can be edited from the entities tab. Linking entities to an intent will annotate your utterances with detected entities as you add them.
Entity roles
An entity role is used to extract information related to one another in the same utterance. This information is put together and is processed as a single unit. Roles are used while creating a custom entity only if entity roles are enabled in the Advanced Settings section of the Change training engine window for RASA and Mindmeld NLU engines. An entity can have multiple roles, and these are available for custom entities. This is especially useful for use-cases where the same entity must be collected twice to complete an intent. Entity roles example include- from/to, start/end, and so on.
For instance, you want to book a flight ticket from point A to point B with a layover at Point C. Create an entity with the name Airport and define three different roles for this entity, such as origin, destination, and layover. Link the entity to each of these roles in the slots section. Subsequently, annotate the training utterances in intents with these roles. The roles arranged in a specific pattern will allow the chatbot to learn the pattern in consumer utterances and have a seamless conversation with the consumer.
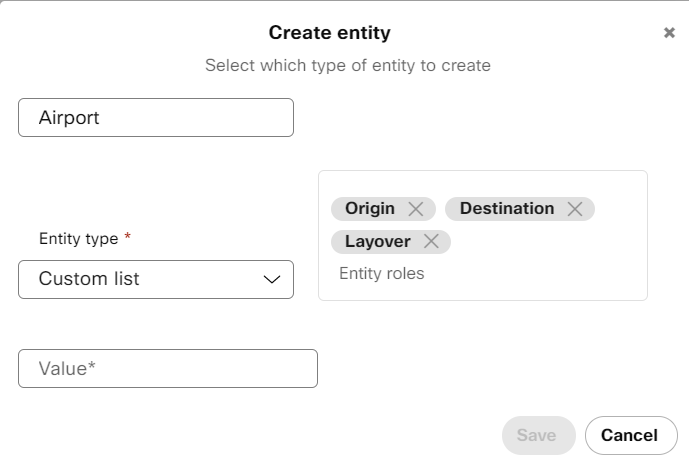
Create entity roles
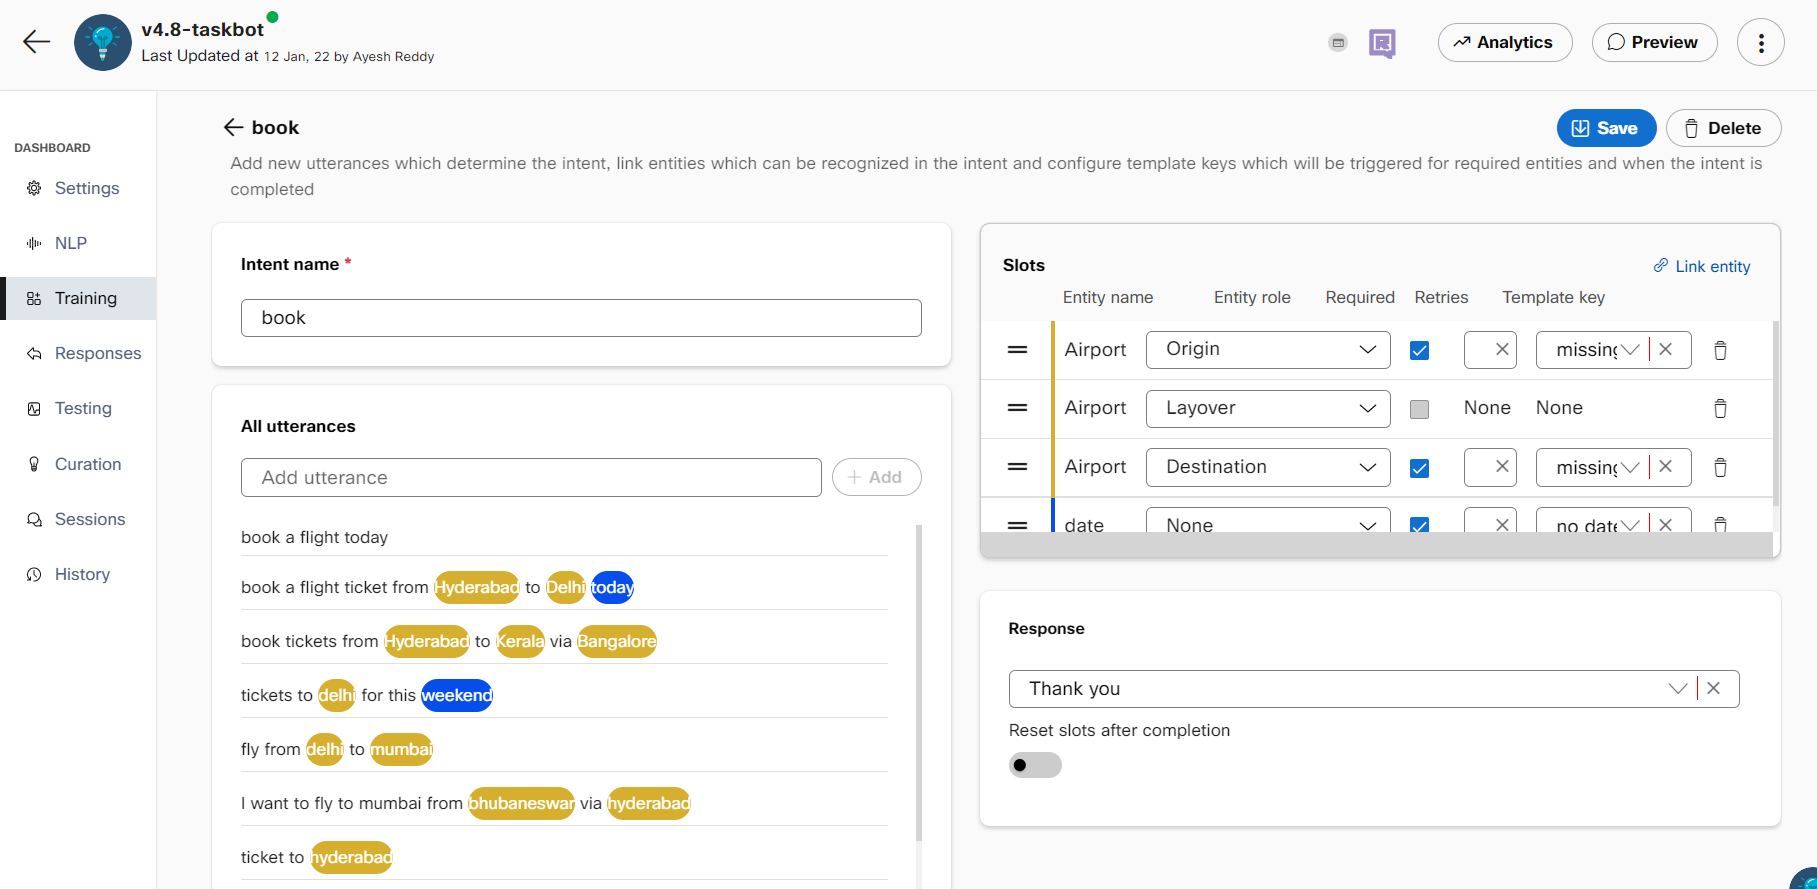
Link entities to roles
Note:
Developers cannot switch from RASA or Mindmeld to Swiftmatch while entity roles are in use. Roles must be removed from intents to disable the entity roles from advanced NLU engine settings.
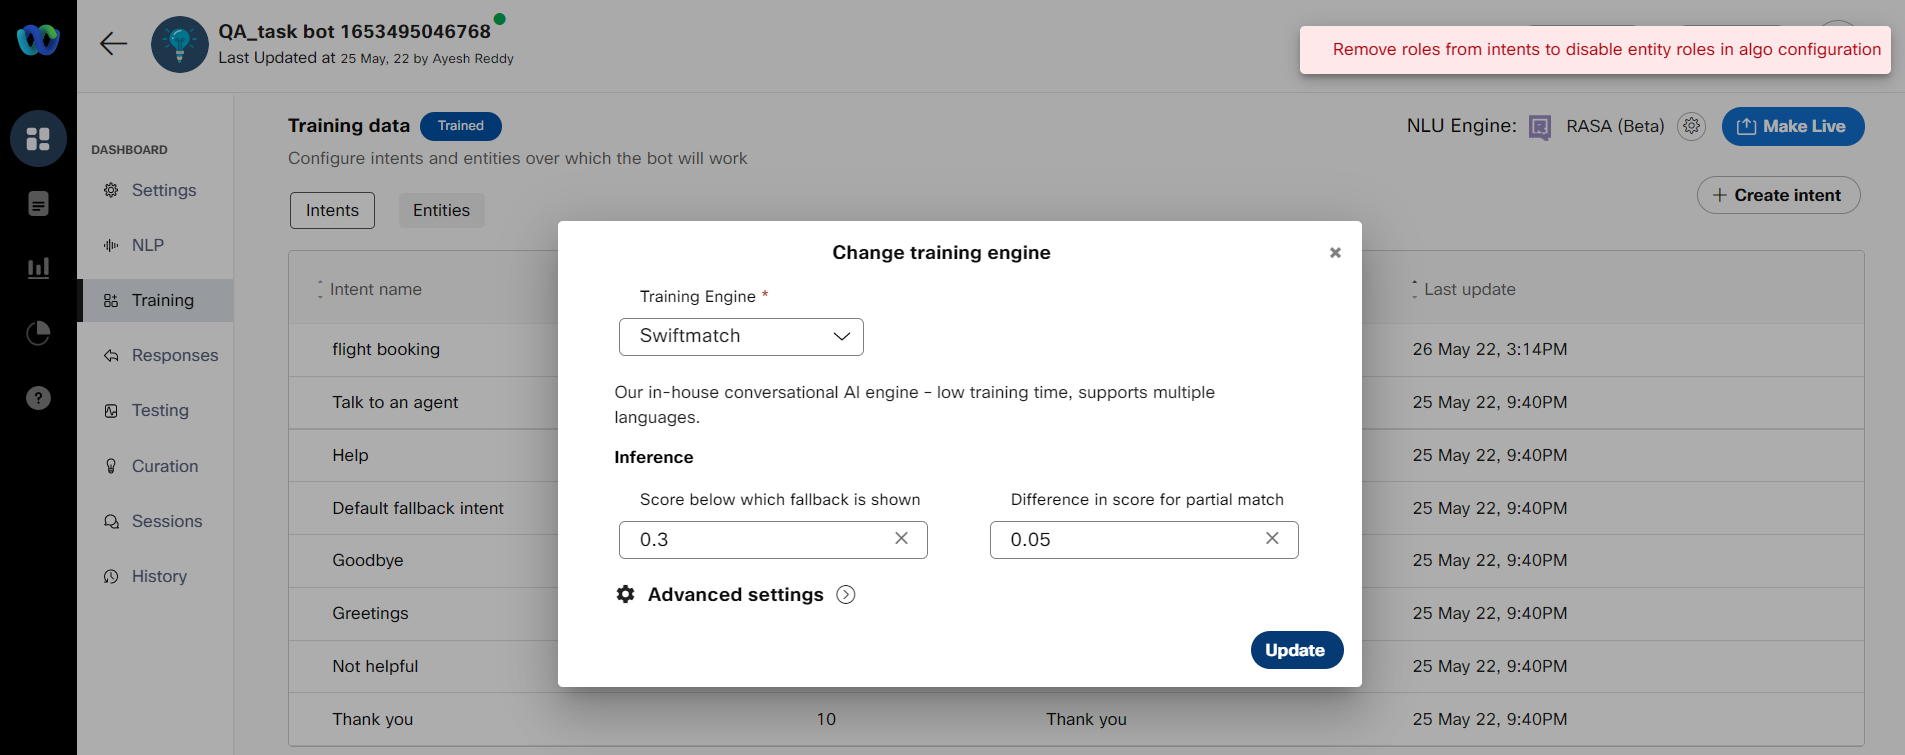
Message displayed when switching from RASA (or) Mindmeld to Swiftmatch with roles still in use
Creating an entity and entity roles
Use this procedure to create an entity and entity roles.
- Select a task bot from the dashboard.
- Click the Training tab. The Training data screen appears.
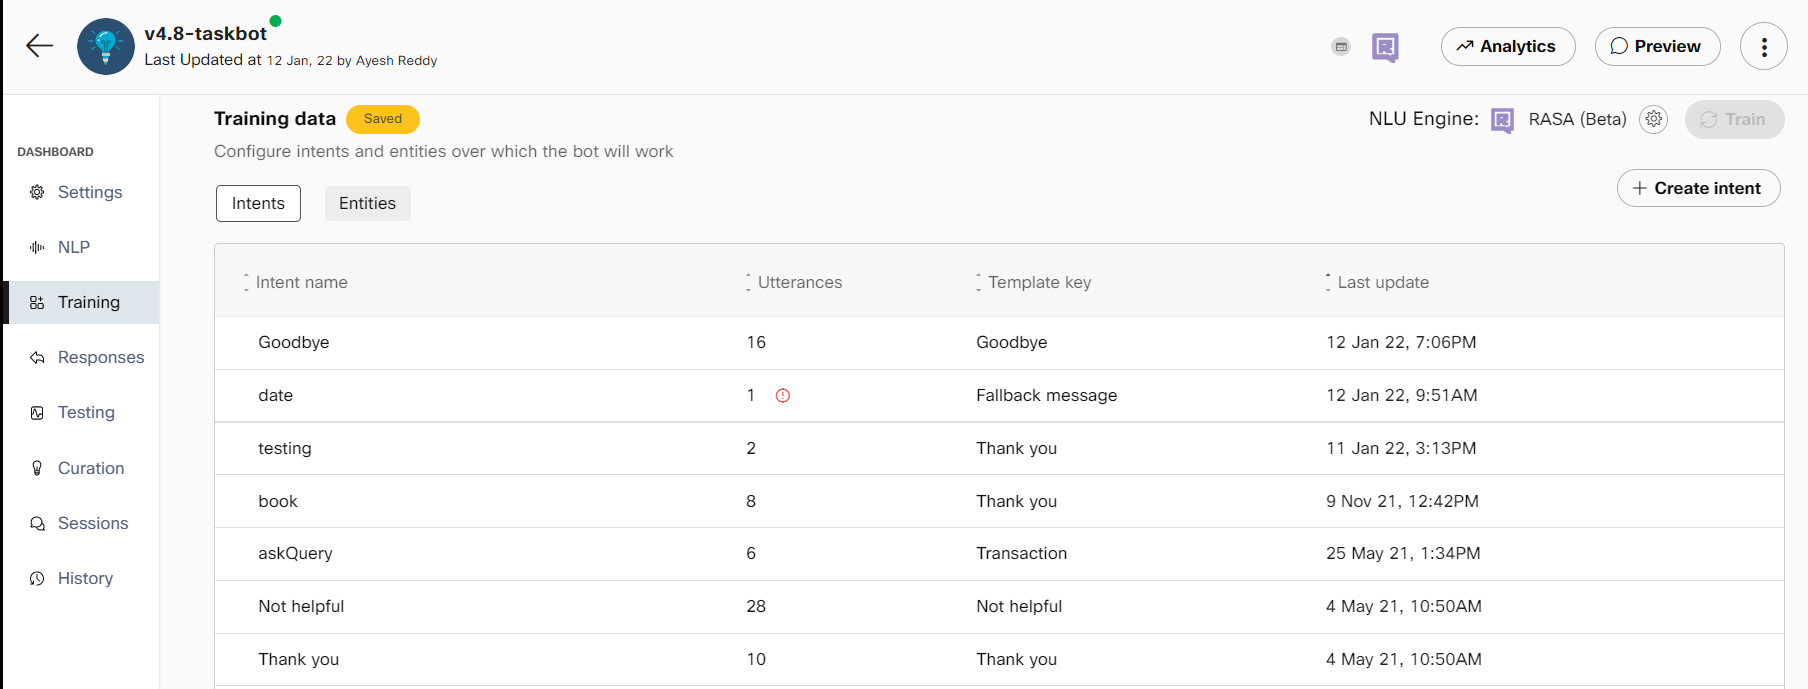
Training data screen
- Click the Entities tab.
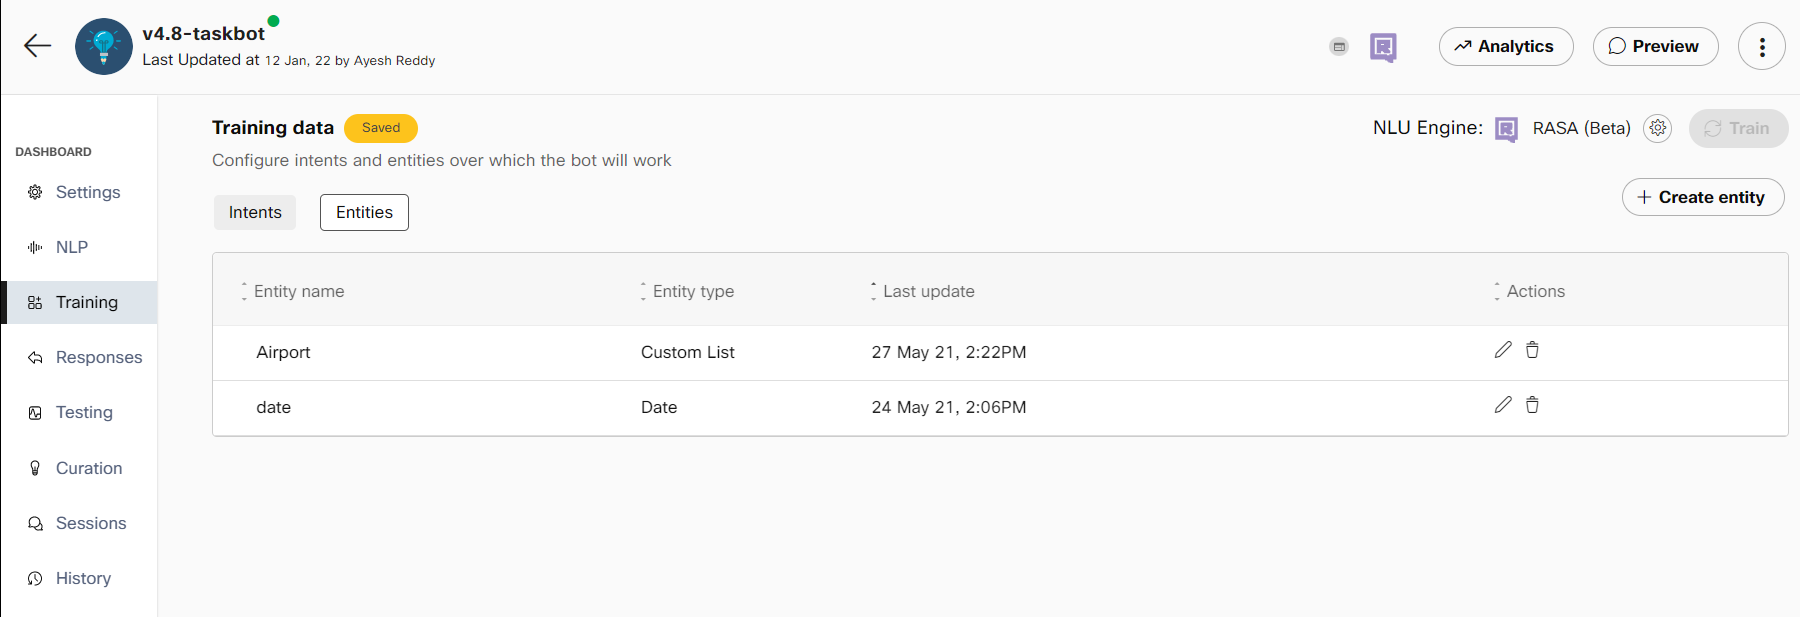
Training data screen to create an entity
- Click +Create entity. The Create entity window appears.
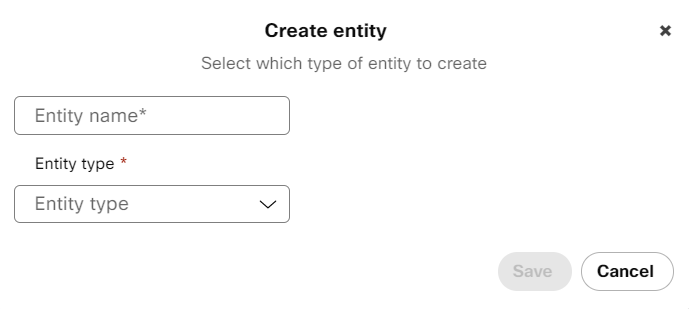
Creating an entity
- Enter the Entity name
- Select the Entity type to the Custom list. The Entity roles field is displayed.
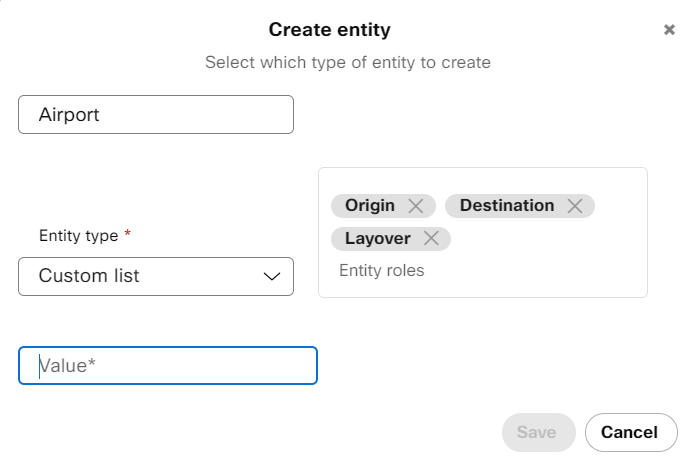
Creating an entity and adding entity roles
Note: Roles field is displayed while creating a custom entity only if entity roles are enabled in the Advanced Settings section of Change training engine window for RASA and Mindmeld NLU engines.
- Enter the entity roles and click Save. The newly created entity with entity roles can be viewed in the entities list on the Entities tab.
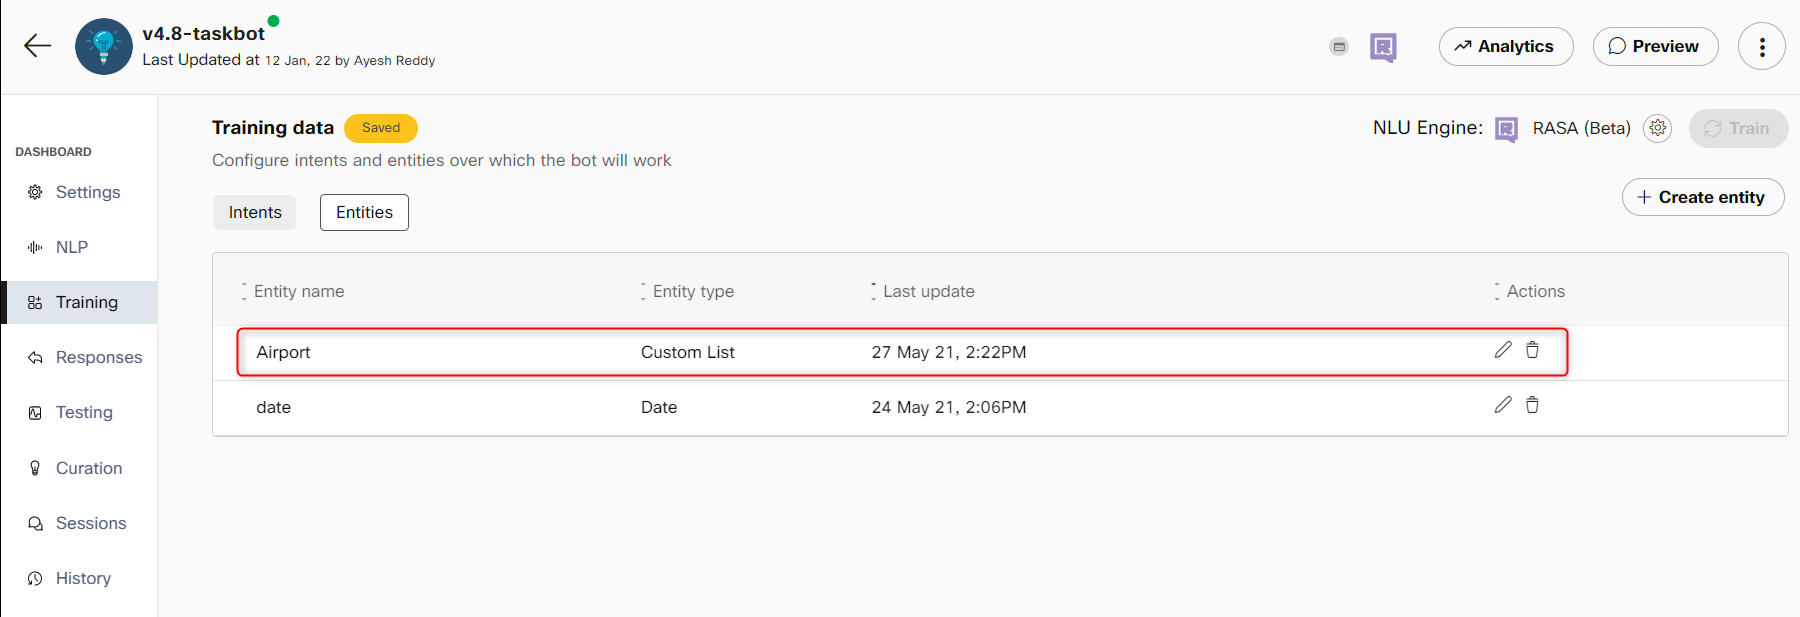
Entities list
Note: You can use the edit button corresponding to an entity to modify the entity or entity role details and use the delete button to delete the entity. Deleting the entity deletes the entity roles associated with this entity.
Linking roles to an entity
Use this procedure to assign roles to an entity for collecting the same entity twice for an intent.
- Select a task bot from the dashboard.
- Click the Training tab. The Training data screen appears.
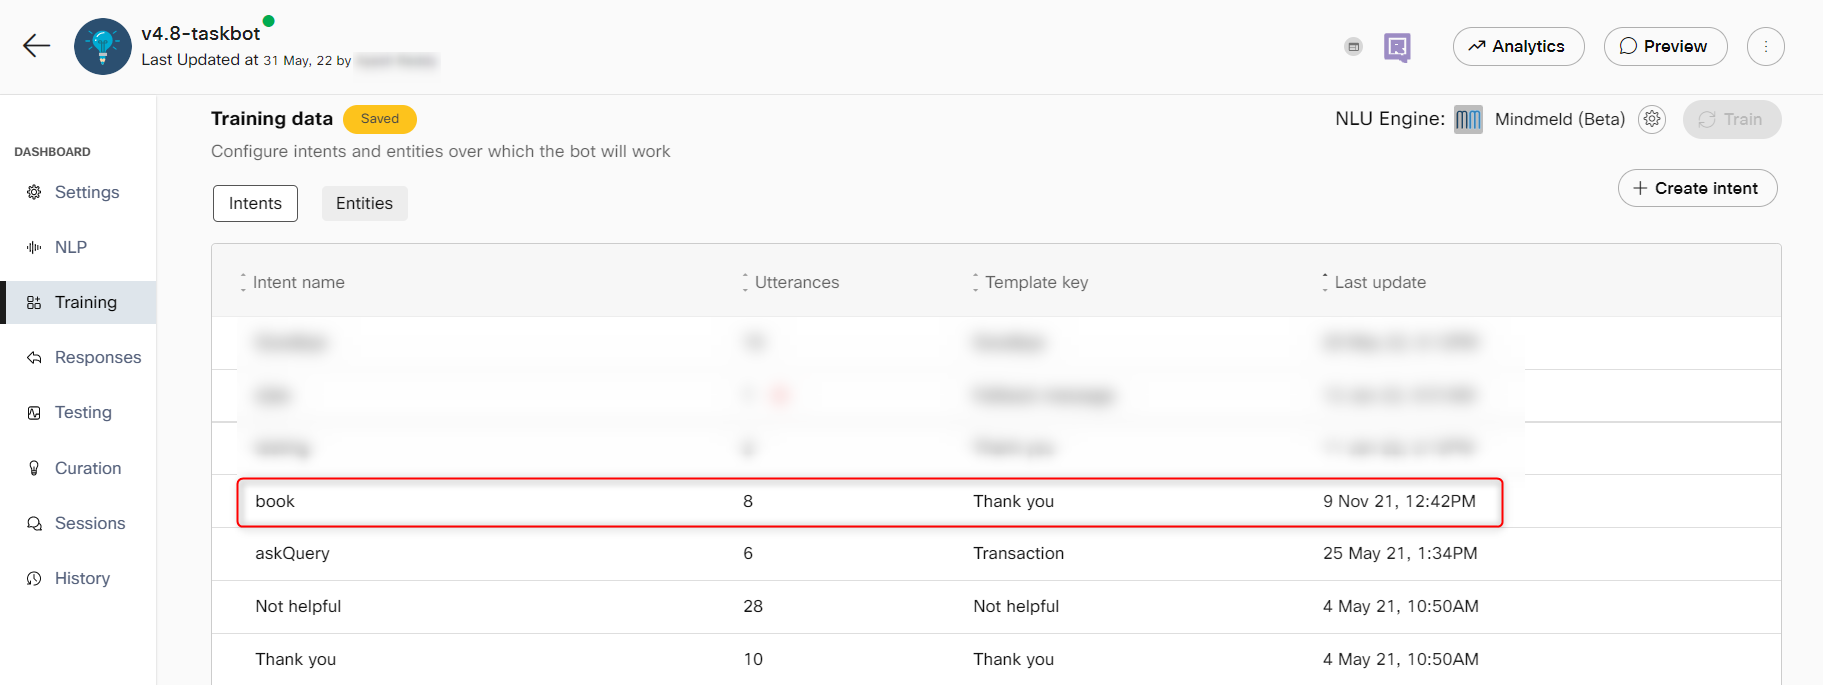
- Click the Intents tab and select an intent to link entities and entity roles
- Click +Link entity to add entity to the slots for an intent
- Select the entity role for the entity name, wherever applicable.
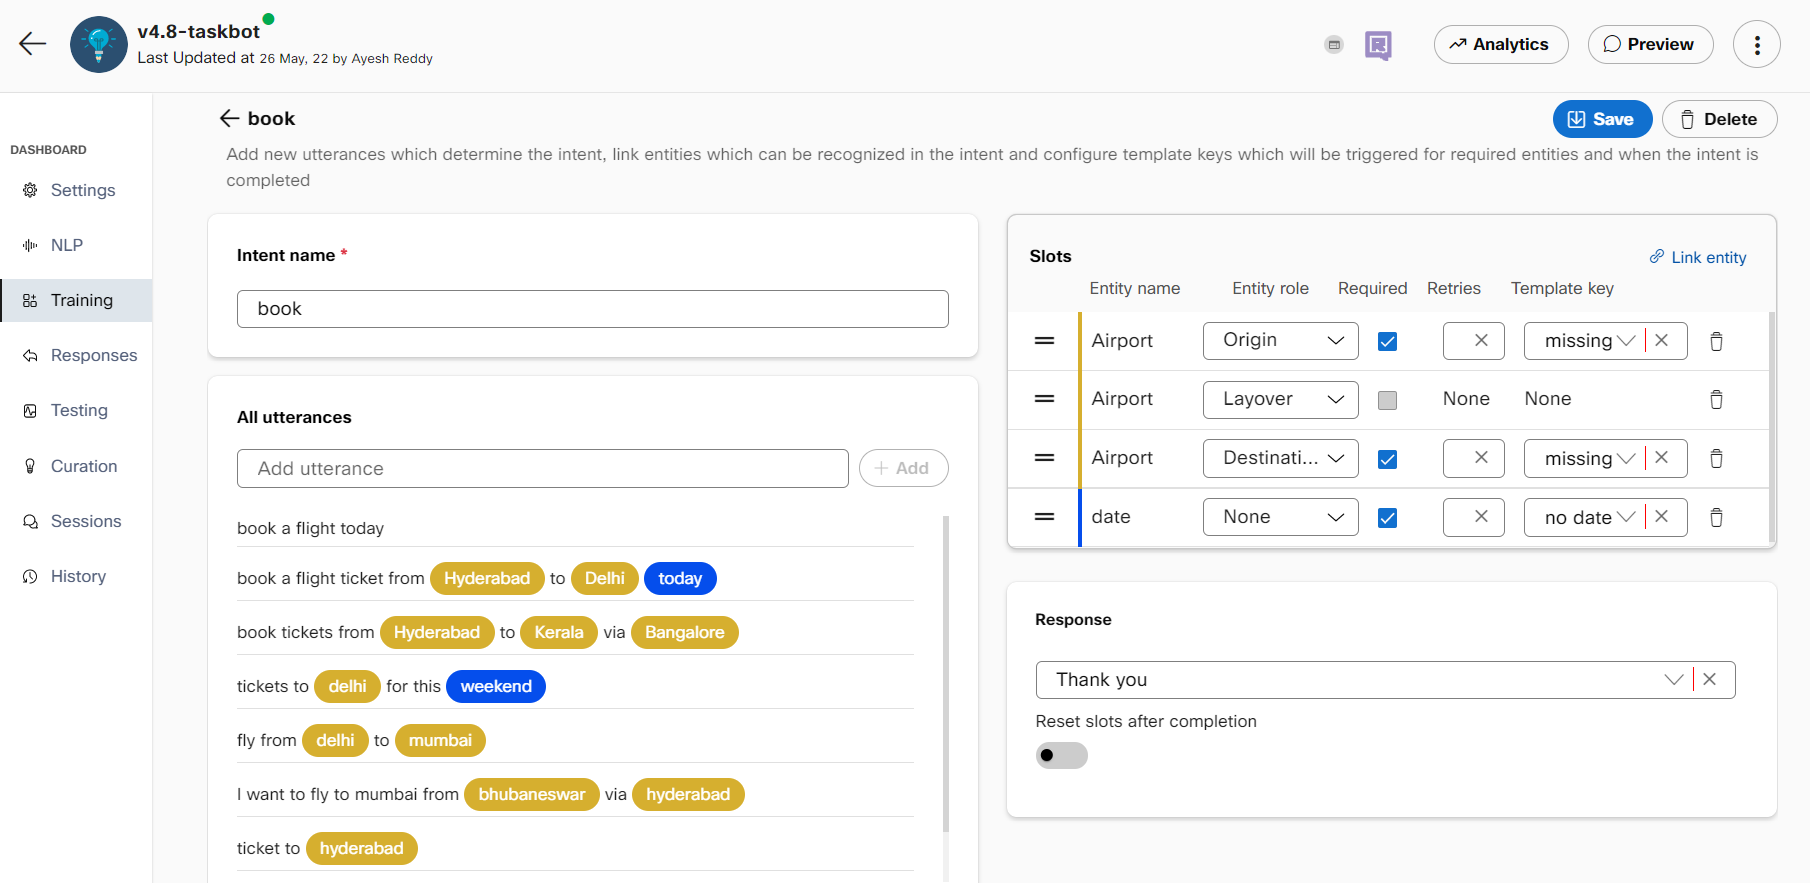
Linking entities to entity role
- Click Save.
Switching between the training engines
Use this procedure to switch between the NLU engines.
- Select the task bot of which you want to change the training engine.
- Click Training. The Knowledge base screen appears.

- Click NLU Engine on the right side of the page. The Change training engine window appears
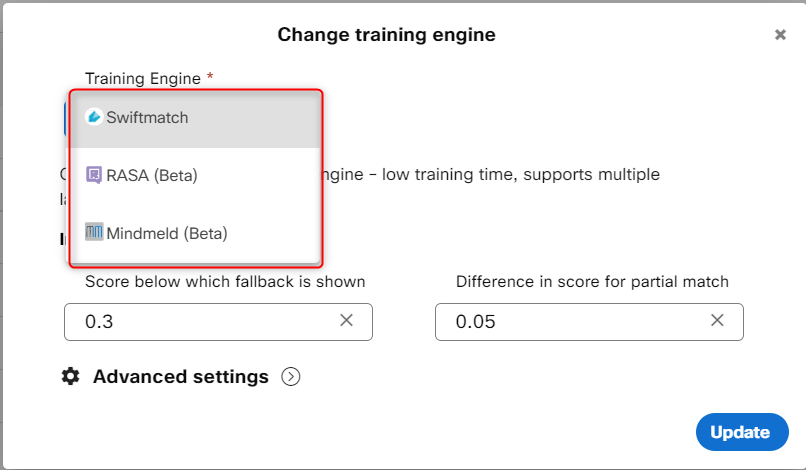
Change training engine in task bot
Note: By default, the NLU engine is set to Swiftmatch for the newly created bots.
4. Select the training engine to train the bot. Possible values:
• RASA (Beta)
• Swiftmatch
• Mindmeld (Beta)
- Specify this information in the Inference section
| Field | Description |
|---|---|
| Score below which fallback is shown | The minimum confidence needed for a response to be displayed to users, below which a fallback response will be shown. |
| The difference in scores for partial match | Defines the minimum gap between confidence levels of responses to clearly display the best match below which a partial match template will be shown |
| No. of results to store for each message | The number of articles for which bot’s calculated confidence scores will be displayed under transaction info in sessions. Note: The number of results to display in the Algorithm section of the Sessions screen has now been limited to 5. The top n results (1=<n=<5) will be available in message transcript reports of Q&A and task bots as well as in the ‘Algorithm results’ section of Transaction info tab in Sessions. |
- Click to expand the **Advanced settings section.
Note:
Developers can set different threshold scores for different NLU engines to determine the lowest score that is acceptable to display the bot response.
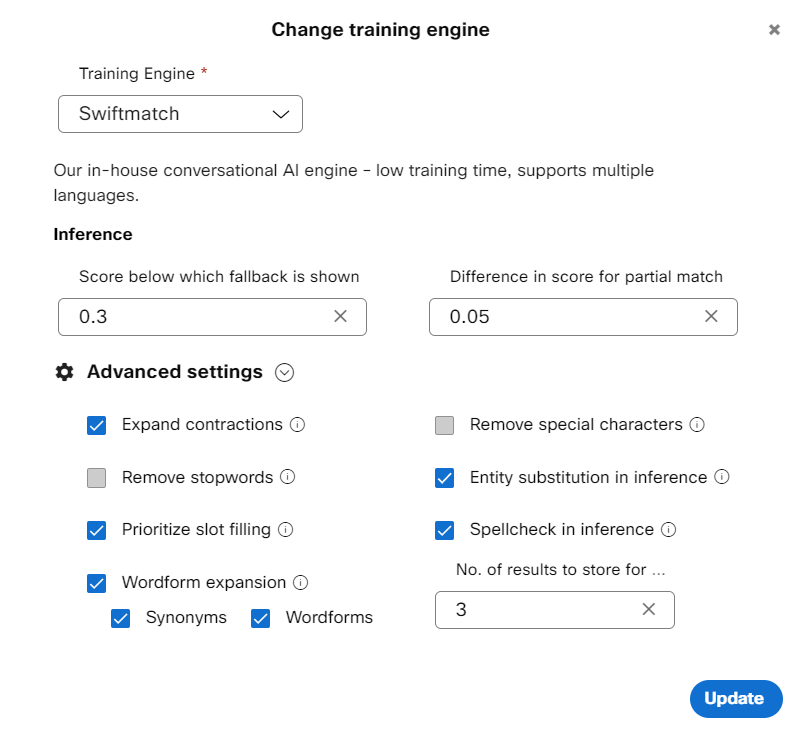
Advanced settings for Swiftmatch in Task bots
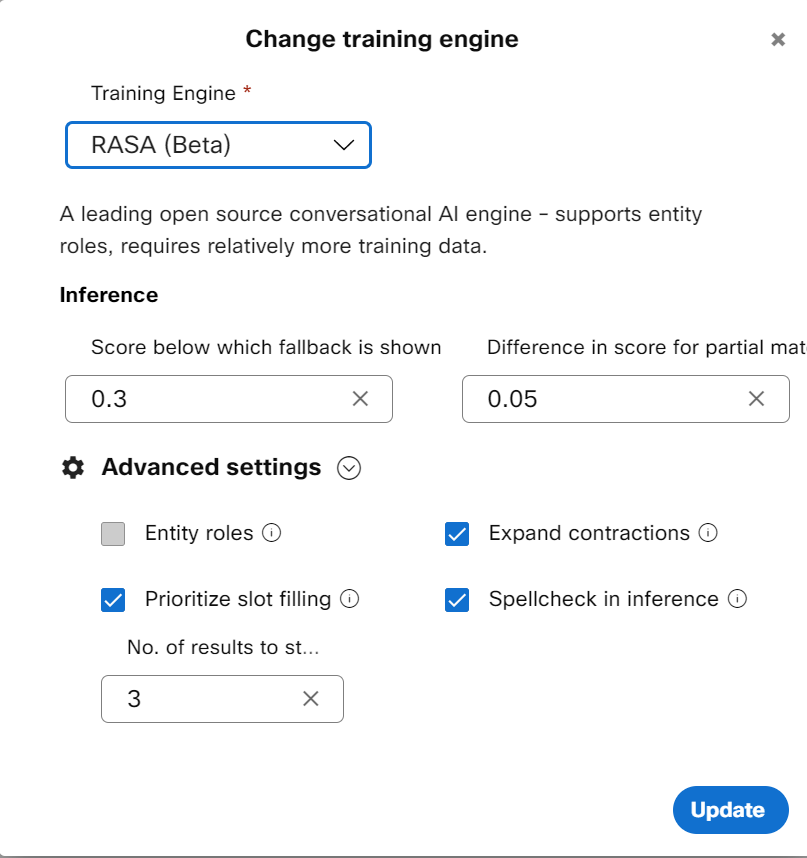
Advanced settings check boxes for Rasa and Mindmeld in Task bot
Expand contractions
English contractions in the training data can be expanded to the original form along with the terms in the incoming consumer query for greater accuracy. Example: ‘don’t' is expanded to ‘do not’. If this check box is selected, the contractions in the input messages are expanded before processing. This capability is supported for all three NLU engines.
Remove stopwords
‘Stopwords’ are function words that establish grammatical relationships among other words within a sentence but do not have lexical meaning on their own. When these stopwords such as articles (a, an, the, etc.), pronouns (him, her, etc.) and so on are removed from the sentence, the machine learning algorithms can focus on words that define the meaning of the text query by the consumer. If this check box is selected, the ‘stopwords’ are removed from the sentence at the time of training as well as inference. This NLU engine capability is supported only for Swiftmatch.
Wordform expansion
This expands the training data with wordforms such as plurals, verbs, and so on, along with the synonyms embedded in the data. This capability is supported only for Swiftmatch.
Synonyms
Synonyms are alternative words used to denote the same word. If this check box is selected, common English synonyms for words in the training data get auto generated from to recognize the consumer query precisely. For instance, for the word garden, the system generated synonyms can be a backyard, yard, and so on. This NLU engine capability is supported only for Swiftmatch.
Wordforms
Wordforms can exist in various forms such as plurals, adverbs, adjectives, or verbs. For instance, for the word “creation”, the wordforms can be created, create, creator, creative, creatively, so on. If this check box is selected, the words in the query are created with alternative forms of words and are processed to give an appropriate response to consumers.
Remove special characters
Special characters are the non-alphanumeric characters that have an impact on inference. For example, Wi-Fi and Wi Fi are considered differently by the NLU engine. If this check box is selected, the special characters in the consumer query are removed to display an appropriate response. This NLU engine capability is supported only for Swiftmatch.
Spellcheck in inference
Text correction library identifies and corrects the incorrect spellings in the text before inference. This capability is supported for all three engines only if the Spellcheck in inference check box is selected.
Prioritize slot filling
Whenever a consumer query is received, intent detection is performed first followed by entity identification or slot filling.
For example, “home loan interest rate” and “branch locator” are two different intents in a bot. The ‘home loan
interest rate’ intent requires a bank name from the user to address their query, and the ‘branch locator intent is
trained with various utterances like ‘where is my nearest bank branch’, ‘looking for the closes bank branch’, etc.
This intent requires a city name from the user before narrowing down on their location. When the user queries to
know about the home loan interest rate, the bot prompts for a bank name. When the customer provides the bank
name – ‘Acme bank’ in our example – due to certain biases in the training data (presence of the ‘bank’ multiple
times in training data for branch locator intent), the bot might take the user to another intent instead of continuing
with the current intent (home loan).
Enabling Prioritize slot filling check box in the Advanced settings of NLU engines in task bot allows developers to control this behavior while their bot is trying to fill slots for the active intent. When this setting is enabled, it will look to fill slots for the current intent rather than trying to move the user to another intent. When the Prioritize slot filling check box is cleared, the bot will default back to the current behavior, that is switch active intents depending on the accuracy scores returned by the NLU engine.
Entity roles
This capability is supported only for Mindmeld (Beta) and Rasa (Beta) in Task bots. The roles field is enabled while creating a custom entity on the Create Entity window only if the Entity roles check box is selected. When this field is enabled, and roles are configured for an intent, the bot can understand the structure of the user query precisely and respond accurately.
7. Click Update to change the algorithm in the bot's corpus.
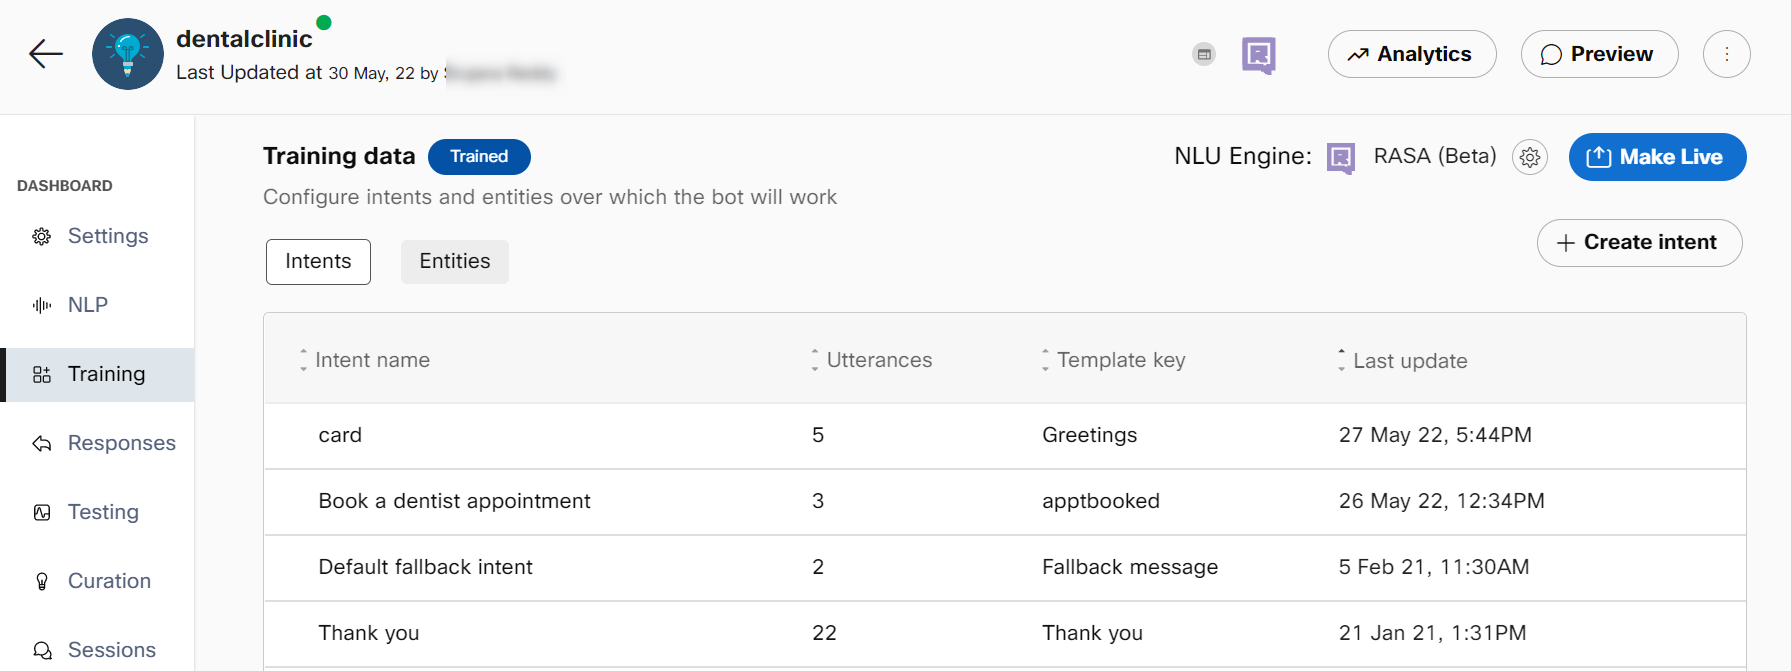
8. Click Train. Once the bot is trained with the selected training engine, the Knowledge base status changes from Saved to Trained.
Responses
Responses define what your bot says when replying to customers, based on the identified intent. You can define text, code, and multimedia elements in your responses. Responses on Webex Bot Builder have two major sections, templates, and workflows. Templates are what the end-users see and are mapped to intents through template keys. Templates for Agent handover, Help, Fallback, and Welcome are pre-configured in the bots and the response message can be changed from the corresponding templates.
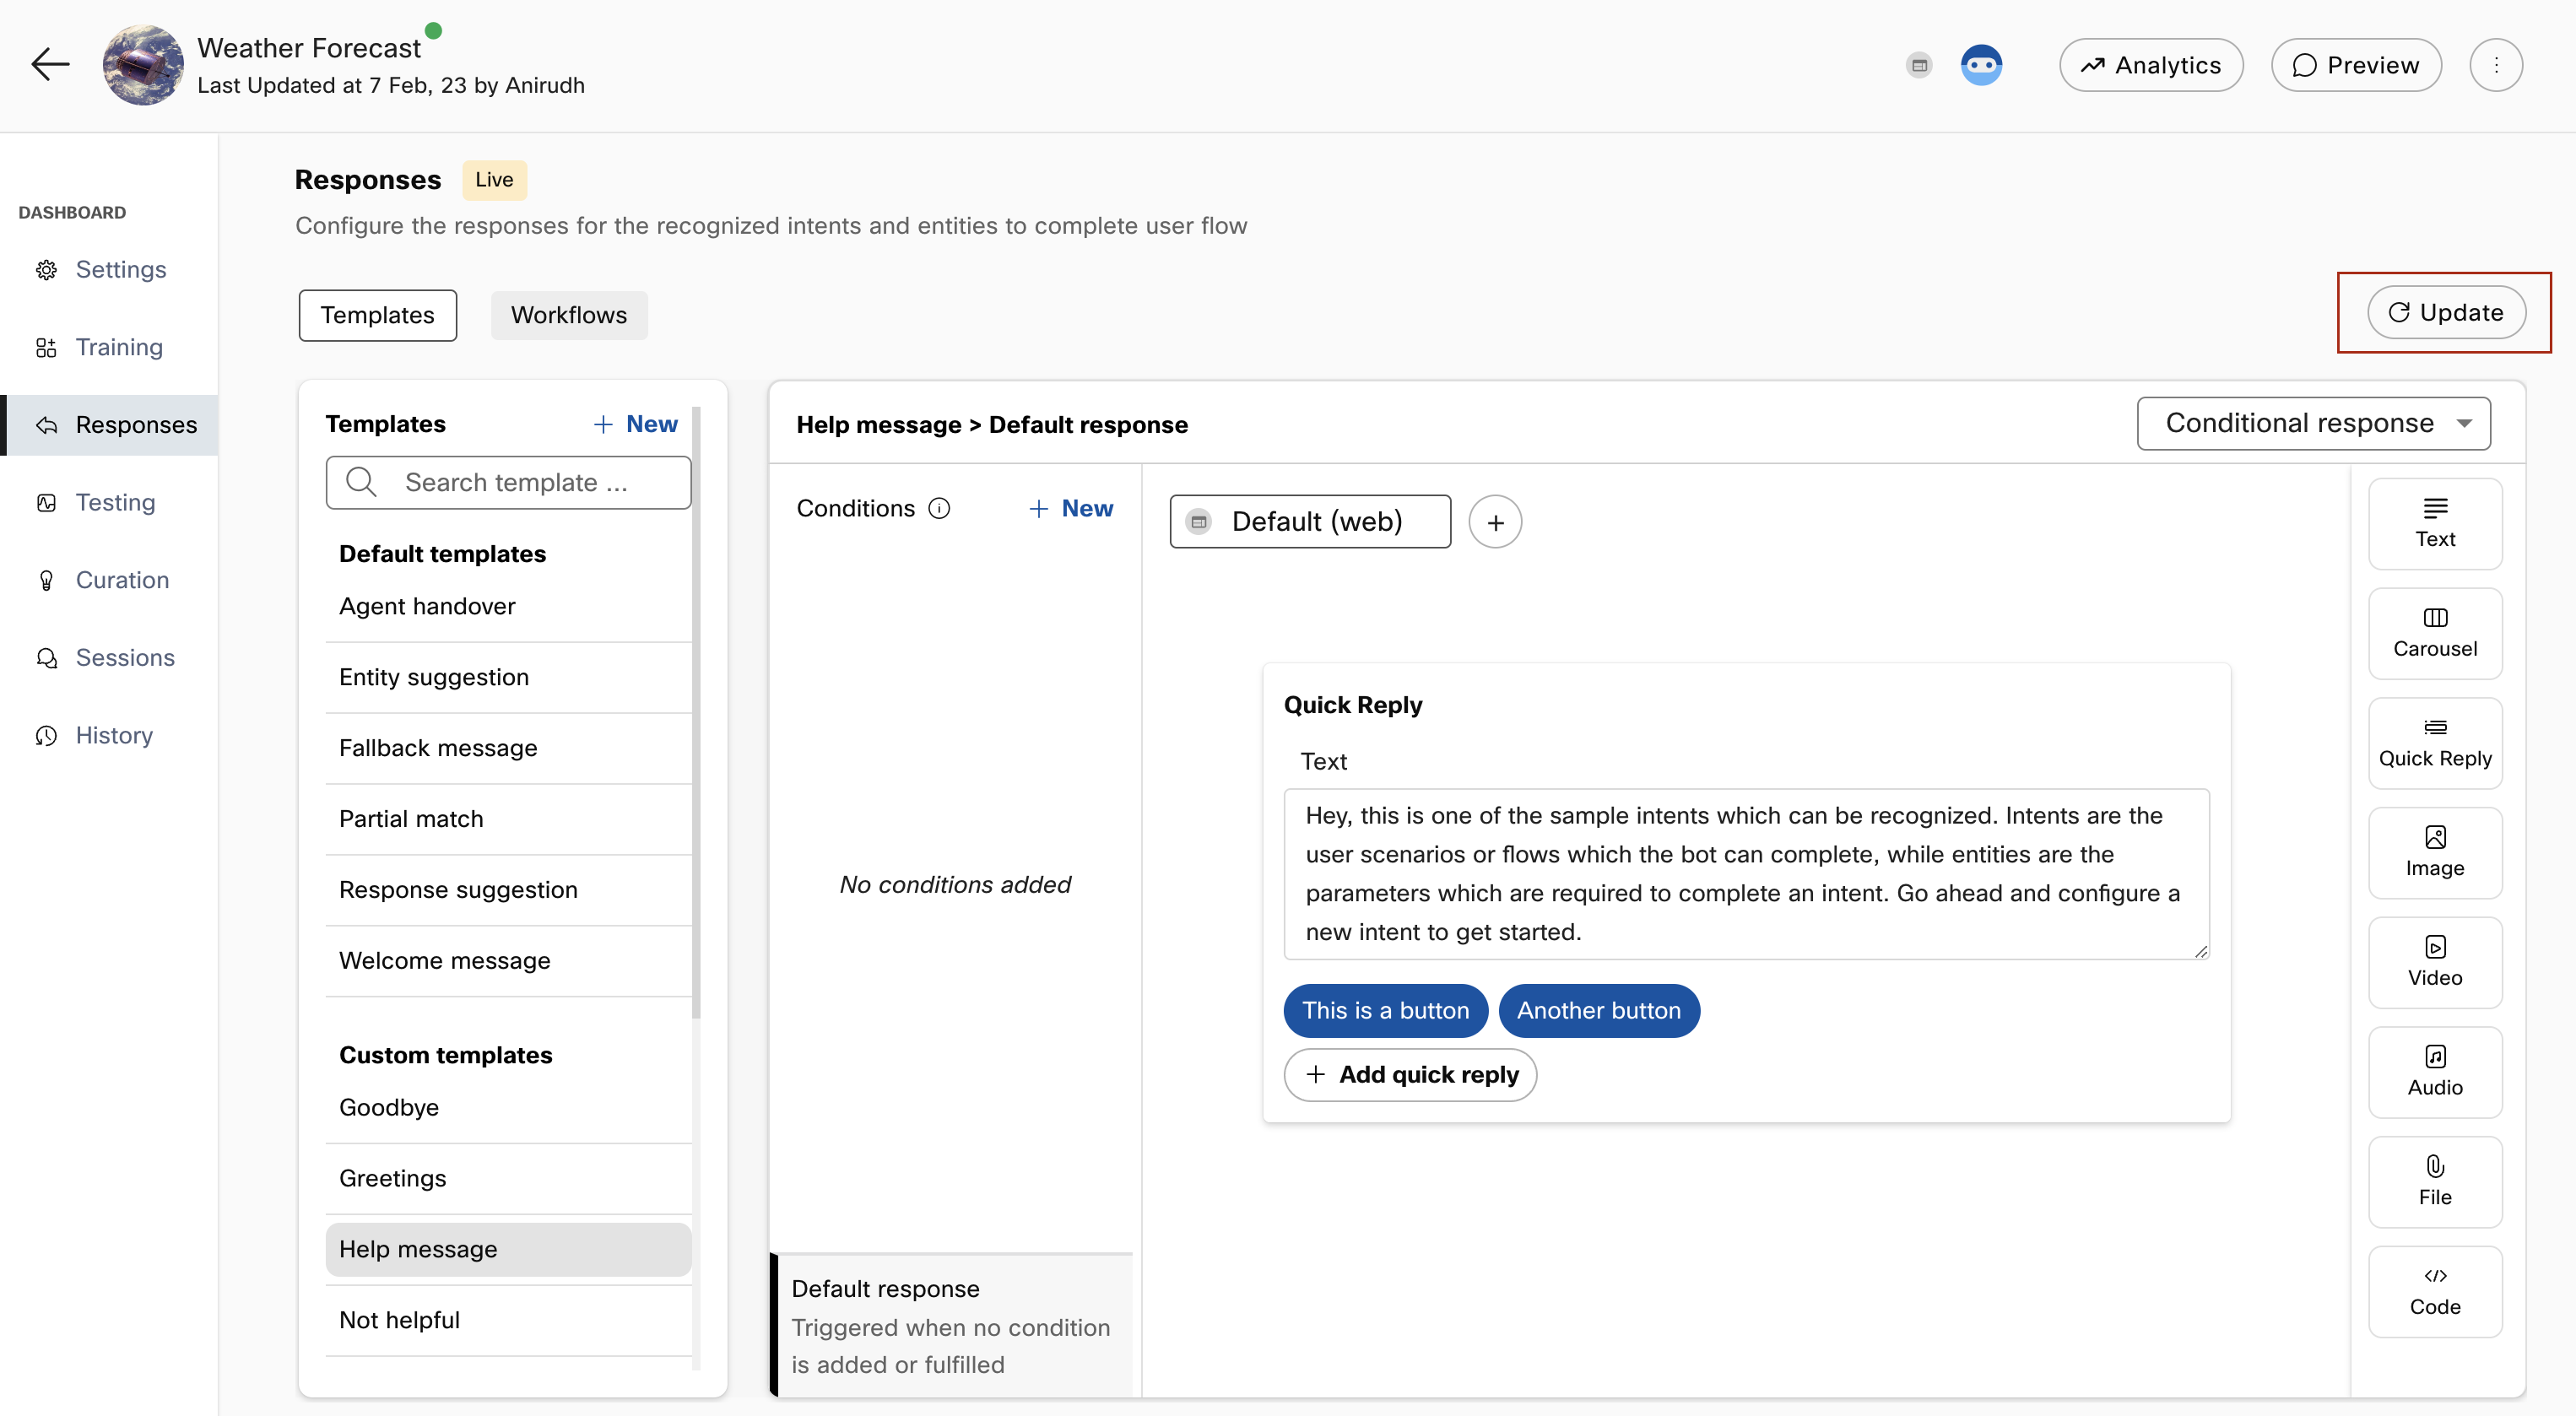
Responses in task bots
Any changes made to responses need to be saved by clicking the Update button on the top right.
Response types
The response designer page covers different types of responses and how they can be configured.
Updated about 2 years ago
