User Roles
Role-based Access Control and managing Teammates
Role-Based Access Control (RBAC)
User management provides a way to control user access (based on the roles) and is the ability to onboard and off-board users across the platform. You can define users and groups and provide the required permissions using user management. The users of the Webex Connect platform are uniquely identified by their email address.
Managing Users
- Tenant 'Owner' is the user role with highest level of access. If you're a partner helping a client go live with their services on Webex Connect, it is best to assign the Owner rights to the individuals who would need access to features such as Single Sign On (SSO) Configuration, Tenant Time Zone Settings, and platform usage audit trail for monitoring purposes.
- Users with Owner and/or Full Access roles can add/delete users and edit the permissions of the existing users. Editing the permissions includes revoking access. Only Owner level users can add another user in "Owner" role. Once a user has been added in "Owner" role, their access level cannot be changed or revoked in a self-serve mode. You will need to reach out to Webex Connect support to make a change in their access level.
- By default, the Service Key and JWT Authentication Tokens are masked. Only Owners, Full Access Users, and Limited Access Users can see the Service Key and JWT Authentication Tokens by clicking the Show Icon (eye icon) next to these credentials.
Note
The same email ID of a user can be added to multiple tenants. The user will be able to take up different roles in each of these tenants.
For example, [email protected] can have the role A (Owner) in tenant Q, and he/she can have role B (Full access) in tenant Z.
The users' access to assets varies depending on the user's hierarchy. Users, also known as teammates, can exist at tenant/client-level, group-level. or a team-level.
User Roles
The following table mentions about the platform features for which default access is provided or not provided for various roles.
| Feature Name | Owner | Full Access User | Limited Access | Read Only | Restricted |
|---|---|---|---|---|---|
| Profile Key | Yes | Yes | No | No | No |
| Service Key/JWT Token | Yes | Yes | No | No | No |
| SSO Configuration | Yes | No | No | No | No |
| Invite Other Users | Yes | Yes | No | No | No |
| Revoke User Access | Yes (Except other Owners) | Yes (Except Owner) | No | No | No |
| Change User Roles | Yes (Except other Owners) | Yes (Except Owner) | No | No | No |
| Change Tenant TimeZone or Date Format | Yes | No | No | No | No |
| Provide Decrypt Access to Other Users | Yes | No | No | No | No |
| Create New Services | Yes | Yes | Yes | No | No |
| View Existing Services | Yes | Yes | Yes | Yes | No |
| Get Numbers | Yes | Yes | Yes | No | No |
| Configure New App Assets | Yes | Yes | Yes | No | No |
| Share App Assets with Groups | Yes | Yes | Yes | No | No |
| Add Integrations | Yes | Yes | Yes | No | No |
| Access Monitoring (Audit Trail) | Yes (if this add-on has been subscribed to) | No | No | No | No |
| Add Group(s) | Yes | No | No | No | No |
| Add Team(s) | Yes | No | No | No | No |
| Access Reports | Yes | Yes | Yes | Yes | No |
| Access Debug Console | Yes | Yes | Yes | Yes | No |
| Download Export Logs | Yes | Yes | Yes | Yes | No |
| Schedule Export Logs | Yes | No | No | No | No |
The platform has users at the following hierarchy levels:
- Tenant/Client - users at this level have access to all the assets.
The users set up at Tenant level can switch to the group/team level to see the assets at that level. The access rights depend on the role of the user. - Group - each tenant/client can have multiple groups or sub-accounts.
The sub-accounts represent various units/departments of a client. Sub-accounts are required to administer a set of users grouped by their function within the organization. This is an optional level in the hierarchy. Users at the group-level have access only to the assets created at that group-level. However, users at the group-level can switch down to the team-level to see the assets of the teams within that group. The access rights depend on the role of the user. - Team - a sub-account can contain multiple teams which in-turn contain team members. This is an optional level in the hierarchy.
Users at the team-level have access only to the assets created at the team-level. They cannot see and access assets at other team-levels or at its parent group-level. The access rights depend on the role of the user.
Specific Permissions
Granular Access to Profile Key, ServiceKey, and JWT Token:
Users with the ‘Owner’ and ‘Full Access’ roles will be able to view the following UI options in the ‘Permissions’ page of the platform:
- Profile API / Media access Key
- Service Key / JWT Token
In case of users with the ‘Owner’ role, the above options will be enabled by default and cannot be disabled. While, users with the ‘Full Access’ role can enable or disable these options in the UI.
Permission Changes
The above change also impacts all the existing users and users whose roles are changed, such that accesses will either be revoked or retained based on the new permission settings above.
For example, if a user with ‘Restricted Access’ role previously had access to either of the options above, their access will now be revoked.The role-based changes can be tracked in the user details of Audit Logs.
Regenerate Profile Key
Users only with the ‘Owner’ role can regenerate the profile key in the Services page of the platform with the ‘Regenerate Profile Key’ option. Users with all other roles (including Support access users) will view this option in the disabled state in the platform UI.
Add Sub-accounts (Groups)
To add sub-accounts:
- Click Sub-accounts in the User Management menu.
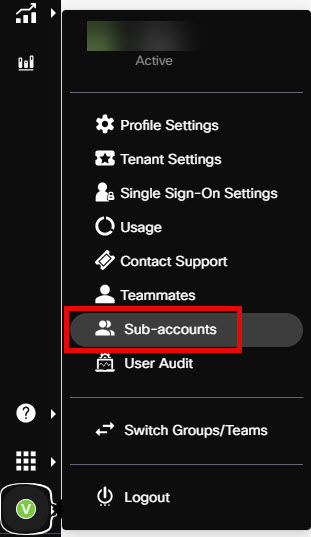
User Management Menu
- Go to the Groups tab and click Add New Group.
- Provide a suitable Name and Description and click Save.
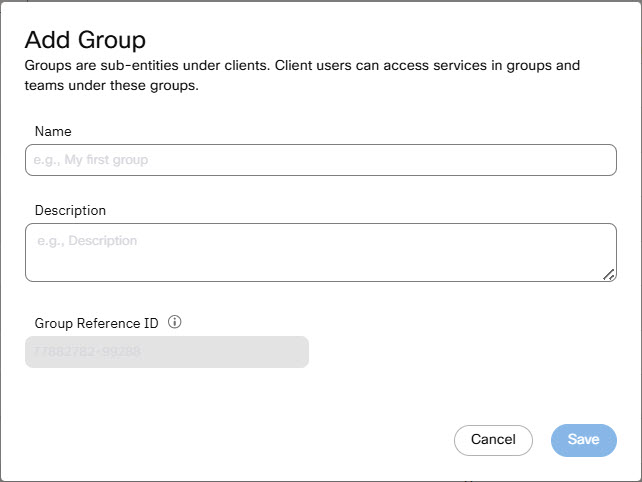
Screenshot of Add Group
The specified group is created.
Deleting Sub-accounts (Groups)
Deleting sub-accounts is not supported currently.
Add/Edit Teams
To add Teams:
- Click Sub-accounts in the User Management menu.
- Go to the Teams tab and click Add New Team.
- Provide a suitable Name and Description.
- Select a group in the Groped Under drop-down list box.
- Click Save.
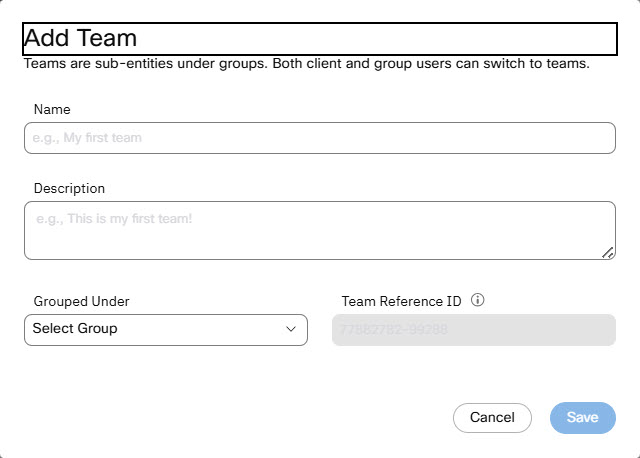
Add Team to a Group
The specified team is created within the selected group.
Deleting Teams
Currently, the deletion of teams is not supported.
Add/Edit/Delete Teammates
To add teammates:
- Click Teammates in the User Management menu. You can see a list of the users at this hierarchy level.
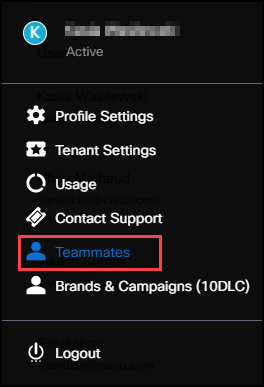
Screenshot of Teammates
- Enter the Email ID of the user.
- Select the Role that you want to grant the user and click Invite User. For details about roles, see the User Roles section.

Add Teammates
- Click Edit against the required user and update the role permission and data access for that user.
- Click Delete against the user that you want to delete and confirm the action to delete the selected user.
Switch View
You can switch from a tenant/client level to a group or team level using the Switch View menu item available in the User Management menu. If you are a user at a group-level, you can switch to the team-level.
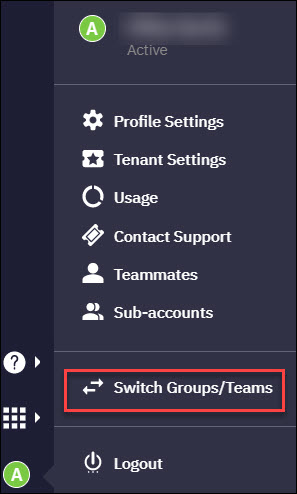
Switch View Menu Item
Hierarchy-based Feature Access
The following table provides an illustration of the availability of the assets between the users across a hierarchy. 'Created at' column refers to the level at which the Entity/Asset has been created or configured.
| Entity/Asset | Created At | Tenant/Client | Group | Team |
|---|---|---|---|---|
| Users | Tenant/Client | ✅ | ❌ | ❌ |
| Group | ❌ | ✅ | ❌ | |
| Team | ❌ | ❌ | ✅ | |
| Services | Tenant/Client | ✅ | ❌ | ❌ |
| Group | ❌ | ✅ | ❌ | |
| Team | ❌ | ✅ only when switched to the team-level | ✅ | |
| Apps | Tenant/Client | ✅ | ✅ only when shared with the group | ✅ only when shared with the team |
| Group | ❌ | ✅ | ✅ only when shared with the team | |
| Team | ❌ | ✅ only when switched to the team-level | ✅ | |
| Integrations | Tenant/Client | ✅ | ❌ | ❌ |
| Group | ❌ | ✅ | ❌ | |
| Team | ❌ | ✅ only when switched to the team-level | ✅ |
Updated 11 months ago
