Navigating Flow Builder Canvas
Editor to create interactive communication flows with minimal programming or scripting efforts
Interface Components
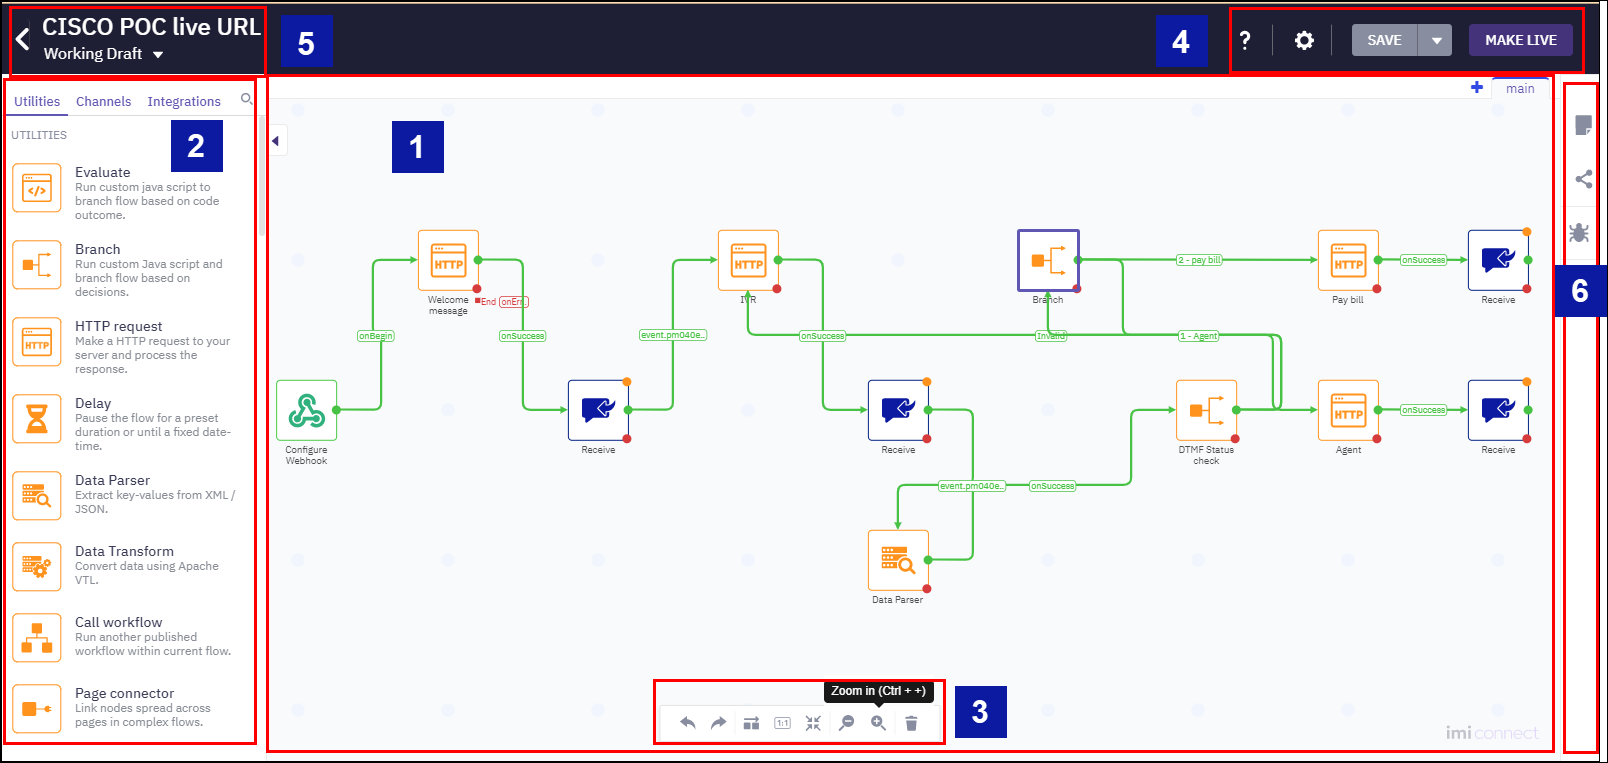
The flow builder has the following user interface components:

Flow Builder Interface
1. Canvas
This is the region where you can build and configure a flow using Nodes. The flow canvas allows you to drag-and-drop nodes from the Node Palette and connect the nodes using connectors to build a flow.
2. Node Palette
The node palette lists all the available Nodes including pre-built nodes and custom nodes. These nodes are categorized into logical groups based on their functions.
- Utilities - Standard functions for orchestrating your business process
- Channels - Nodes for embedding Send/Receive message events through any of the Webex Connect channels
- Integrations - Custom nodes build with third-party APIs to connect with their respective systems.
You can start typing in the search bar to look up a node from the list.
3. Canvas Controls
The canvas controls contain the tools for managing activities and the node layout on the flow canvas.
Controls for managing activity:
- Undo - A multi-level undo that reverses an action and its relative effect
- Redo - A multi-level redo that repeats the previous action
- Delete - Deletes a selected node or a connector.
Quick Tip - Selecting multiple nodes at once
If you want to select multiple nodes at once (for example, to avoid the need to individually delete each of these nodes when updating an already existing flow) you can do so by pressing the 'ctrl' key in Windows (or the 'command' key in Macbook) and clicking the required nodes one by one. You can release the 'ctrl' key once you have selected all required nodes.
Controls for managing canvas layout:
- Auto-arrange - All the nodes in the flow are arranged in order from left to right with equal distance between the nodes
- Actual size - Resets to default canvas size (from zoom in/out level)
- Fit to screen - Flow canvas gets refreshed and the whole flow with all the nodes is displayed in the flow canvas
- Zoom in - Magnifies the canvas
- Zoom out - Shrinks the canvas.
4. Flow Controls and Settings
Access Documentation, Flow Settings, and tools for managing edits made to the flow.
- Help: Links to access Documentation and Shortcut Keys
- Settings: Allows managing General Settings, Custom logs, Flow outcomes, Custom Variables
- Save: Saves all edits made to the flow as a Working Draft without propagating the changes to the flow version; also displays any errors and warnings related to the flow configuration
- Make Live: Displayed only when a working draft version is loaded in the canvas and allows you to make the working draft live by creating a new version. Clicking on this button launches the Make Live Configuration Wizard.
Note
Make sure your version comments do not exceed 250 characters before going live with the flow.
- Edit: Displayed only when a live version is loaded in the canvas. It creates a new working draft version by copying the flow from the version that was selected.
5. Flow Versioning
This area displays the current version of the flow. Click the drop-down list box to view the Version History and to load any of the available versions in the flow canvas.
6. Right-side Toolbar
Optional tools that aid flow setup.
- Errors & Warnings: Displayed only if the flow has any errors upon clicking Save or Make Live
- Notes: Allows you to add comments and tag them to a node
- Share: Generates a read-only link to share the flow with other users including/excluding the Analyze Mode. The Analyze Mode option is visible only if the administrator has configured it. You must protect the shareable link with a password.
- Flow Debug: Launches the debug pane from the bottom of the flow and allows you to access detailed debug logs for each flow run.
Updated 15 days ago
