
Outbound Webhooks
Configure an Outbound Webhook URL to post events such as incoming messages from customers, incoming call events, and/or status receipts for your outbound messages
Outbound Webhooks can be used to forward the following events or messages to your applications or systems:
- Status receipts for the outbound messages sent using Webex Connect (E.g., Submitted, Failed, Delivered, etc. receipts are subject to channel-specific capabilities.)
- Incoming calls and messages from customers across channels and Incoming call events.
URL Endpoint Notifications
- We only support HTTPs URLs. We make a test call to the configured URL and expect a standard 200 HTTP Response before you can save your configuration. All notifications will be delivered by making POST requests.
- In case Webex Connect is not able to send a notification because of an unreachable URL, it will retry sending notifications three times each, after 60 seconds. The maximum request timeout for each notification is 10 seconds. The HTTP Responses for which retries are not performed are - 202, 203, 204, 205, 206, 207, 208, 226, 300, 301, 302, 303, 304, 305, 306, 307, 308, 400, 402, 404, 405, 406, 407, 408, 409, 410, 411, 414, 415, 416, 418, 505.
SHA256 and SHA512 support
With the v5.6.0 release (Oct 23), we have added support for SHA256 and SHA512 signatures while setting up outbound webhooks. The SHA1 signature option is no longer supported and isn’t allowed for new outbound webhook configurations. This does not impact existing functional outbound webhook configurations ( i.e. webhooks configured before the April 22 release).
Configuring Outbound Webhooks at a Service Level
To configure an outbound webhook for a given service on Webex Connect platform, perform the following steps:
- Navigate to Assets > Integrations.

Integrations in Assets Menu
- Click Add Integration > Outbound Webhook.

Create Outbound Webhook
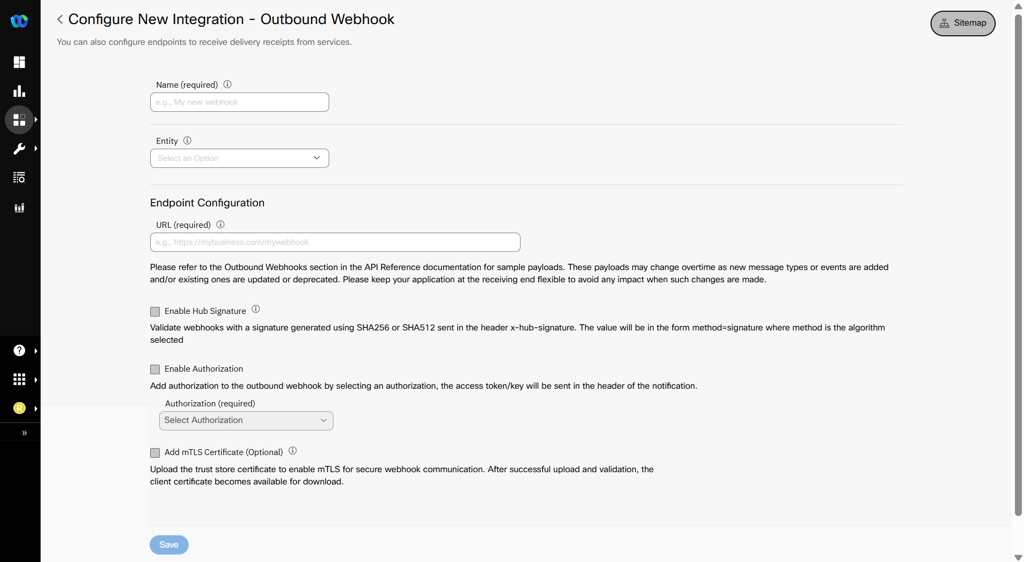
- Enter/select details like Name, Entity, Endpoint Configuration.
- Name - the name that you want to use for your outbound webhook configuration
- Entity - the Service to which you want to associate your outbound webhook
- URL - the URL at which the Webex Connect platform notifies your application of incoming events and messages.
- Which Notifications Do You Want To Receive - select the required notification you want to receive for the Outbound Webhook.

Outbound Webhook Configuration
Note
For Email Channel, the events marked with Asterisk are applicable only if 'Email via AWS SES' is the selected route.
-
Enable Hub Signature (Optional Configuration) - The signature is the hexadecimal (40-byte) representation of the signature computed using the HMAC algorithm selected during configuration (E.g., one of SHA256 or SHA 512) as defined in RFC2104. When enabled, you will receive an additional header called x-hub-signature. The signing of Webhooks (also known as, enabling hub signature) is recommended under best security practices. Webhook signatures help ensure that a webhook payload was sent by Webex Connect and was not tampered with. The value of the hub secret is used as the key to creating a signature of the notification data and is sent along with the notification, which can then be verified by the receiving server.
Secret Key in the x-hub-signature
The consumer (client) of the Outbound Webhook provides the Secret Key in the x-hub-signature of the Outbound Webhook. This allows the client to calculate the signature on the client-side and match the signature for the incoming payload in the Outbound webhook.
A sample Python script for checking the signature is added in the FAQs section. Click here to view the sample script. -
Enable Authorization (Optional Configuration) - Select the Authorization that you would like to apply to this Outbound Webhook Configuration. Adding an Authorization to the outbound webhook is advised under best security practices. It allows the notification-receiving endpoint to make sure the request is posted from the authorized platform (i.e. Webex Connect). Authorizations are added under Integrations. Please refer to the section on Authorization Configuration below for more information.
-
Add mTLS Certificate (Optional) - Select the Add mTLS Certificate checkbox to enable mTLS for secure webhook configuration. mTLS (Mutual Transport Layer Security) is a security protocol that ensures both parties in a communication (for example, a client and a server, such as Webex Connect and an external system) to authenticate each other before establishing a secure connection. Please refer to the section on mTLS Configuration for more information.
Add mTLS Certificate
Note
Add mTLS certificate is not available by default. To enable this for your tenant, please contact your account manager.
-
Click Save.
Configuring Outbound Webhook at Apps Level
To configure an outbound webhook for a given app on Webex Connect platform, perform the following steps:
- Click Add Integration > Outbound Webhook.
- Enter Name for your outbound webhook configuration.
- Select Entity to which you want to associate your outbound webhook at App level. It must be an In-App app asset.

Screenshot displaying to select the Entity.
- Select the checkboxes for the notifications you want to receive.

Screenshot displaying to select the checkboxes for the notifications you want to receive.
- For endpoint configuration refer to Configuring Outbound Webhooks at a Service Level section.
- Click Save.
How to use Outbound Webhooks to forward delivery receipts
To receive delivery receipts for your outbound messages:
- Select a service from the Entity dropdown
- Select the outbound channel for which you want to receive the delivery receipts
- Select the receipt types you want the notifications for. Please note that different channels offer different kinds of receipts.
The below table shows which notifications are available for each channel supported by Webex Connect. By default, none of the notifications are selected. You must explicitly select the required notifications channel-wise.
Instagram as a channel is deprecated.
| Channel | Applicable Delivery Status |
|---|---|
| SMS | Submitted Delivered Undelivered Failed Clicked |
| Voice | Offered Accepted Answered Dropped Rejected Released Disconnected Trombone Connect Trombone Release Failed |
| MMS | Submitted Delivered Failed |
| Messenger | Submitted Delivered Failed Read |
| In-App Messaging / Live Chat | Submitted Delivered Read Failed Clicked |
| Submitted Delivered Read Failed | |
| Push | Submitted Delivered Read Failed |
| Submitted Delivered Not verified Invalid Bounced Complaint Failed Read Clicked Note: Delivered, Not verified, Invalid, Bounced, Complaint, Read, and Clicked events are only available if Email via AWS SES is the selected route. | |
| Apple Messages for Business | Submitted |
| RCS | Submitted Delivered Read Failed Subscribe Unsubscribe |
| Read Submitted Failed |
Sample Payloads for Outbound Message Status and Incoming Messages
Sample Payloads
For Information related to the sample payloads, refer to the section Outbound Webhooks in the API Reference documentation. Please note that the payloads vary for each message type, each event type, and each channel. Also, enhancements are made to these payloads overtime as new message types or events are added and/or existing ones are updated or deprecated. Please keep your application at the receiving end flexible to avoid any impact when such changes are made.
Error Codes
Error Codes
For Information related to the common and channel-specific error codes, refer to the section Channel Specific Status Codes in the API Reference documentation.
For more information, refer to Authorization for Outbound Webhook.
Export Logs for Outbound Webhooks Failed Notifications
Notification to an endpoint can fail because of multiple reasons, for example - the Endpoint not being reachable, Authorization failed, Too many requests, etc. On encountering a failure, Webex Connect tries to successfully post the request to the endpoint three times, after 60 seconds. After three retries, Webex Connect drops the notification requests as failed notifications.
You can download or export the list of all the failed notifications to SFTP/S3 locations using the Export Logs configuration.
Note
The failed notification logs are available only in New Export Logs, not Legacy Export Logs.
This feature allows you to download or export logs for Incoming messages, Message receipts failed notifications configured through Outbound Webhooks.
This does not include notifications sent through Reserved keywords, Contact Policy APIs, Flow Notifications configured under Flow settings, Data Stream etc.
FAQ
Below is a sample Python script for checking the signature.
import hashlib
import hmac
#rawData is the payload and signatureHeader is the header received in the notificaiton post request (Please note to trim all white spaces in the rawData and
#signature header contains only the value of  x-hub-signature without sha256=
rawData = '{"deliveryInfoNotification":{"deliveryInfo":{"timeStamp":"2024-03-04T18:24:17.284Z","Description":"Submitted","code":"7501","deliveryChannel":"email","additionalInfo":"","destination":[email protected],"destinationType":"email","deliveryStatus":"Submitted"},"subtid":"","transid":"8388899605-56e9-46b0-861e-44af7ee10391","callbackData":"This is callbackdata","correlationid":""}}'
signatureHeader = "12345678901234567890ijklmnoqrstuvwxyz1234567890c9c034044e6558980"
#Secret used in the outbound webhook configuration
secret = "abcdefgh1234567890ijklmnoqrstuvwxyz1234567890"
#if using sha512 use hashlib.sha512
sha = hashlib.sha256
newHmac = hmac.new(secret.encode(), rawData.encode(), sha).hexdigest()
print(newHmac)
if(signatureHeader == newHmac):
                print("Header verified")
else:
                print("Header NOT verified")
What happens if the certificate expires and I don’t upload a new one?
- If your certificate expires and you do not upload a new one, Webex Connect cannot establish a secure connection with your endpoint.
- Outbound webhook calls will fail, and all retries will also fail until you upload a valid certificate.
- Webex Connect retries three times using exponential backoff intervals of 30, 60, and 120 seconds. If you upload a new certificate during this period, we will deliver the pending events. If not, all events will fail.
What happens if I enable mTLS along with Authorization and Signature Hub?
- If you enable mTLS along with Authorization and Signature Hub, Webex Connect enforces all configured security layers:
- mTLS: Validates both client and server certificates.
- Authorization: Validates the access token or credentials.
- Signature Hub: Ensures message integrity and authenticity.
If any validation fails, Webex Connect does not deliver the webhook event.
What happens if I delete the old certificate while uploading a new one?
- If you delete the old certificate before the new one becomes active, webhook deliveries may fail.
- Best practice: Add the new certificate before deleting the old one, then click Save. After saving, Webex Connect caches the certificate for 1 minute, during which the old certificate is still used for handshakes. After 1 minute, the new certificate becomes active.
Note
To avoid service disruption, keep both the old and new certificates on your server for a short period before removing the old certificate.
Can I upload multiple certificates for smooth rollover?
- No, you cannot upload multiple certificates at the same time. Webex Connect uses only the active certificate. During rollover, after you upload and save a new certificate, the previous certificate remains active for 1 minute before the new certificate takes effect.
Will webhook events be retried if my endpoint is down but the certificate is still valid?
- Yes. If your endpoint is down but the certificate is still valid, Webex Connect retries event delivery according to the retry policy. It attempts delivery three times, with exponential backoff intervals of 30, 60, and 120 seconds. If your endpoint becomes available during these attempts, the events will be delivered. If the endpoint remains down after three retries, the events will fail.
What happens if I upload an invalid certificate?
- If you upload an invalid certificate,Webex Connect rejects the upload.
How will I be notified about certificate expiry?
- You will receive reminder notifications (e.g., 60, 30, 15, 7, 3,2 and 1 day before expiry) so you can upload a new certificate in advance.
Do the server and client certificates need to come from the same Certificate Authority?
- No, the server and client certificates do not need to come from the same Certificate Authority (CA). They can be issued by different CAs, as long as both certificates are trusted and added to the appropriate trust stores.
Can I temporarily disable mTLS after enabling it for webhooks?
- Yes, you can temporarily disable mTLS after enabling it for webhooks. If you disable mTLS, webhook delivery will revert to standard HTTPS.
Updated 6 months ago