Encryption Node
Understand what a Encryption node is and how to configure it
The Encryption node enables you to encrypt a text or a string using either AWS Key Management Service or Webex Connect encryption.
To use AWS Key Management Service, you must have an account with AWS. During encrypting a text or a string, you need to specify the details provided by AWS such as Access key, Secret key, AWS region, Key ID, Encryption context key value in the Encryption screen.
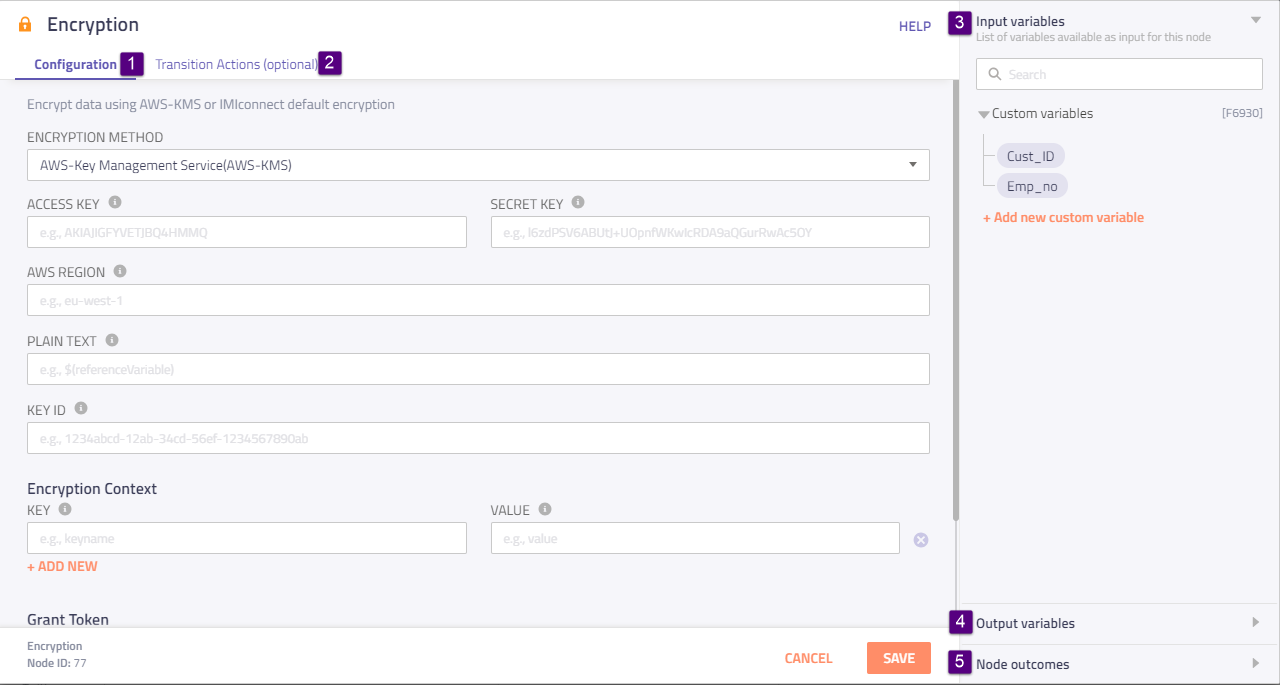
When you double-click the Encryption node, the Encryption screen appears with two tabs: Configuration and Transition Actions. The Configuration tab enables you to configure the encryption settings whereas the Transitions tab provides configuring the node on-enter/on-leave operations.
Here is the node image:

Encryption Node
Interface Elements

Screenshot of Encryption Node Configuration Page.
Here is the description for the interface elements:
| S. No | Element | Description |
|---|---|---|
| 1 | Configuration tab | Use this tab to configure the encryption settings using AMW Key Management Service or Webex Connect encryption. Here is the description for these: AWS Key Management Service method Use this method if you have an account with AWS, and then furnish the following details provided by AWS: Access Key and Secret Key: These are not your regular user name and password, but are special tokens and must be used together. AWS Region: This is the geographic area where the master key is generated. Plain Text: In this field, specify the text, which you wish to encrypt. Key ID: This is created along with the secret key when the access keys are created. Encryption Context (Key and Value): These are a set of non-secret key-value pairs. Providing encryption context makes the encryption request bound cryptographically to the cipher-text. The advantage with this is - same encryption context is required to decrypt (or decrypt and re-encrypt) the data. Grant Token: It is created to provide temporary permissions. Webex Connect encryption method Variable Name: Specify the variable in which the encrypted data is stored. Plain Text: Specify the text to be encrypted. |
| 2 | Transition Actions tab | Use this tab to configure node on-enter/on-leave operations. Here is the description for the fields: Add action link - Click it to view the Transition action fields. |
| 3 | Input Variable | Click this collapsible panel to view the list of all the available flow variables. You can search for a variable using the Search field. You can also add a variable to the flow variables list by clicking the Add new flow variable link at the bottom of the list. |
| 4 | Output Variables | Click this collapsible panel to view the output variables. The data generated by the node is displayed as variables here. |
| 5 | Node Outcomes | Click this collapsible panel to view the list of possible node outcomes. You can also customize the node labels by clicking the Edit icon. |
Encrypting a Text or String
You can encrypt a text or string in two steps: Configuring encryption settings and Transition actions. However, configuring transition actions is optional.
Here is the description for these steps:
Configuring Encryption Settings
- Double click the Encryption node.
The Encryption screen appears. - On the Encryption screen, click the Configuration tab if it is already not opened by default.
The configuration fields appear. - On the Configuration tab, from the Encryption Method drop-down box, select AMW Key Management Service or Webex Connect encryption.
If the selected method is AMW Key Management Service
- Specify the Access Key and Secret Key provided to you by AWS.
- Specify the AWS Region. This is the geographic area where the master key is generated
- In the Plain Text field, enter the text to be encrypted.
- In the Encryption Context area, specify the key and the corresponding value. These are a set a non-secret key-value pair.
- Specify the Grant Token to provide temporary permissions.
Note: Click Add New to provide more grant tokens. - Click the Save button at the bottom.
The text is encrypted.
If the selected method is Webex Connect encryption
- Specify the variable in which the encrypted data is stored.
- Specify the text to be encrypted.
- Click the Save button at the bottom.
The text is encrypted.
Configuring Transitions
As part of configuring transition actions, you can configure on-enter/on-leave operations. However, configuring these are optional.
Here are the steps:
- On the Encryption screen, click the Transition Actions tab.
- On the Transition Actions tab, click Add Action.
The Transition Actions area appears. - On the Transition Actions area:
- From the Time drop-down box, select On-enter or On-leave. For example, On-enter.
- From the Acton drop-down box, select an action choosing from the pre-built options.
Tip
To delete an event, click the delete button corresponding to that event. See the image below.

Delete Button
- Finally, click the Save button at the bottom.
The transition actions are configured.
Updated 6 days ago
