Call Workflow Node
Invoke one flow within a service from another flow within the same service.
At times you may have the need to divide a large and complex flow into a number of simple flows or you may have a use case that requires multiple flows to operate in combination leading to the need for calling a flow within a service from another flow within the same service.
As a quick example, assume you want to set up a simple self-service flow across various channels that allows customers to message in BALANCE keyword along with their account number to get their account balance in response. This would typically involve configuring one flow for each of the channels where you want to launch this experience. In most cases, a flow like this would involve customer identity verification by sending an OTP. While you can configure the node sequence for OTP generation and validation within each of the channel-specific flows, a more effective way to handle it would be to configure separate flow(s) for OTP generation and validation and invoke it from other flows wherever needed.
The Call Workflow node enables you to achieve this by allowing you to call one flow within a service from another flow within the same service. When called, the full context of the current flow along with the session data is passed to the newly invoked flow.
This process allows the modular design of flows where changes to specific parts of a large workflow can be managed locally within smaller modules.
Variable Management for Context Transfer across Flows
You can use custom variables to pass values of required variables from the calling flow (i.e., parent flow) to the called flow (i.e., child flow).
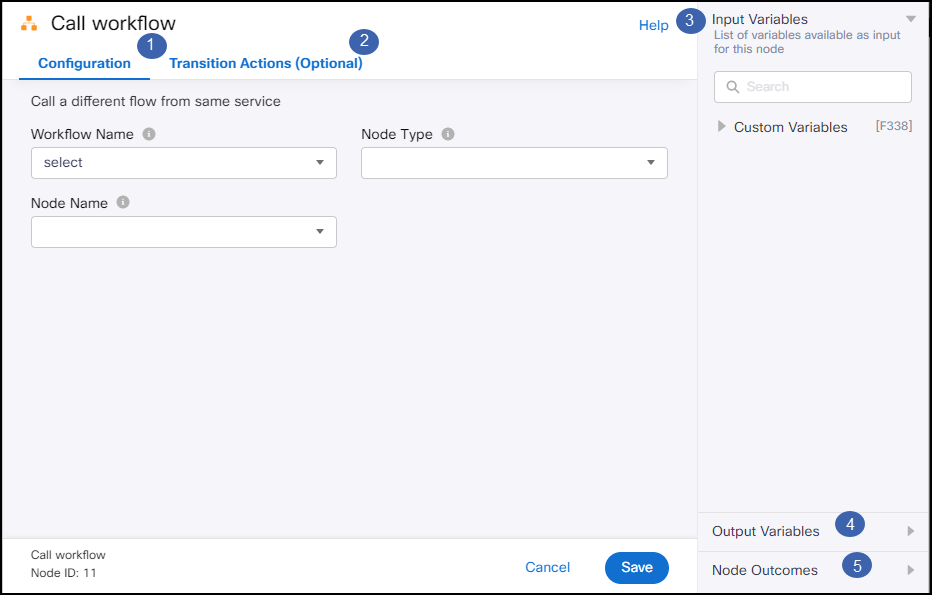
When you double-click the Call Workflow node, the Call Workflow screen appears with two tabs: Configuration and Transition Actions. The Configuration tab enables you to configure the workflow that you wish to call. The Transitions tab allows you to configure node on-enter/on-leave operations.
Here is the node image:

Call workflow Node
Call Workflow Node Configuration
- Double click the Call Workflow node.
The Call workflow screen appears.

Call Workflow Node Configuration Page.
-
On the Call workflow screen, click the Configuration tab if it is already not opened by default.
The workflow configuration fields appear. -
On the Configuration tab:
- In the Workflow Name drop-down box, select the workflow, which you wish to call.
- From the Node Type drop-down box, select the node type.
- From the Node Name drop-down box, select the node name.
- Click the Save button at the bottom.
Optionally configure Transition Actions
As part of configuring transition actions, you can configure on-enter/on-leave operations. However, configuring these are optional.
Here are the steps:
- Click the Transition Actions tab.
- On the Transition Actions tab, click Add Action.
The Transition Actions area appears. - On the Transition Actions area:
-
From the Time drop-down box, select On-enter or On-leave. For example, On-enter.
-
From the Acton drop-down box, select an action choosing from the pre-built options.
-
Finally, click the Save button at the bottom.
The transition actions are configured.
Here is the description for interface elements:
| S. No | Element | Description |
|---|---|---|
| 1 | Configuration tab | Use this tab to configure the workflow that you wish to call. Field descriptions: WORKFLOW NAME Select the workflow that you wish to call. NODE TYPE Select from the following options: All, Start and End. Note: If you select All, then both Start and End are selected. NODE NAME From this drop-down box, select the node name. |
| 2 | Transition Actions tab | Use this tab to configure node on-enter/on-leave operations. |
| 3 | Input Variable | Click this collapsible panel to view the list of all the available flow variables. You can search for a variable using the Search field. You can also add a variable to the flow variables list by clicking the Add new flow variable link at the bottom of the list. |
| 4 | Output Variables | Click this collapsible panel to view the output variables. The data generated by the node is displayed as variables here. |
| 5 | Node Outcomes | Click this collapsible panel to view the list of possible node outcomes. You can also customize the node labels by clicking the Edit icon. |
Page Connector vs Call Workflow - When to use which node
Both page connector and call workflow nodes help you modularize your flows to avoid repetitive configuration. However, there are some small differences that make them better suited for one situation over another. Here are a few such examples:
Typically Page Connector is the preferred approach want you to want to repeat a node sequence multiple times within the same flow. Call Workflow is the preferred option when you want to repeat a node sequence/logical flow construct across various flows within the same service.
If you modularize a flow using Page Connector, any incremental edits on any of the pages would require you to edit the flow as a whole. On the contrary, if you modularize a flow into various flows then incremental edits in a specific flow can mostly be done without impacting the other flow. If you see a more frequent need to iterate parts of a large flow it may be better to carve them out as a separate flow and invoke them from the main flow using the Call Workflow node.
Flow analytics for a flow spread across various pages are available as a whole in Sankey Chart mode. If you have the flow analytics add-on enabled, and not having the details of flow traffic across various nodes of each of the modularized flow impacts your ability to analyze the customer journey as a whole, you would want to prefer the Page Connector(s) approach.
Since Page Connector is just visual segregation of a large flow across pages, all the variables are reference-able across pages. On the contrary, only Custom Variables from parent flow are reference-able in the child flow.
Overall, both Page Connector and Call Workflow Nodes provide you with the flexibility to modularize your flows and handled them more effectively. There are times when you would want to use both of these capabilities at the same time in combination.
Please note that the flow loading speed varies depending on the size and complexity of a flow. We recommend that you modularize your flows using Call Workflow nodes when you have more than 150 nodes within the same flow. In some scenarios, you may face this issue with lesser number of nodes as well. For example, if you use pre-built integration nodes such as Set Variable node a large number of times (typically more than 25) in the same flow canvas you may observe loading issues leading to the inability to save your flow configurations. Modularise your flow using the Call Workflow node in such cases as well.
Publishing a flow with Call Workflow Nodes
When a calling flow (i.e., parent flow) doesn't have any channel related nodes (and hence doesn't have any channel asset mapped) but invokes another flow (i.e., the child flow) that has some channel related nodes, you may come across 'Channel Bean is null' error once you reach the Send/Receive nodes during execution. To address this, you can add a placeholder Send Node in the parent flow and map it with the relevant channel asset during publishing of the parent flow.
Notify URL
You can choose to notify a URL with the delivery report for your preferred channel. This field accepts only a valid URL or a variable. If an invalid URL is passed in an API request or via a variable, then such a request will not be considered eligible for retries.
Validations for Notify URL field:
- It is an optional field for all the channels. Send node can be executed without including these values.
- The notify URL should be updated with the proper URL format. The system returns the error message when the Notify URL field is not updated correctly as ‘Invalid URL: field accepts only valid URL or variable.’
- When you provide a space in front of the URL, the system displays the 'Invalid URL: field accepts only valid URLs or variables' error message.
- When you provide space at the end of the URL, the system trims and ignores the space, and the URL receives delivery receipts (DRs).
- Select the Enable Notify URL Auth checkbox to activate the authentication of the notify URL.
- There is no maximum length validation defined for this field.
- Variables can be added to this field.
Note:
Notify URLs track the status of delivery receipts (DRs) for sent messages.
If Enable Notify URL Auth is enabled for your node and an Auth ID that is random, invalid, or deleted is used, the payload will be parked in Webex Connect and not forwarded to the receiver's server. However, this does not impact the delivery of the message.
If Enable Notify URL Auth is not enabled, the payload is forwarded to the receiver's server regardless of any invalid Auth ID used.
Updated 25 days ago
