Flows
A flow is a collection of nodes that represent the logic to address a specific communication use case. One or more flows can be used to automate an end-to-end customer journey.
Webex Connect Flow Builder allows you to configure multi-step customer interaction flows with minimal programming or scripting efforts. It has an easy-to-use drag and drop interface called Flow Canvas, which allows you to build communication flows using pre-built building blocks referred to as Nodes. The communication logic is built on the flow canvas by connecting and configuring nodes in a logical order.
A node is a connection point for communications across channels. It contains pre-built functionality for performing specific tasks like making HTTP requests, sending messages, or evaluating conditions. A node contains complete workflow such as initiation, execution, error-handling, conditions, notifications, and decision logic required to automate complex processes. Nodes execute in sequence and the control flows from one node to another.
Important
The maximum allowed flow size is 10 MB, we recommend keeping your flow size below this limit to avoid issues with saving or publishing flows.
Creating a Flow
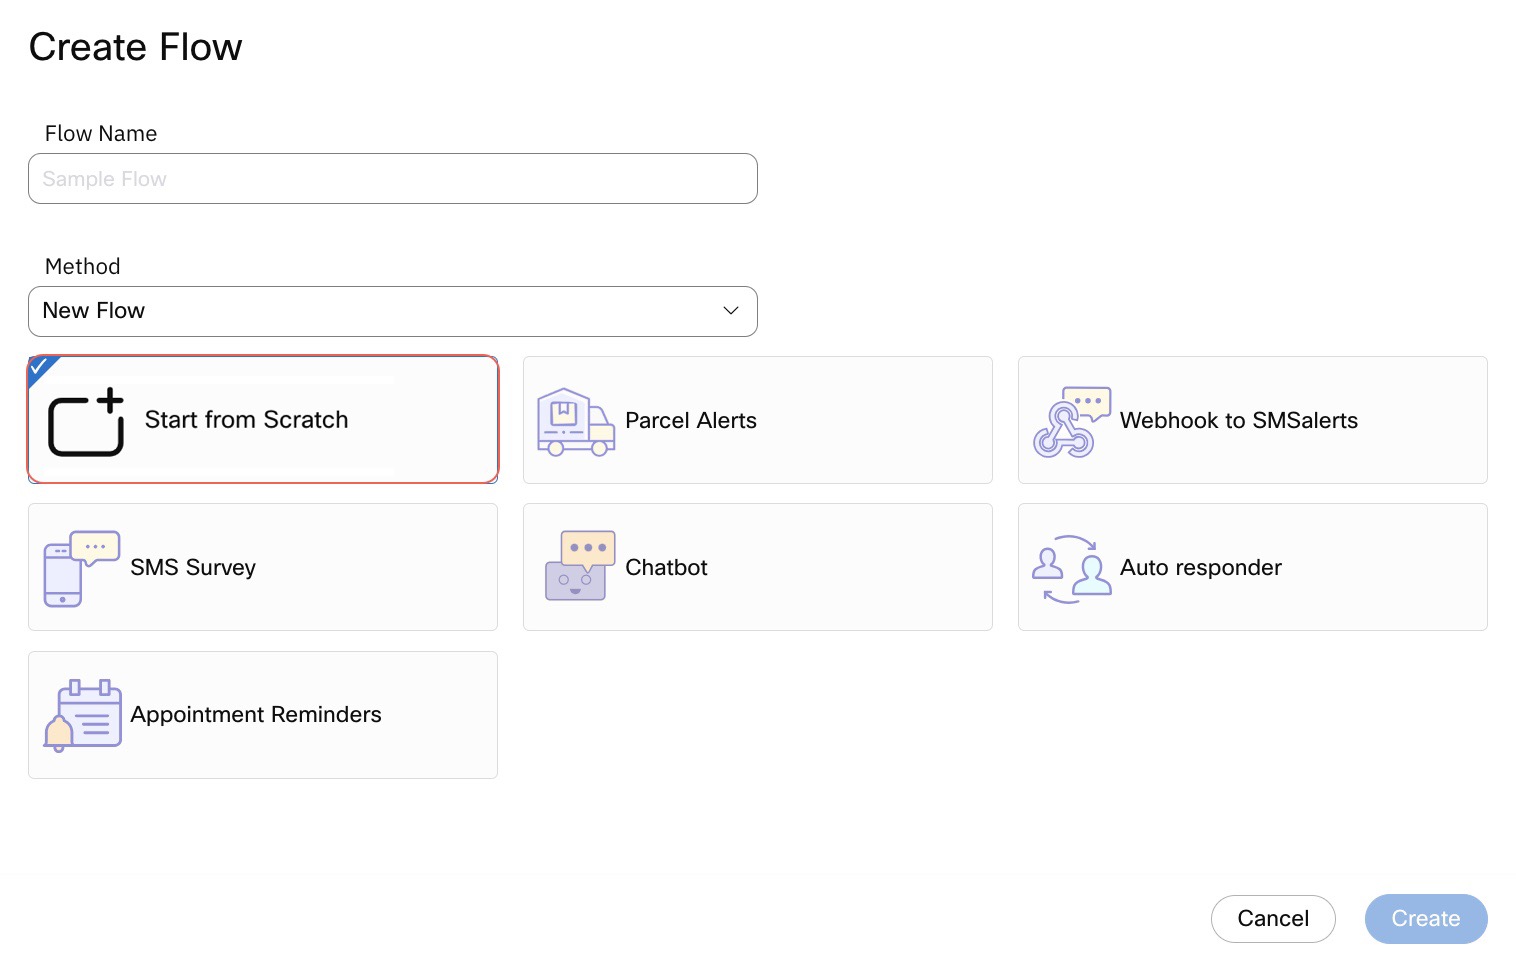
You can create a flow using one of the following options:
- Leveraging one of the pre-configured sample flow templates.
- Creating a flow from scratch.
- Copy an existing flow.
- Importing a flow that was previously configured elsewhere and exported for reuse.
Exporting and importing flows with custom integration nodes
You can export and import flows with custom integration nodes across services within client, group, or team level. If the custom integration used in the flow is available across groups and teams, then you can export and import such flows across groups and teams as well. However, flows with custom integration nodes cannot be imported across Webex Connect tenants.
You may receive following error: "The flow cannot be imported. The following nodes used in the source stream are not accessed / supported in this account"
To resolve please follow below steps to import a flow.

Flow Creation Wizard
Depending on the Webex Connect version you're on, you may see one of both of the following options:
-
Flow Builder: For automating customer communication through text messages.
-
Voice Flow Builder (Deprecated): We used to offer a separate voice flow builder for creating Interactive Voice Response (IVR) flows. This is not possible by using voice nodes within the flow builder and the separate voice flow builder has been deprecated.
Configuring and Publishing a Flow
Configuring a Flow
Once you click on 'Create' flow button:
- The flow builder screen appears with a Start node. Setup the Start node following the on-screen instructions.
- Configure business logic by adding nodes to flow canvas by dragging them from the Node Palette onto the Flow Canvas.
- Setup each Node following the Node Configuration
- Set Flow Settings appropriately, map logbook(s) as needed to capture custom logs in the flow, and define the Flow Outcomes.
- (Optionally) Enable the 'Prevent Duplicate Sessions' and configure the unique identifier that should be used for each flow run under Flow Settings - General tab
- Stitch the Nodes together using Connectors, building the flow business logic.
- Some nodes may have two or more Outcomes. At least one should be connected to a subsequent Node to continue the flow.
- For the Node outcomes that are not to be handled within the flow logic, attach these outcomes to end node and tag each of these Ends with an appropriate Flow Outcome.
- You can SAVE your flow at any stage during the configuration. Saving a flow also lists any configuration errors or warnings - which are displayed in the Errors & Warnings pane at the right side of the flow canvas.
- Click on 'Make Live' to launch the make live wizard if the flow doesn't have any errors. From this wizard you can now manage: a. Apps / Numbers for the channels used in the flow. Apps will only need to be selected if you have used a send or receive node and selected one of the app-based channels such as Mobile/Web apps, Messenger, Email, etc., and b. Define values for Custom Variables you have created in the flow. Additionally, you can add a comment against the flow version to track what changes were deployed with each increment.
When you 'Save' a flow, it is saved as 'Working Draft' and when you make the flow live, the flow status is changed to 'Live'. For more information, see Flow Versioning.
Flow Status
Draft: A flow is saved as 'Working Draft' if the flow is partially complete and you are still working on building the flow.
You saved the flow, but there are errors in the flow that are required to be addressed. This can also be an incomplete flow.
Live: Once you've completed your flow configurations and there are no more errors, you can hit 'Make Live' button to publish your flow and start using it. The flow 'Status' on flow listing page will read 'Live' once you have made a flow live. You can pause such a flow temporarily by using the Toggle button under State column on Flow Listing page.
Make sure your version comments do not exceed 250 characters before going live with the flow.
Please note that the flows that are triggered before the new flow was published will continue to work as per the last published flow configuration. Flows triggered after the latest version has been published will work as per the latest flow configuration.
Adding New App
When an app-based channel such as Facebook Messenger, WhatsApp, etc. is used in the flow, you can either select one of your existing apps or set up a new one from the wizard. The context of the flow along with the settings is maintained while the app is setup.
Errors and Warnings
When you save a flow, it might be incomplete or have errors. When you attempt to save incomplete flows, errors are generated and listed under ERRORS & WARNING pane, at the right side of the flow canvas. Most of the errors and warnings are self-explanatory.
Click an error/warning to highlight the corresponding node on the flow canvas. You can double-click the node to address the errors by editing the flow.
Errors and Warnings are generated under the following context:
- When you save an incomplete flow.
- When a mandatory parameter is left incomplete in a flow.
- When a node outcome is left unassigned.
- When a connector is incomplete.
Editing a Flow
You can edit a flow when you need to fix an error or update a flow. However, you can also edit to fine-tune the flow as per the updated business process.
- Search/Locate a service on the services dashboard.
- On the Flows tab, locate the flow you want to edit, click on the corresponding Flow Name to open the flow.
- By default, the latest version of the flow is loaded. (Optionally) You can choose the version you wish to edit by clicking on the Flow Version history drop-down. Click Edit in the upper-right corner to edit that version of the flow.
- Clicking on Edit will create a new 'Working Draft' version of the flow, branched from the version loaded earlier.
- Now make the necessary modifications to the flow and click Save or Make Live accordingly. For more information, see Flow Versioning.
When you 'Save' any edits on a given flow version, the changes are saved as 'Working Draft'. When you make the flow live, a new version (auto-incremented) is created.
Importing a Flow
You can import flows with custom integration nodes across services within client, group, or team level.
Importing Limitations
Flows with custom integration nodes cannot be imported across Webex Connect tenants.
You may received following error:
"The flow cannot be imported. The following nodes used in the source stream are not accessed / supported in this account"To resolve please follow below steps to import a flow.
Steps to import a flow from one tenant to another:
- Remove the custom/integration nodes then save the flow on your .
- Export the flow from your .
- Use the previous version of the flow i.e. before removing the custom/integration nodes on <tenant 1>.
- Import the flow onto the <tenant 2>.
- Add the custom/integration nodes on <tenant 2>.
Note
and <tenant 2> in the above steps refers to the two different environment or subscriptions of
Sharing a Flow
Allows you want to share a flow in Read-only format with an external user for a brief view.
To view the flow, the target user must enter the password when prompted. No other credential or additional information is required to access the flow link.
Creating a Shareable Flow Link
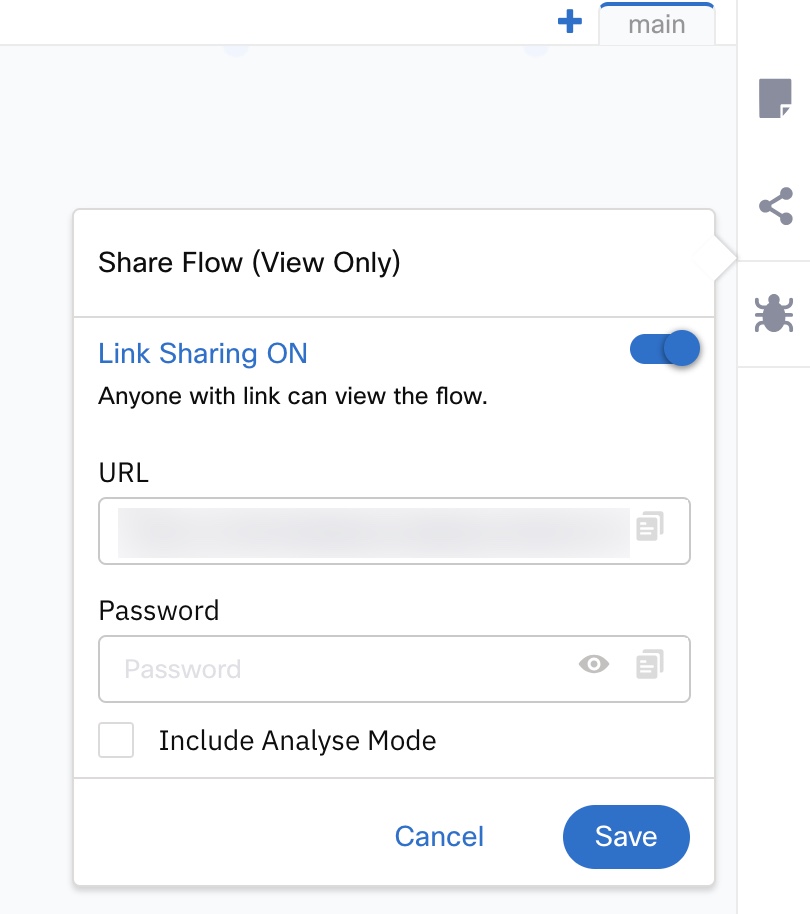
- After a flow is set up and successfully saved, click the share icon available in the Right-side Toolbar.
- The share flow settings screen appears, as displayed below.

Share Flow
- Turn the slider towards the right to enable the Link sharing.
- Click the copy icon at the end of the URL to copy the URL into the clipboard.
- Enter a password and click Done.
Now, the URL and password can be shared via email or any other medium. When the user clicks on the URL, a password prompt screen appears. On entering the correct password, the respective flow is displayed.
Notes
Comment your flow using notes. By commenting inline, users can easily document and follow the business logic.
A note can be a brief description of the overall flow and the business logic or it can be attached to a node for describing the execution logic within the node. Standard text formatting and hyperlinking are supported.
Configuring a flow using Voice Flow Builder (Deprecated)
Voice Flow - Voice Media Folders
A media file folder containing the audio prompts must be created using Tools - Voice media prior to creating a voice flow. However, the audio prompts contained within the designated media folder can be updated later and the same would be reflected within the voice flow.
To configure a voice flow:
- You will need to set the 'Media Folder' containing the Voice media to be used in the flow. You can manage your voice media using Tools - Voice media .
- All media folders setup are listed for selection. Same media folder can be used by multiple voice flows.
- Optionally, prompts can be organized into language folders to build multi-language flows. However, the name of the audio prompt must be same when uploading them to the different language folders.
- If a multi-language Media Folder is selected, you will be prompted to set the list of languages to be made available within the flow. You can manage this using the 'Required' toggle against each language.
- Once set, you can preview the availability of prompts by language that can be used within your flow.
Important Considerations
- Every flow must begin with a Start node.
- Every voice flow must start with a Start node and end with a Disconnect node.
- All nodes in any flow must be connected using connectors and configured appropriately.
- Every node outcome must either be mapped to the next node or terminate onto an End node.
- Ensure all errors and warnings are fixed before making a flow live.
Compiling a Voice Flow
(Applicable only to voice flows) You must compile a voice flow before publishing it. Similar to Save in Workflows, any errors/warnings arising from the flow configuration are displayed.
Only Compiled Voice flows without errors can be 'Published'.
Updated 29 days ago
