
Proactive chat - Flows - WXCC
A guide to configure Proactive chat flows within Webex Connect
Introduction
Proactive user journeys play a vital role in elevating customer experience by anticipating the customer's needs and offering support proactively.
With Cisco Webex Contact Center, business administrators can engage end-customers proactively when certain business rules are met (e.g., visiting a specific page, spending a certain amount of time on a page, or clicking primary buttons on the business's website). This is achieved by delivering messages automatically and inviting them to chat—rather than waiting for them to initiate contact.
Prerequisites
- Cisco Webex Contact Center with Digital Channels enabled
- Webex Engage - Livechat asset with website(s) configured
- Webex Engage - Proactive chat rules configured on Webex Engage Admin Console accessible from Control Hub
Summary
Below is a high-level summary using a sequence diagram that explains how proactive chat feature works
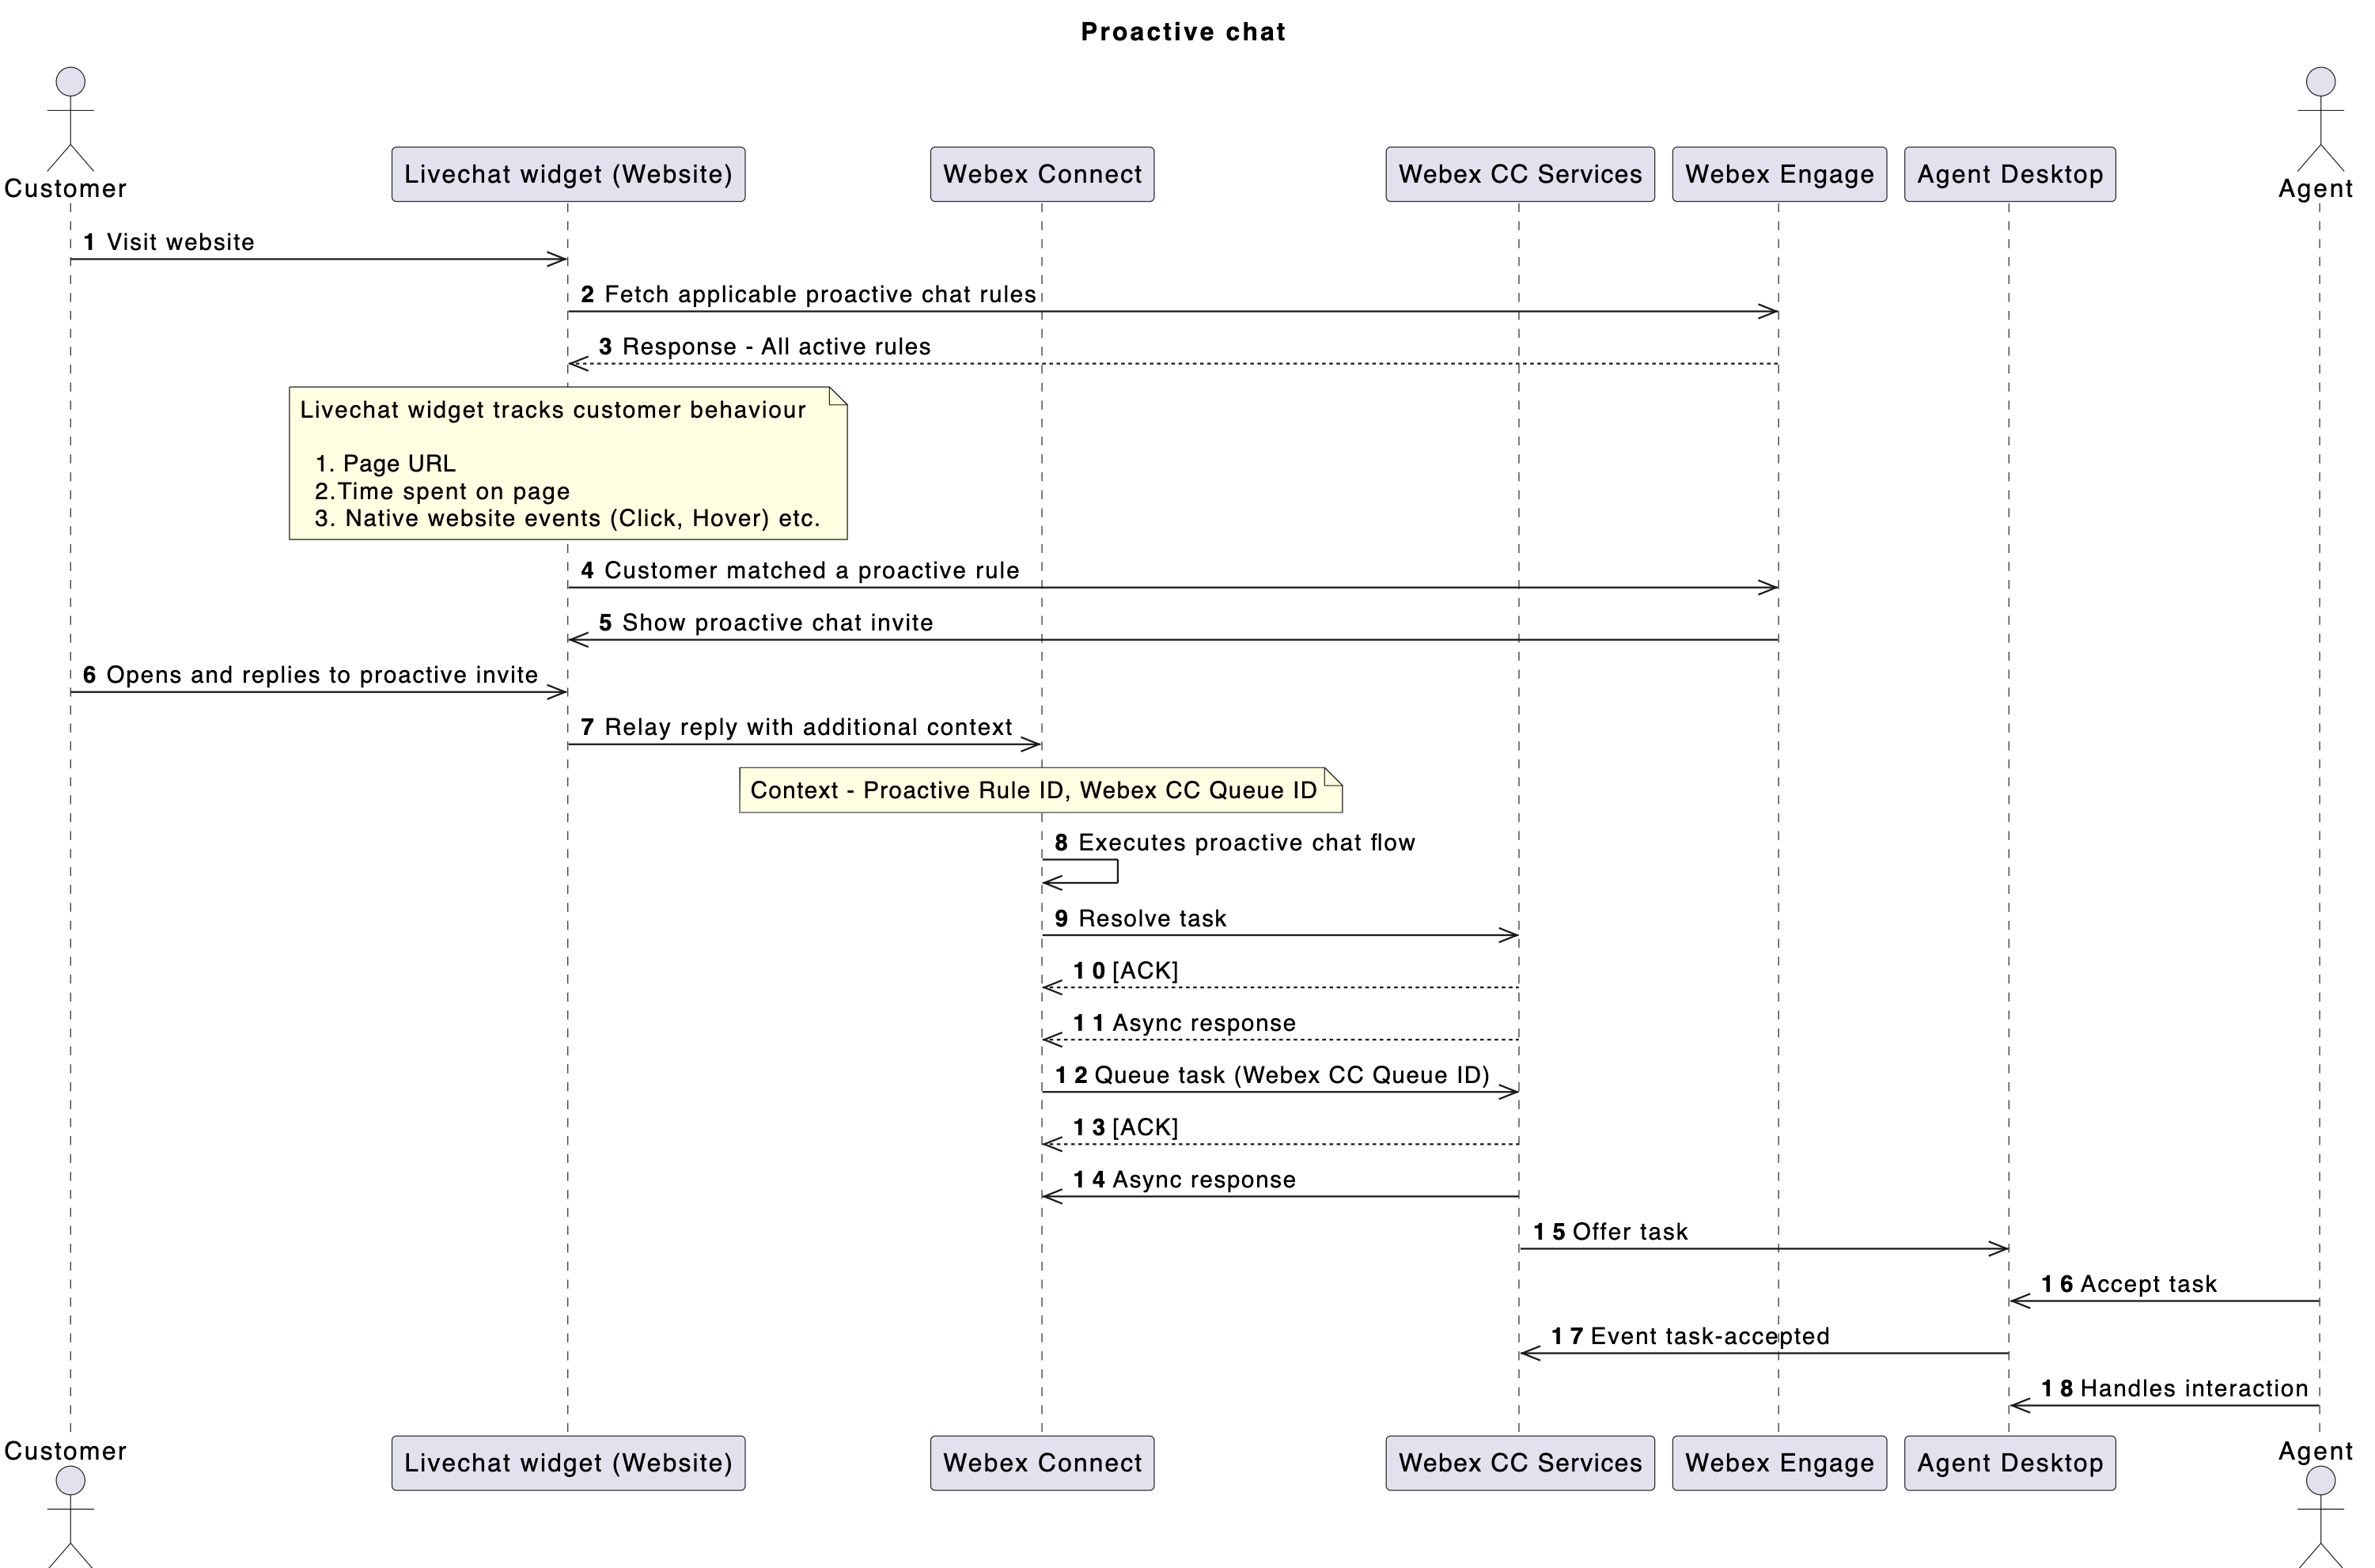
Sequence Diagram
Importing / Configuring Flows
You can either import our sample flow from GitHub or create a new flow should you wish.
Note
If you are currently using the old flow templates, we strongly recommend that you consider moving to the simplified flows to build your workflows to manage proactive chat replies
Start node
When a customer responds to a proactive chat invite by clicking on the Chat Now button or typing their message manually, the Start node carries additional contextual variables in the $(inappmessaging.message.extras)variable as part of the On Incoming Message trigger.
Note
- The template flow provided above can handle both reactive inbound chats as well as responses to proactive outbound chats
You will notice the following contextual variables when you print this variable. In general this will be stringified but here's a parsed JSON view of the same for readability:
{
  "hasprechatform": "0",
  "Webpage": "https://attach.imichat.io/widget/widgetloader.html?docwidth=1720&id=419ec491-4cc3-11ee-a88b-0ea23f10b39f&org=",
  "initiatedon": "",
  "useragent": "Mozilla/5.0 (Macintosh; Intel Mac OS X 10_15_7) AppleWebKit/537.36 (KHTML, like Gecko) Chrome/137.0.0.0 Safari/537.36",
  "Website": "example.com",
  "browserfingerprint": "d0add319-d4a2-4d09-a972-189279180aa2",
  "customprofileparams": "BWzJtGh66G0PSoRm3htLU/pR6lN4e2xdWjhnL9C6eL50AgL73hxmnoAMEUXUSZw9",
  "website_id": 326,
  "Initiated from URL": "https://resilient-zany-reaction.glitch.me/",
  "proactive_id": 1234,
  "proactive_queue_id": "d0add319-d4a2-4d09-a972-189279180aa2",
  "proactive_queue_name": "Acme Proactive Chat Queue",
  "Browser language": "en-US"
}
Take note of the variables proactive_id, proactive_queue_id, proactive_queue_name. We will be using these variables downstream within the flows.
Send - Form and Receive Form Response (Optional)
You can optionally send out a pre-chat form to the end-customer to gather their details such as (but not limited to) Name, Email ID, Reason for chatting, etc. and receive their form response via the Receive node. Make sure you handle all the edges of this node.
Evaluate node
After receiving the trigger: On Incoming Message on a proactive chat invite, we now construct necessary payloads and variables that will be used downstream in the flow by Webex CC nodes.
In summary, the following steps are being carried out in the Evaluate node:
- Generate a Task ID - stored in the variable
flid - Parse the Proactive ID - this is the Proactive Rule ID as stored in Webex Engage and will be required in the Resolve conversation (Simplified Flows) and Create Conversation (Old Flows) downstream in the flow. This is used to update the near real time dashboard on the Proactive chat screen within the cross launched Webex Engage Admin console.
- Parsing PCI compliance results and preparing message payloads
Below is a sample code with comments that explains various attributes being constructed in the Evaluate node.
var tid = transid;
var flid = tid.split('_')[0];

/* Added business logic to parse Proactive chat attributes */

var messageExtras = JSON.parse(messageExtras);
isProactiveChat = false;
if (messageExtras.proactive_id !== 0) {
    proactiveId = messageExtras.proactive_id;
    proactiveQueueId = messageExtras.proactive_queue_id;
    isProactiveChat = true;
}

//Handle blank message
var message = message;
if (message === '' || message === 'undefined' || message === undefined) {
    message = 'No text'
} else {
    message = message;
    message = JSON.stringify(message);
    message = message.replace(/\\n/g, "\\n").replace(/\\'/g, "\\'").replace(/\\"/g, '\\"').replace(/\\&/g, "\\&").replace(/\\r/g, "\\r").replace(/\\t/g, "\\t").replace(/\\b/g, "\\b").replace(/\\f/g, "\\f").replace(/\//g, "\\/");
    message = message.replace(/(^")|("$)/g, '');
}
//Parse PCI Compliance attachment payload For LiveChat
/*
1. create one custom variable with name `inappPayloadObject` and assign value `inappmessaging.attachment`
2. create one custom variable with name `nonPCIComplianceReasonObject` and assign value `inappmessaging.pciInfo.nonPCIComplianceReason`
*/
var arr = [];
var parseDataAttachment = "";
// inappPayloadObject = "";
if (inappPayloadObject !== '' && inappPayloadObject !== null) {
    inappPayloadObject = JSON.parse(inappPayloadObject);
}
if (nonPCIComplianceReasonObject !== null && nonPCIComplianceReasonObject !== '' && nonPCIComplianceReasonObject !== 'NA') {
    var nonPCIComplianceReasonObject = JSON.parse(nonPCIComplianceReasonObject);

    if (("attachments" in nonPCIComplianceReasonObject)) {
        //Some attachment has been sent

        if (nonPCIComplianceReasonObject.attachments.length) {
            //Attachment was dropped
            arr[0] = {};
            arr[0]["mimeType"] = nonPCIComplianceReasonObject.attachments[0].type;
            arr[0]["fileName"] = "[Dropped]";
            arr[0]["url"] = "";
            arr[0]["dropped"] = true;

        } else {
            //Attachment was passed
            var url = inappPayloadObject[0].file;
            var fileName = url.substring(url.lastIndexOf('/') + 1);
            fileName = fileName.split('?')[0];
            arr[0] = {};
            arr[0]["mimeType"] = inappPayloadObject[0].contentType;
            arr[0]["fileName"] = fileName;
            arr[0]["url"] = url;
            arr[0]["dropped"] = false;
        }
    }
}

if (isPCIValidationDone == 'NA' && inappPayloadObject.length > 0) {
    var url = inappPayloadObject[0].file;
    var fileName = url.substring(url.lastIndexOf('/') + 1);
    arr[0] = {};
    arr[0]["mimeType"] = inappPayloadObject[0].contentType;
    arr[0]["fileName"] = fileName;
    arr[0]["url"] = url;
    arr[0]["dropped"] = false;

}
//`parseDataAttachment` variable can be used as payload
if (arr.length) {
    parseDataAttachment = JSON.stringify(arr);

} else {
    var emptyArray = [];
    parseDataAttachment = JSON.stringify(emptyArray);
}

if (attachmentCount === "") {
    attachmentCount = "0";
}

var customerEmail = customerEmail;
if (customerEmail === '' || customerEmail === 'undefined' || customerEmail === undefined) {
    customerEmail = userId
}

var customerName = customerName;
if (customerName === '' || customerName === 'undefined' || customerName === undefined) {
    customerName = userId
}

/* Added Proactive Rule ID to handle Proactive Chats */

var messageDetails = {
    "appId": appId,
    "domain": liveChatDomain,
    "threadId": threadId,
    "threadTitle": threadTitle,
    "threadStatus": threadStatus,
    "userId": userId,
    "message": resolveConversationMessage,
    "attachmentCount": parseInt(attachmentCount),
    "attachment": attachment,
    "extras": extras,
    "version": version,
    "tid": transId,
    "serviceKey": serviceKey,
    "customerName": customerName,
    "customerEmail": customerEmail,
    "timestamp": timestamp,
    "proactiveRuleId": proactiveId.toString()
};

var pci = {
    "isPCICompliant": JSON.parse(isPCICompliance.replace("NA", "true")),
    "isPCIValidationDone": resolveConversationIsPCIValidationDone,
    "nonPCIComplianceReason": resolveConversationNonPCIComplianceReasonObject,
    "isAttachmentEnabled": JSON.parse(isAttachmentEnabled.replace("NA", "true")),
    "droppedAttachmentCount": JSON.parse(droppedAttachmentCount.replace("NA", "0"))
};

var details = {
    "messageDetails": messageDetails,
    "pciDetails": pci
};

var detailsJson = JSON.stringify(details);
1;
Note
- It is important that the
messageDetailsobject in the above code contains theproactiveRuleIdas this determines that the task to be created is generated by a proactive chat rule.
Errors edges
If you're building a custom flow, ensure that you connect all the error and time-out edges appropriately. For more details refer to the specific node documentation.
Resolve conversation
With the parsed variables from the Evaluate node, we now proceed to resolve the message using the Resolve conversation node.
To configure this node, follow the steps below:
- Drag and drop the Resolve conversation node from the node palette and connect the previous node to this node. Ignore this step if you're using the templated flow
- Double click to open and configure the node.
- Select the Method: Resolve conversation
- Choose the Node Authorization and select from the authorizations available
Best practice
We recommend choosing the Default Authorization always so that you don't have to amend each of your nodes in your flows when the access token expires. You can set the default Node Authorization from the Integrations screen on Webex Connect.
- Enter the Flow ID - this can be found from the URL in the address bar when you have Webex Connect's Flow Builder open
- Set the Trans ID field's value to
$(transId) - Set the Media Type dropdown to
Chat - Set the Media Channel dropdown to
Livechat / In-App Messaging - Set the Details field's value to
$(detailsJson) - Click Save and manage the node outcomes appropriately
Errors edges
If you're building a custom flow, ensure that you connect all the error and time-out edges appropriately. For more details refer to the specific node documentation.
Append conversation - Form response (Optional)
If you decide to send out a form response, once you receive the Form response using the Receive node, you will now need to append the form response using the Append conversation node. Make sure you handle all the edges of this node.
Errors edges
If you're building a custom flow, ensure that you connect all the error and time-out edges appropriately and gracefully close the conversation using the Close conversation node in case of any errors. For more details refer to the specific node documentation.
Queue conversation
Now that we've resolved the message in the previous step, we'll go ahead and queue this task into the queueId selected by the Admin.
To configure this node, follow the steps below:
- Drag and drop the Queue Task node from the node palette and connect the previous node to this node. Ignore this step if you're using the templated flow
- Double click to open and configure the node.
- Select the Method: Queue task
- Choose the Node Authorization and select from the authorizations available
Best practice
We recommend choosing the Default Authorization always so that you don't have to amend each of your nodes in your flows when the access token expire s. You can set the default Node Authorization from the Integrations screen on Webex Connect.
- Set the Task ID variable to the output variable
$(nX.taskId)from the Resolve conversation node configured previously. You can view all the output variables of the previous nodes on the right within the node variables palette. - Set the Conversation ID field's value to
$(conversationId) - Set the Media Type dropdown to
Chat - Set the Media Channel dropdown to
Livechat / In-App Messaging - In the Queue Details section, you can either choose one of the following options:
- Static
- Dynamic
- If you select a dynamic queue (recommended) - set in the Dynamic Queue ID field's value to
$(proactiveQueueId)(OR) if you select a static queue - choose from one of the queues in the dropdown.
Errors edges
If you're building a custom flow, ensure that you connect all the error and time-out edges appropriately. For more details refer to the specific node documentation.
Position in Queue (PIQ) and Estimated Wait Time (EWT) - Optional
You can also optionally choose to configure a PIQ and EWT node to send updates to the customer while we're hunting for an agent.
End flow
Connect the Queued outcome from your Queue Task node to the End to complete the flow.
Publish flow
Once you’ve configured all the above steps, click Make Live in the top-right corner to publish the flow. This action will activate the flow and enable proactive chat interactions based on your configuration.
Event Flows
Given that the proactive chat flow is largely similar to an inbound chat flow barring the initial parsing of contextual variables, all Event Flows (e.g. Task Routed, Task Modified, Task Closed, etc.) will continue to work for this use-case and can be extended to configure additional use-cases as your business sees fit.
Updated 3 months ago